

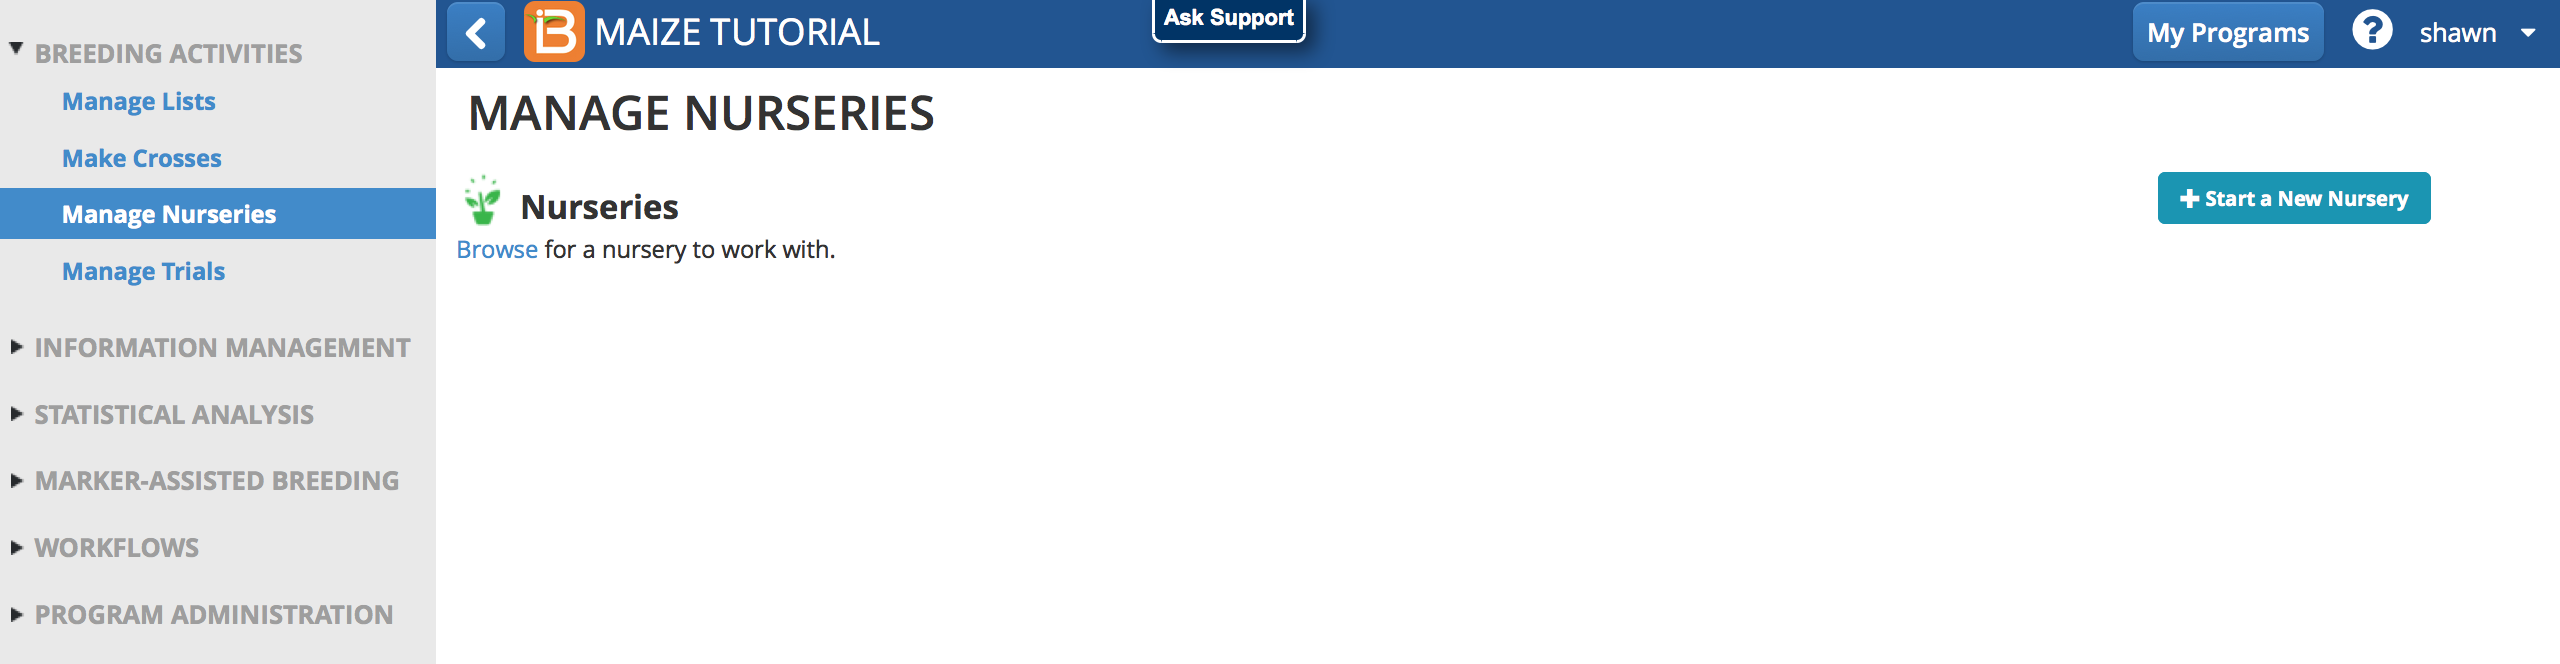
Start a New Nursery
- Launch Nursery Manager from the left side menu. Select Add a New Nursery.
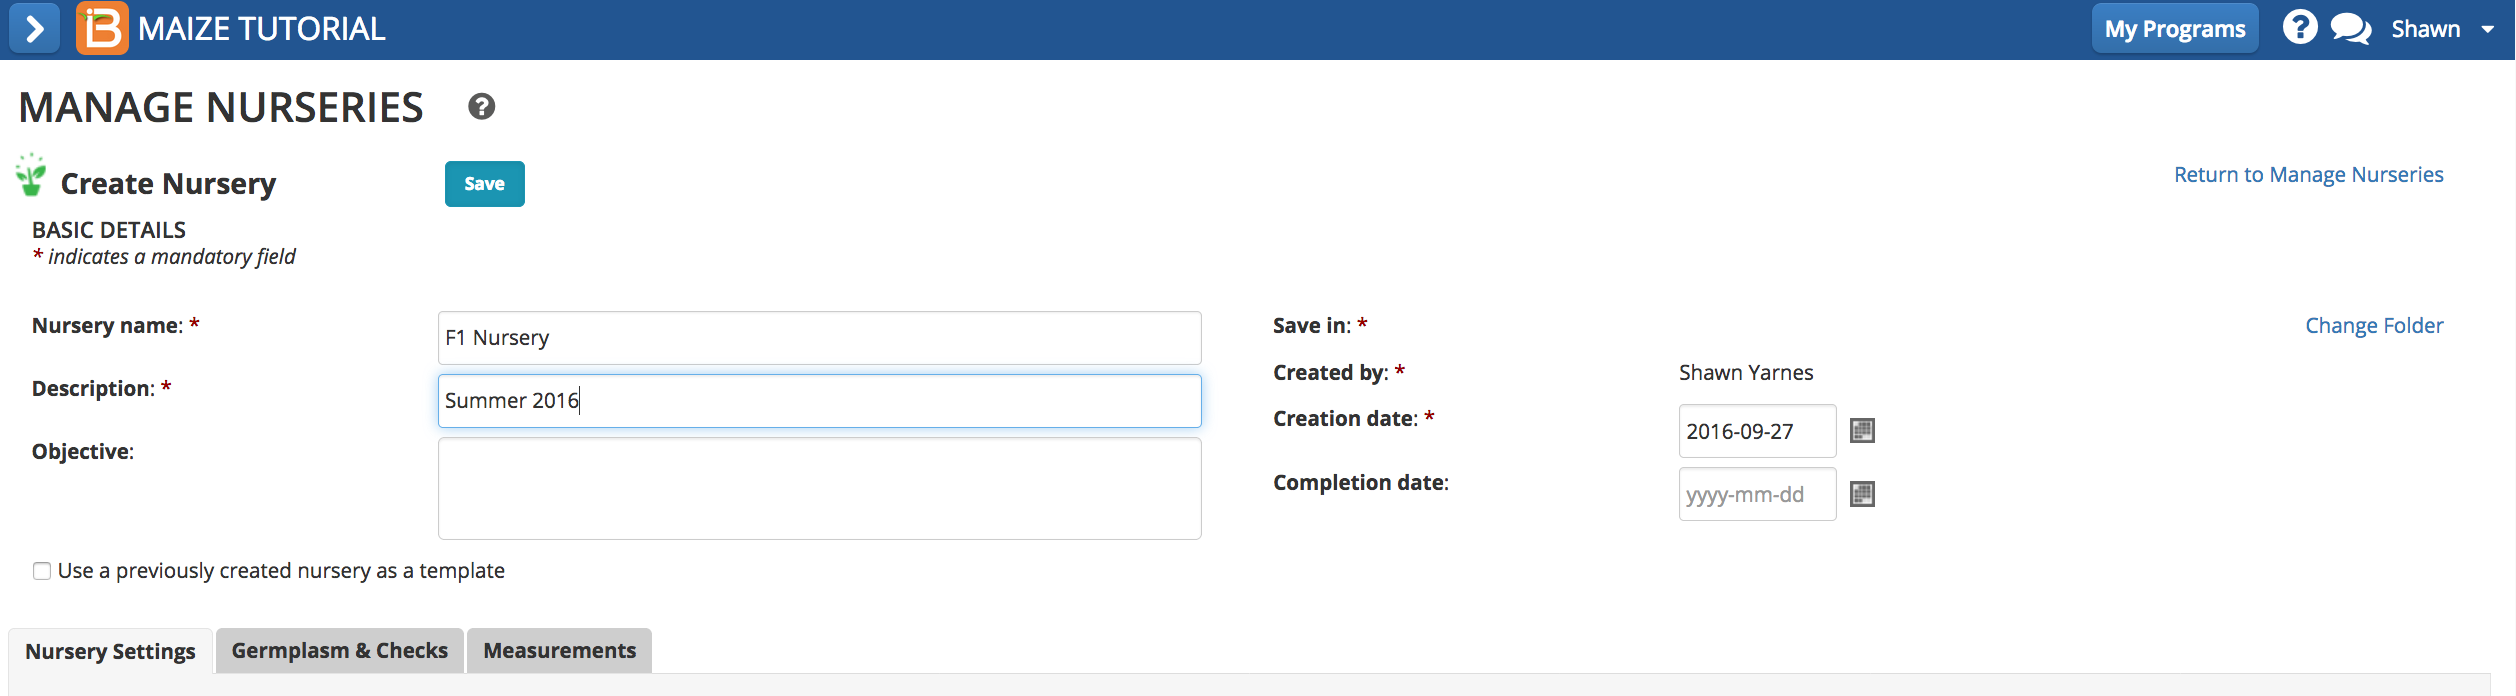
- Enter the basic details of the nursery. Start with a blank nursery or retrieve nursery information from a previous nursery. Once the nursery has a name and description, the nursery details can be saved.
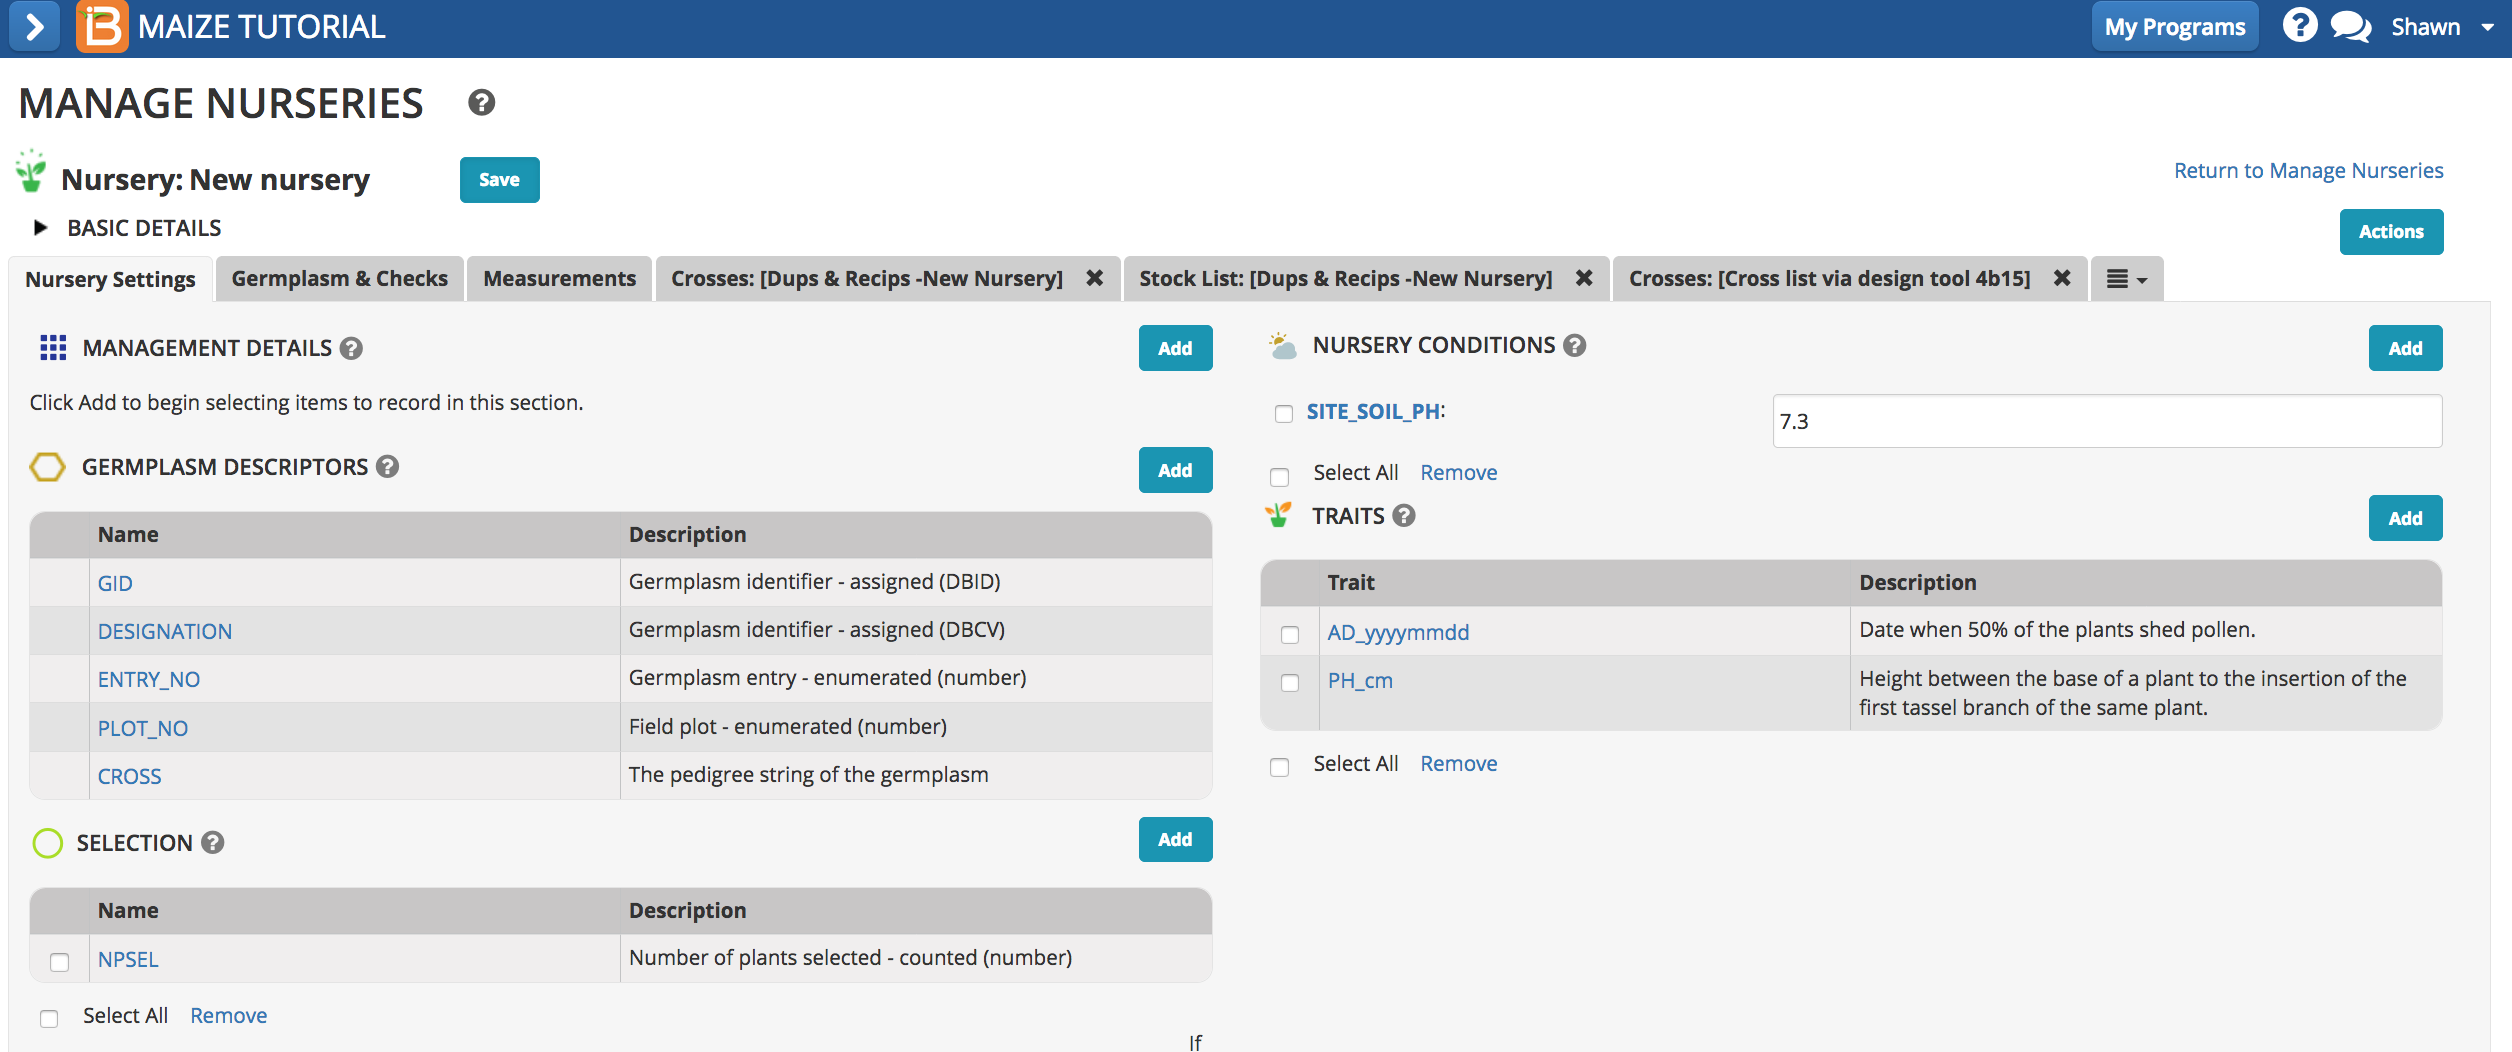
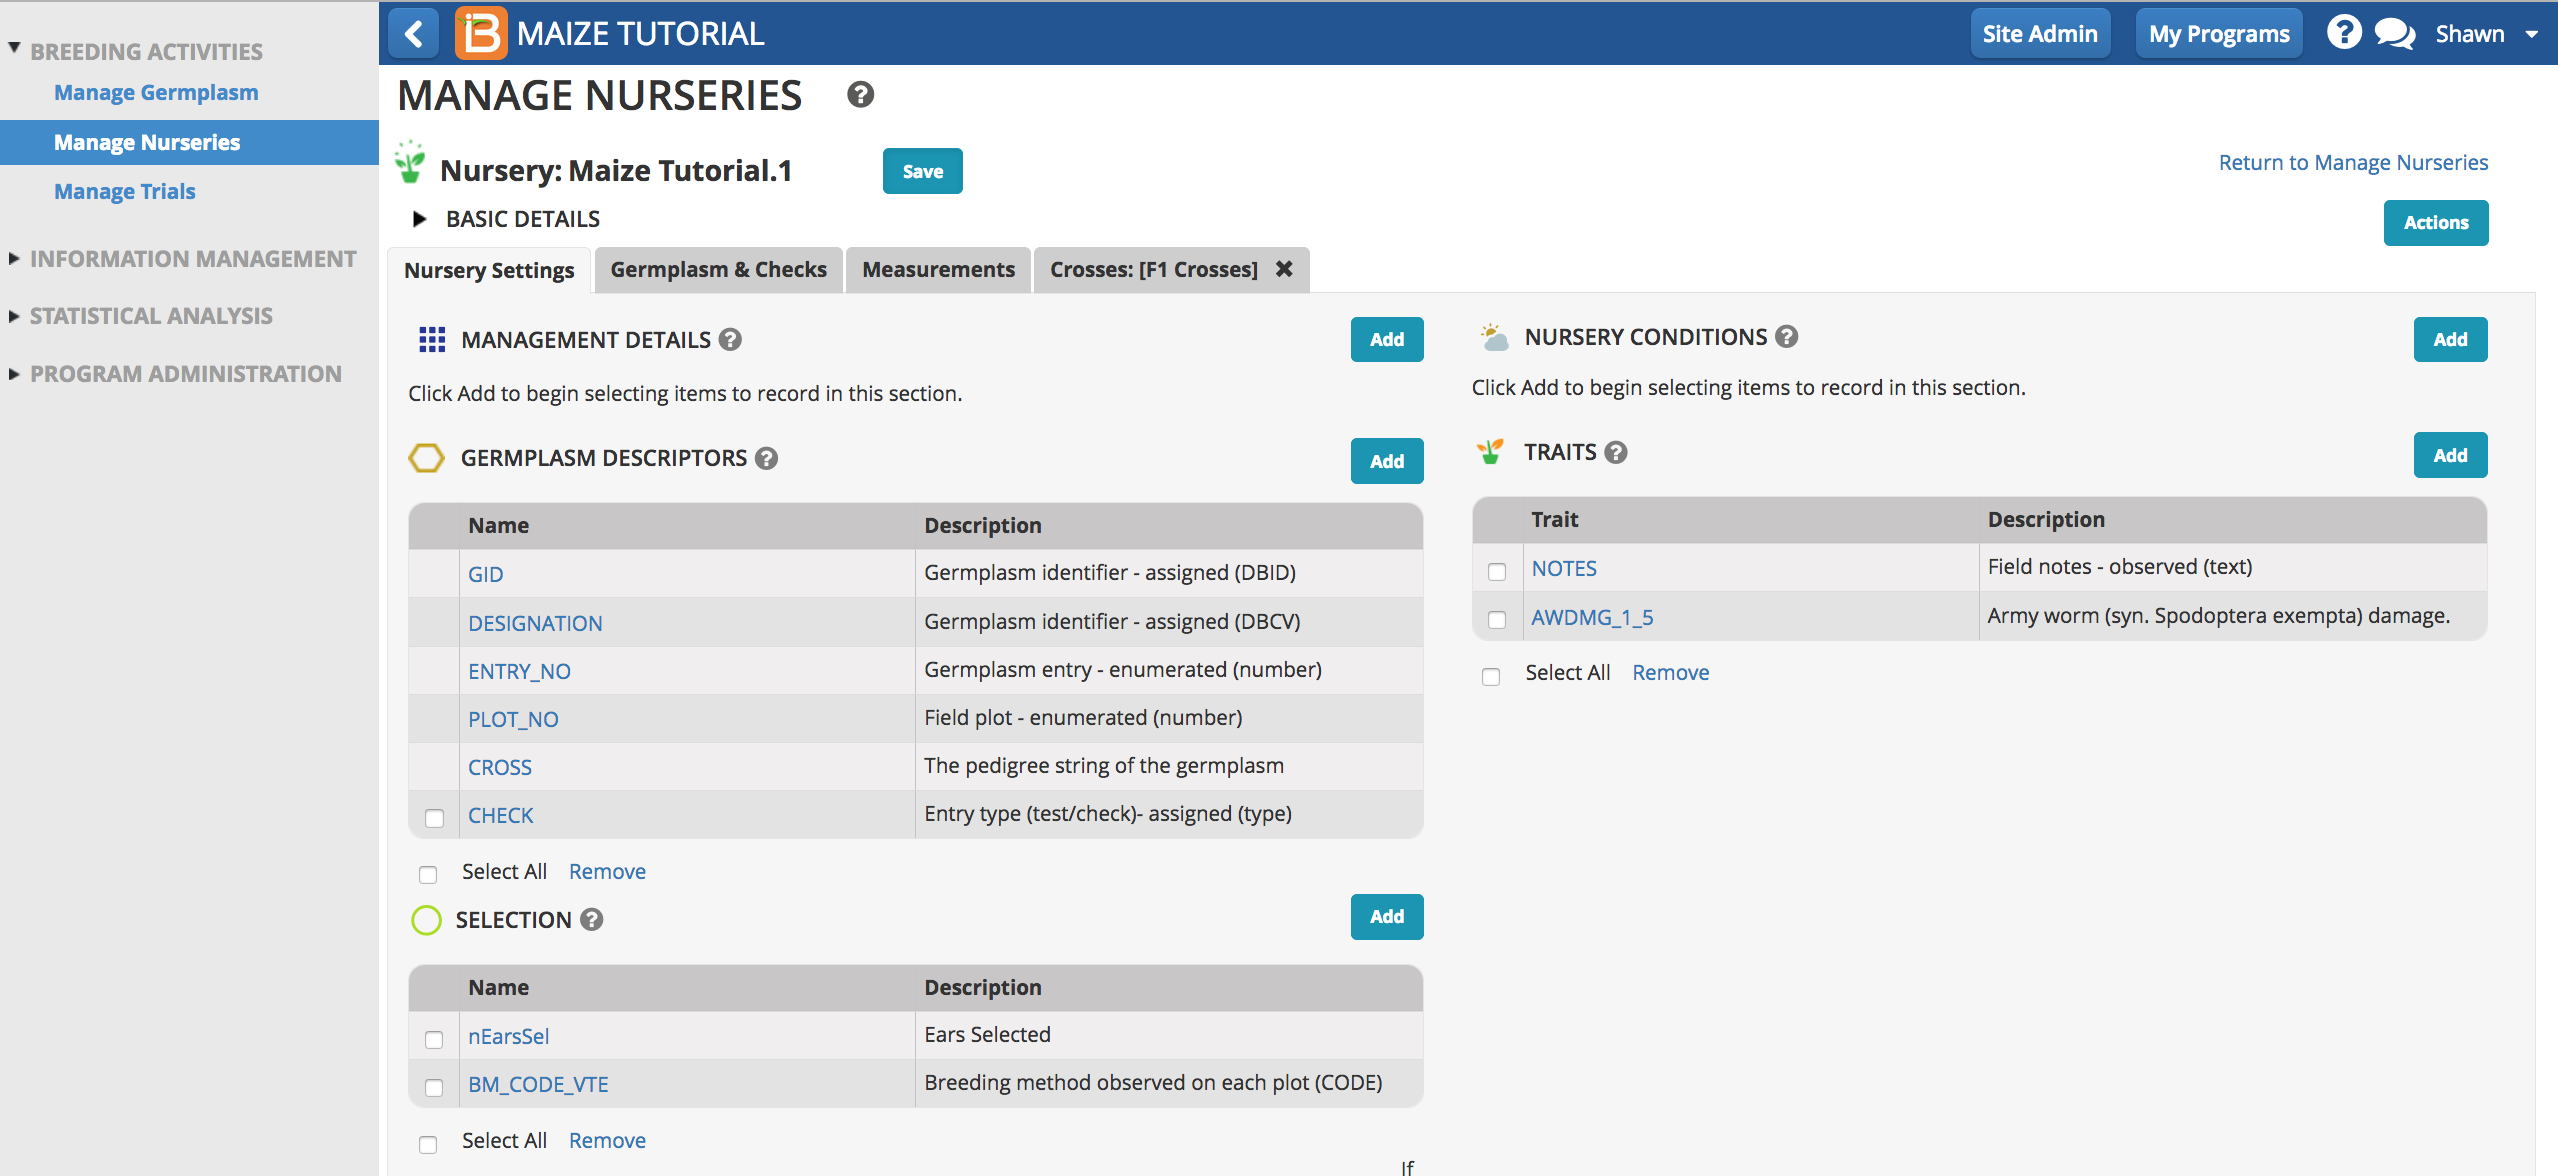
Nursery Settings
- Management details
- Germplasm descriptors
- Nursery conditions: location details like soil pH and fertilizer regimen
- Selection Criterion: Number of plants or number of ears selected for advancement (see more on Advancement below).
- Traits: Nursery observations
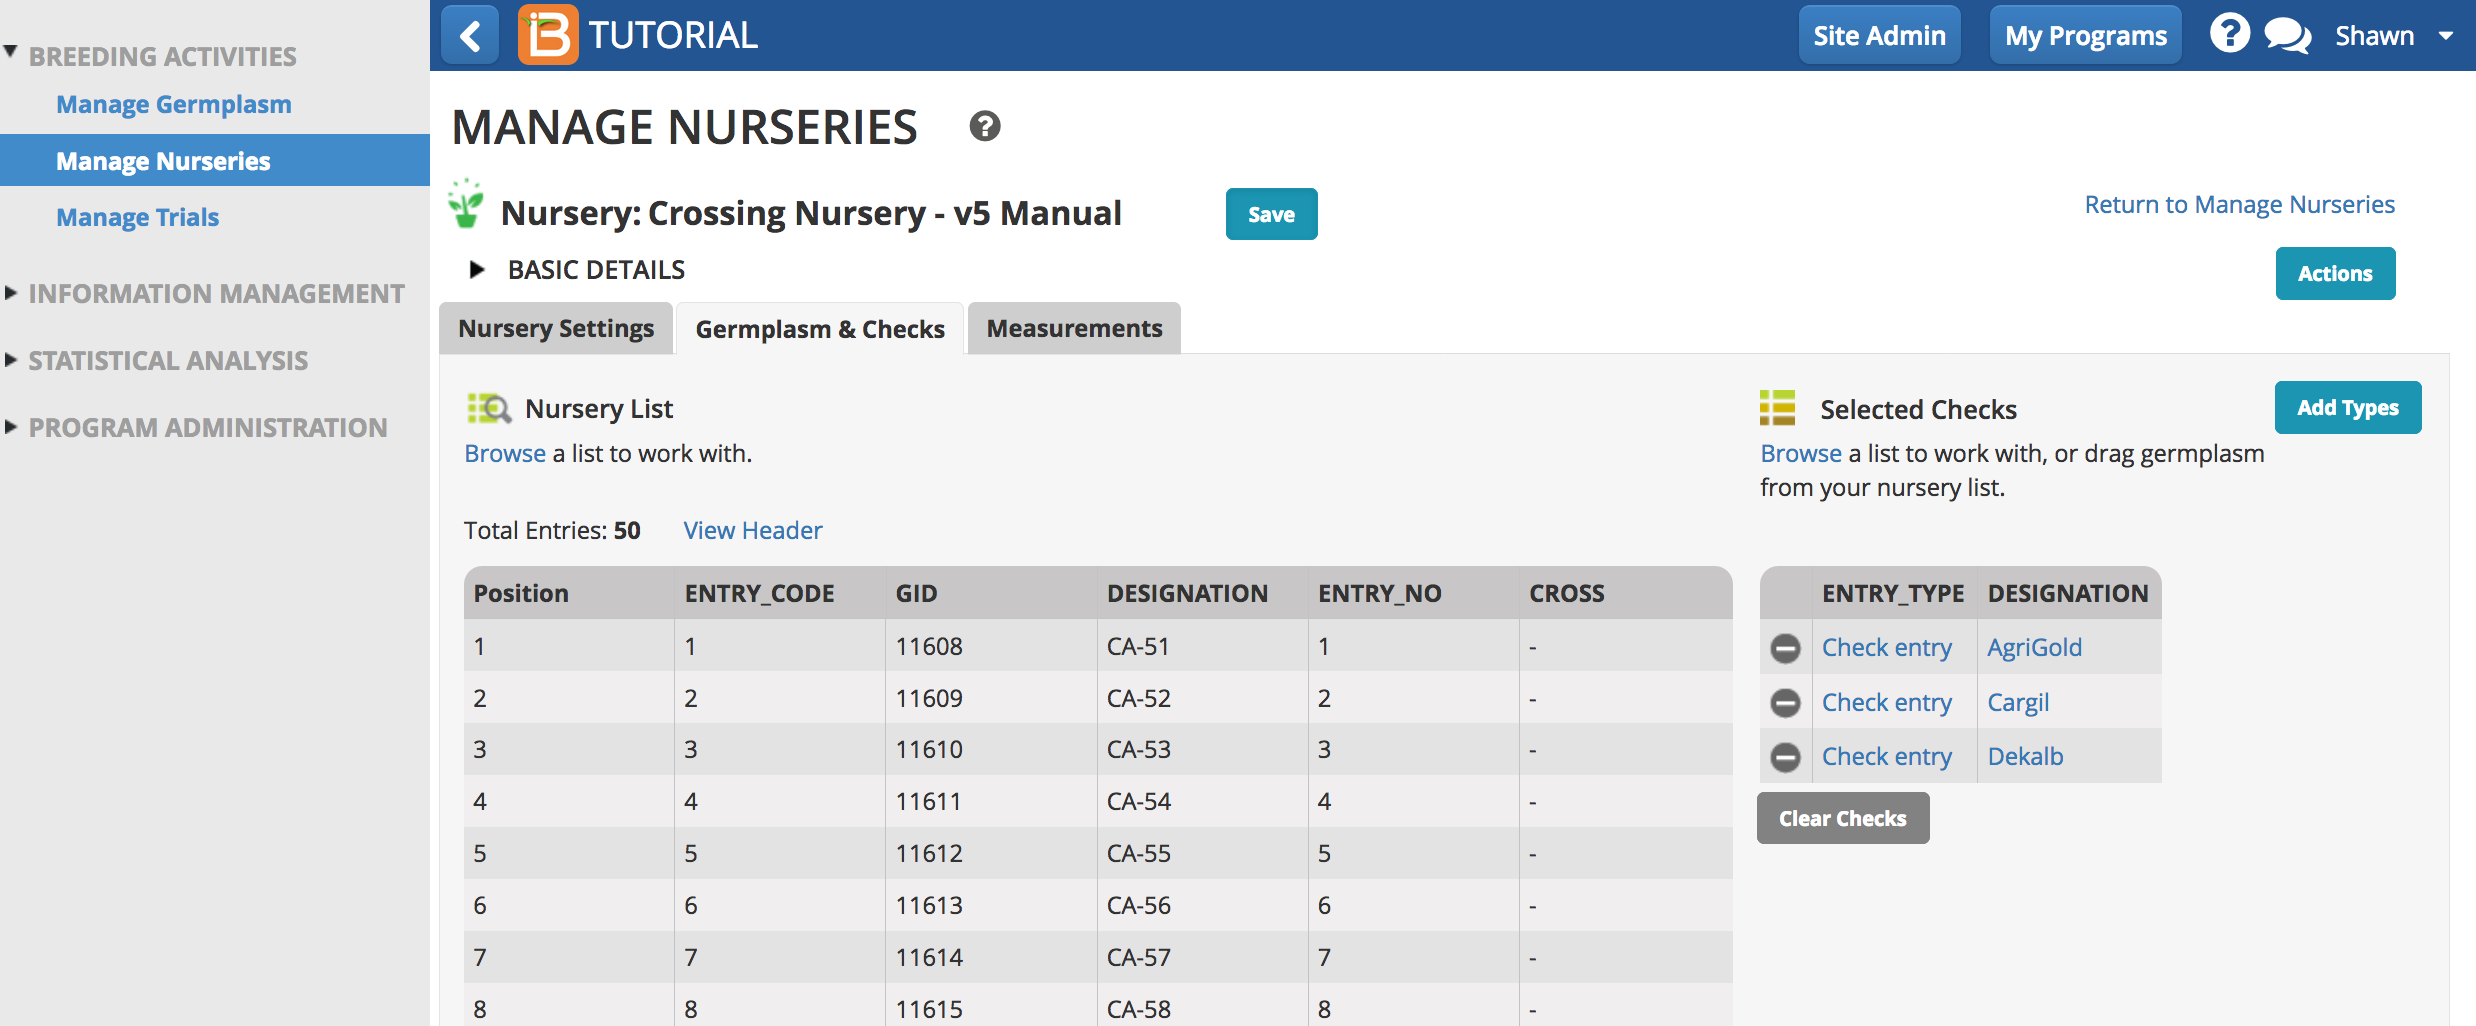
Germplasm & Checks
Choose an existing germplasm list or use the cross design tool to populate nursery with parents of the desired offspring. (see more on Crossing below).
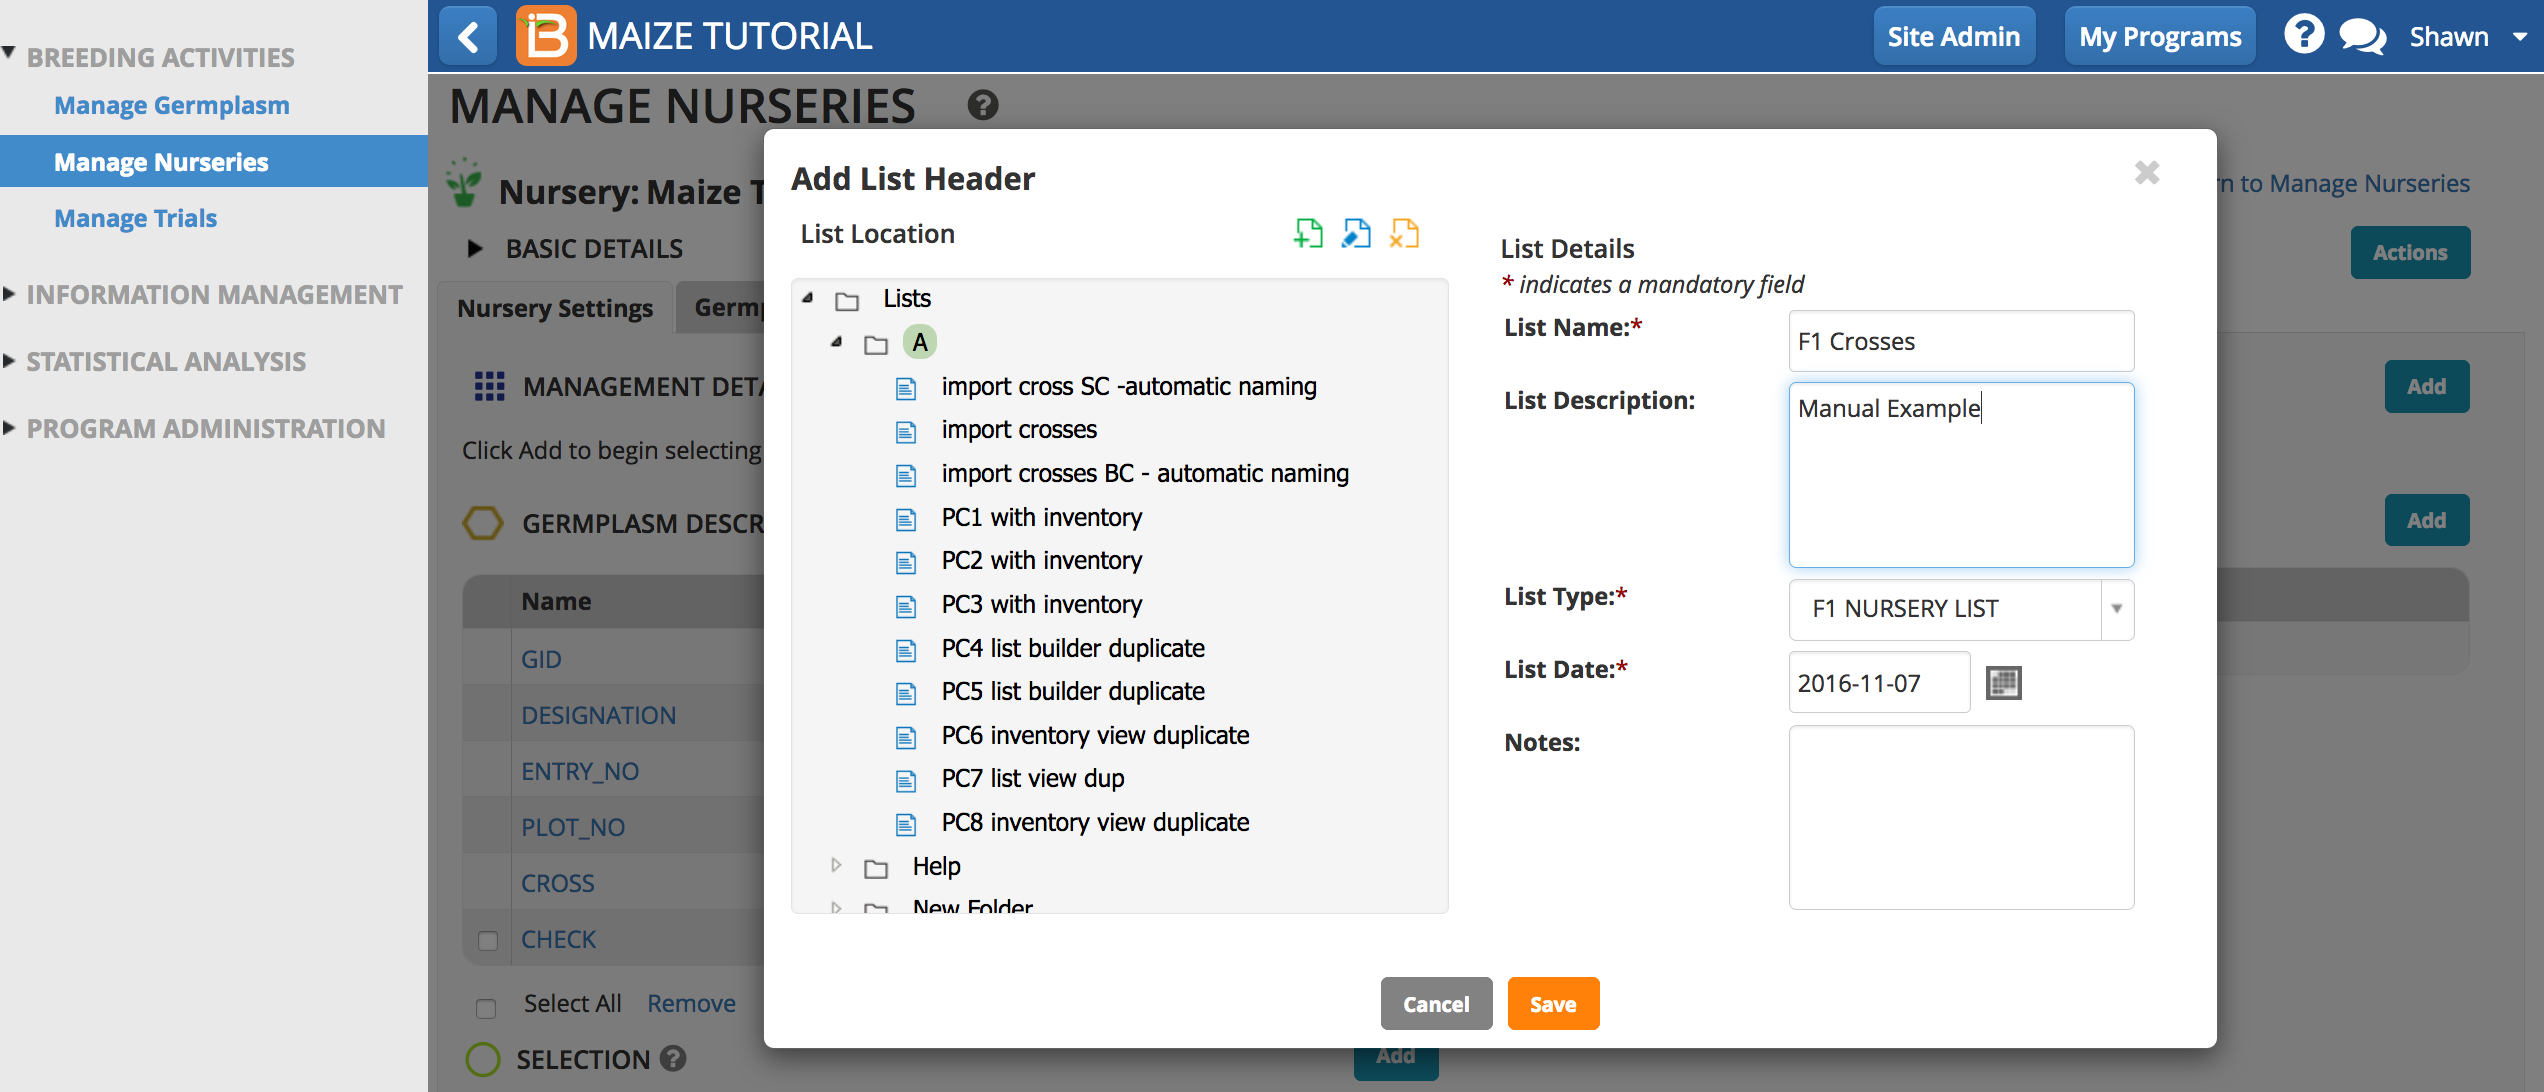
- Select nursery list and check entries.
- Scroll down and enter check position details. Save the nursery to populate the Measurements tab.
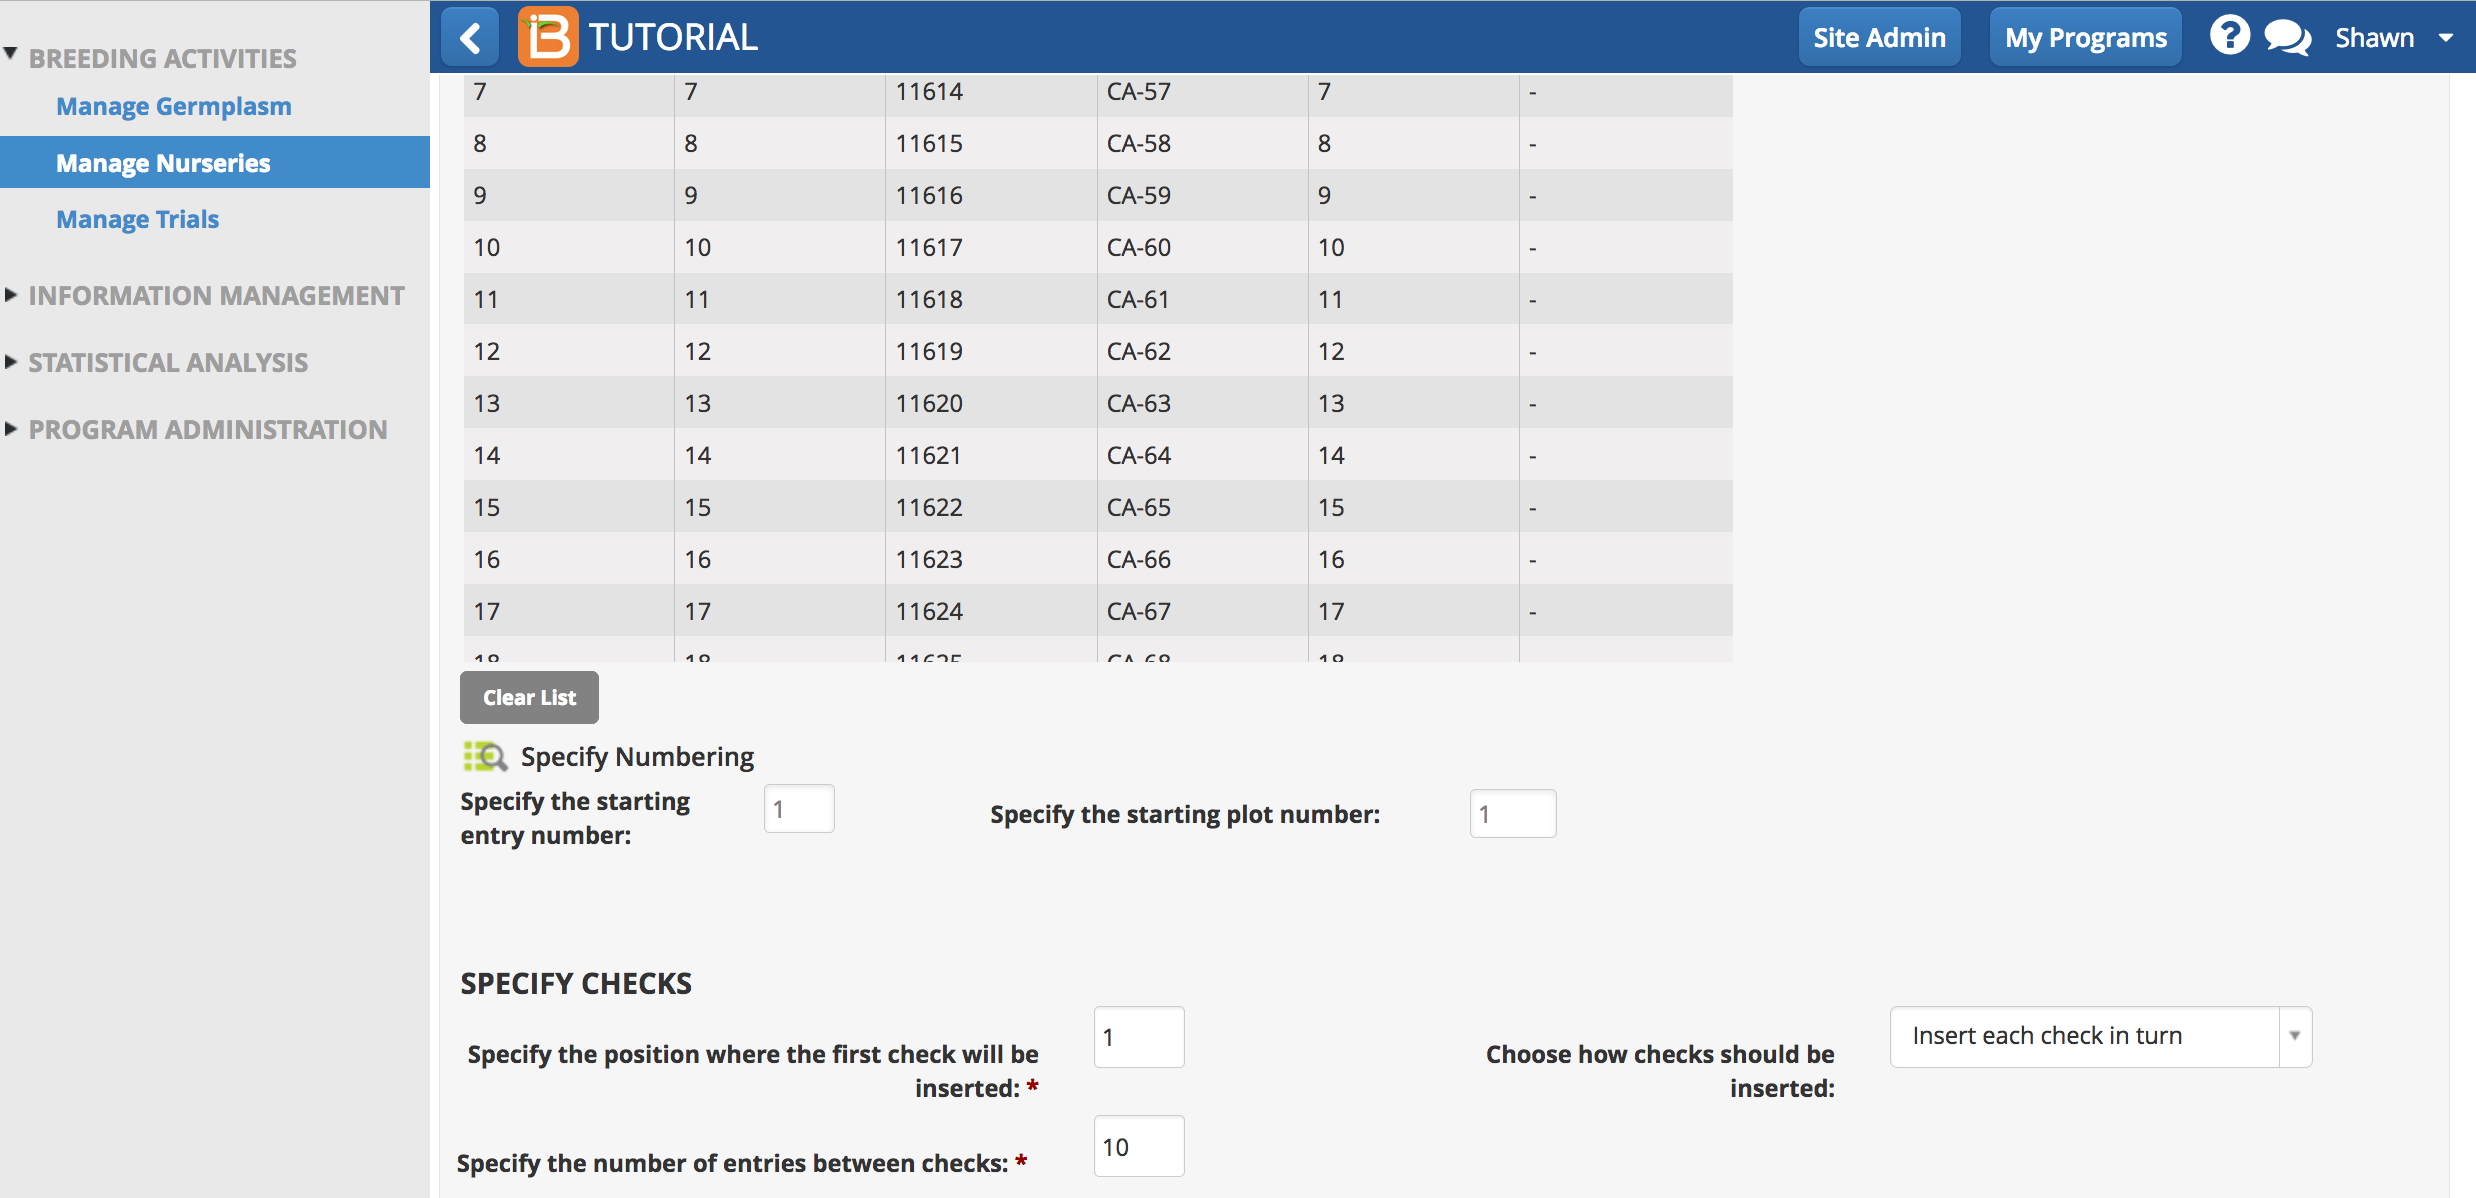
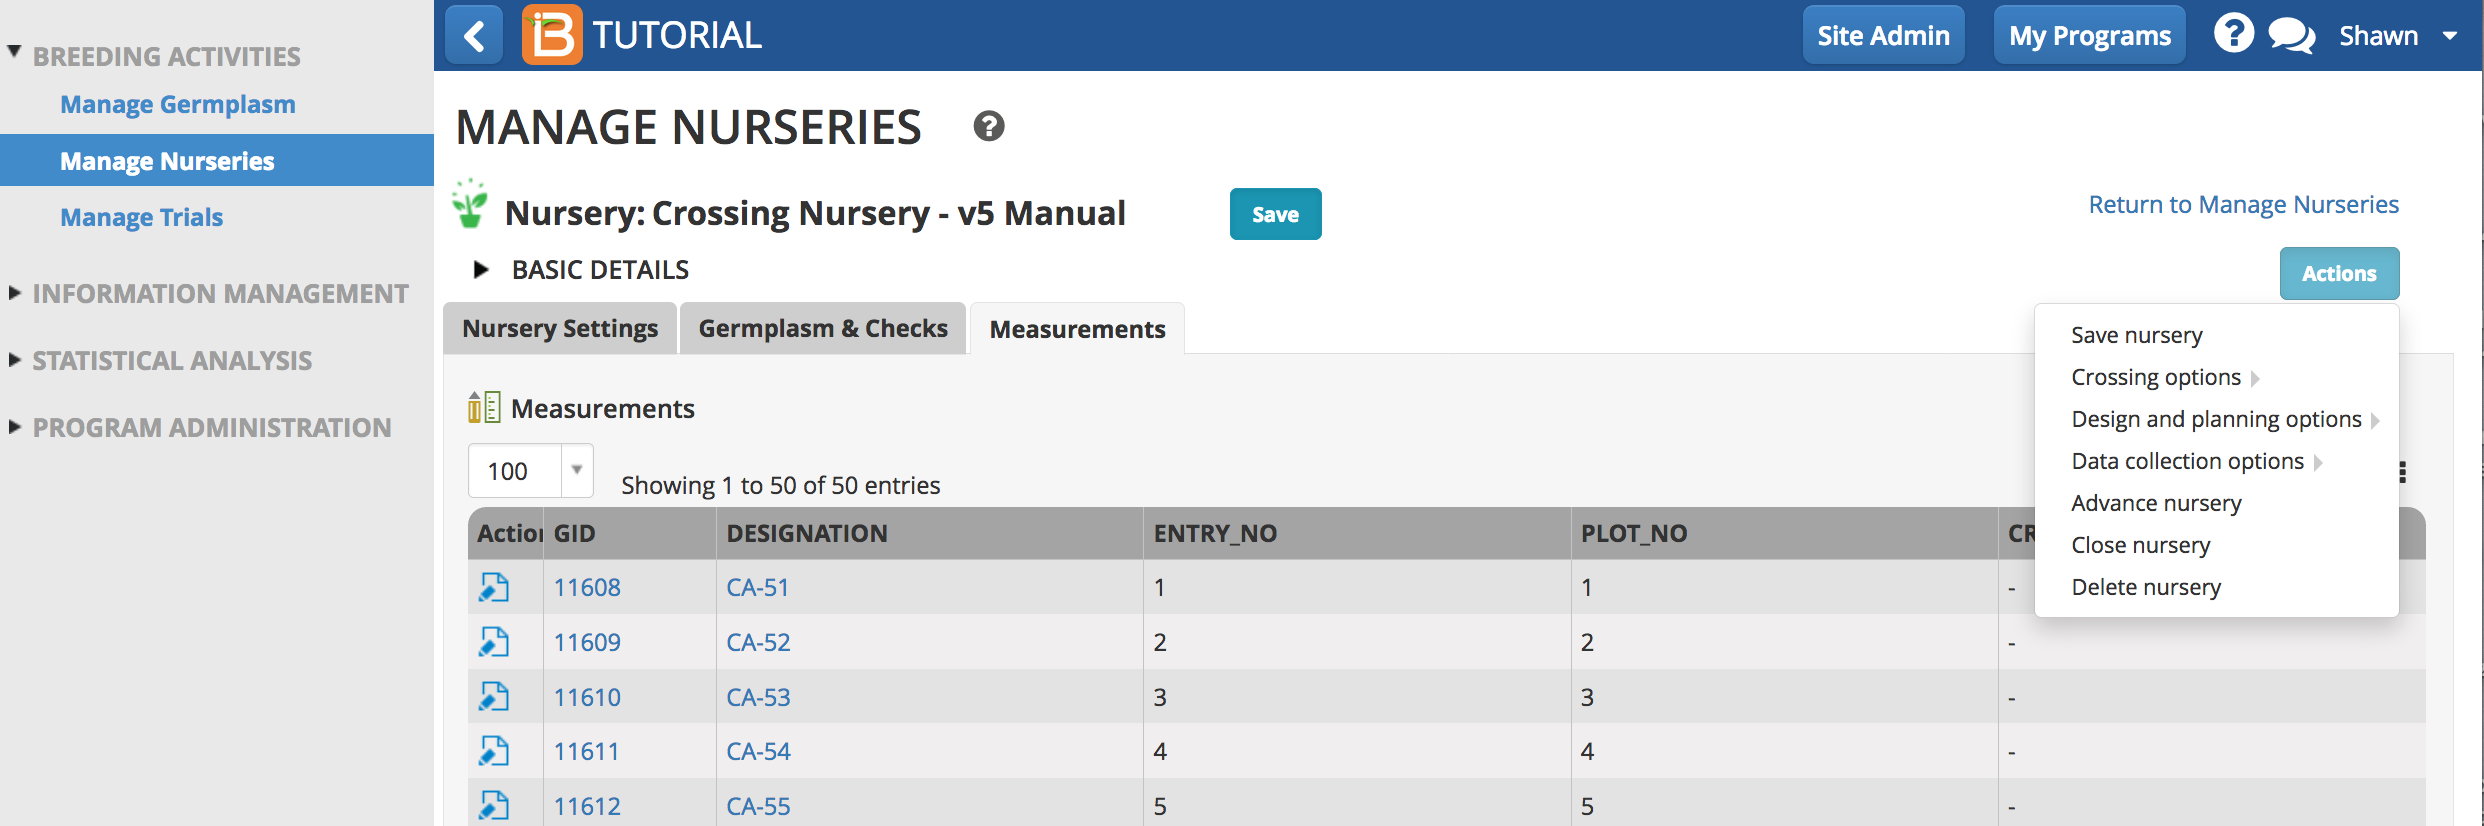
The Measurements table has a CHECK column tha differentiates check from test entries.
- Save the nursery to activate the full options available from the Actions menu.
External Nursery Design
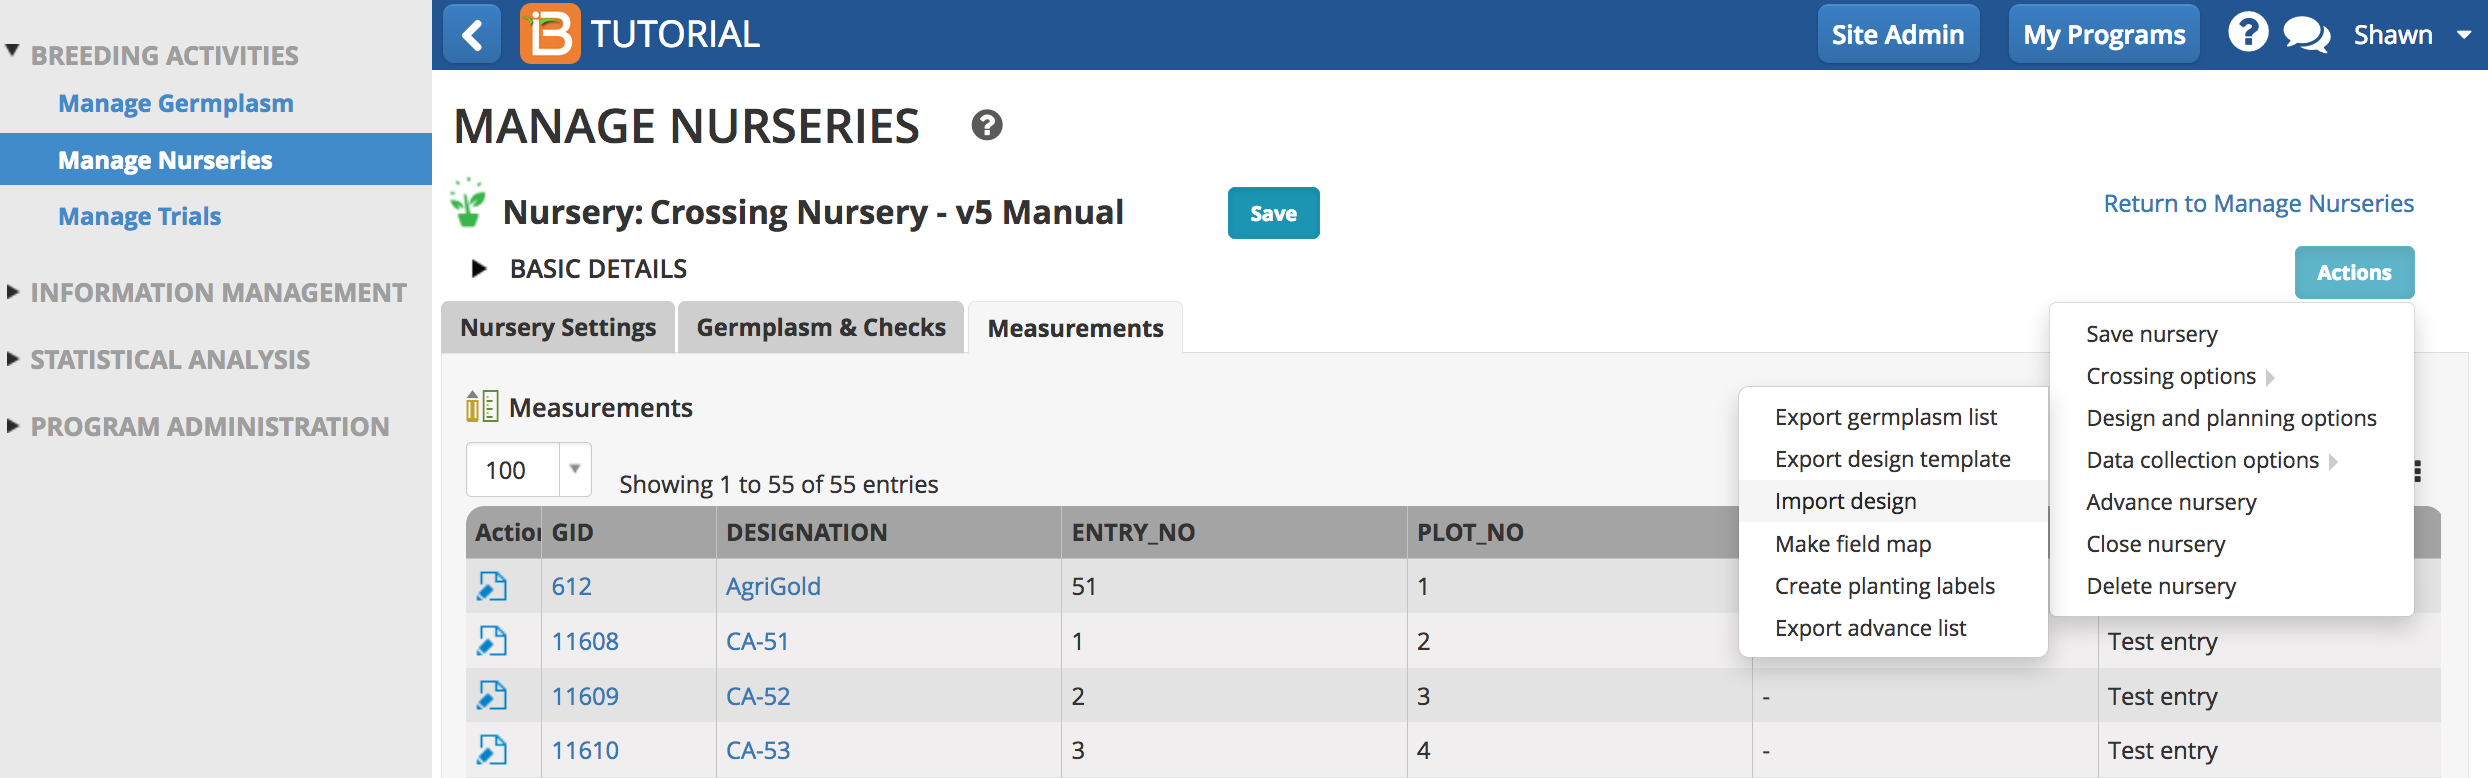
- Once germplasm is specified and saved, select Import Nursery Design from the Actions menu to impose a custom nursery design.
Nursery design files are .csv files with 3 mandatory column headers. Additional ontology-defined variables can be added to further customize the nursery design file. CHECKS is an important optional design variable.
- TRIAL_INSTANCE
- ENTRY_NO
- PLOT_NO
- CHECKS: T =Test & C= Check entry
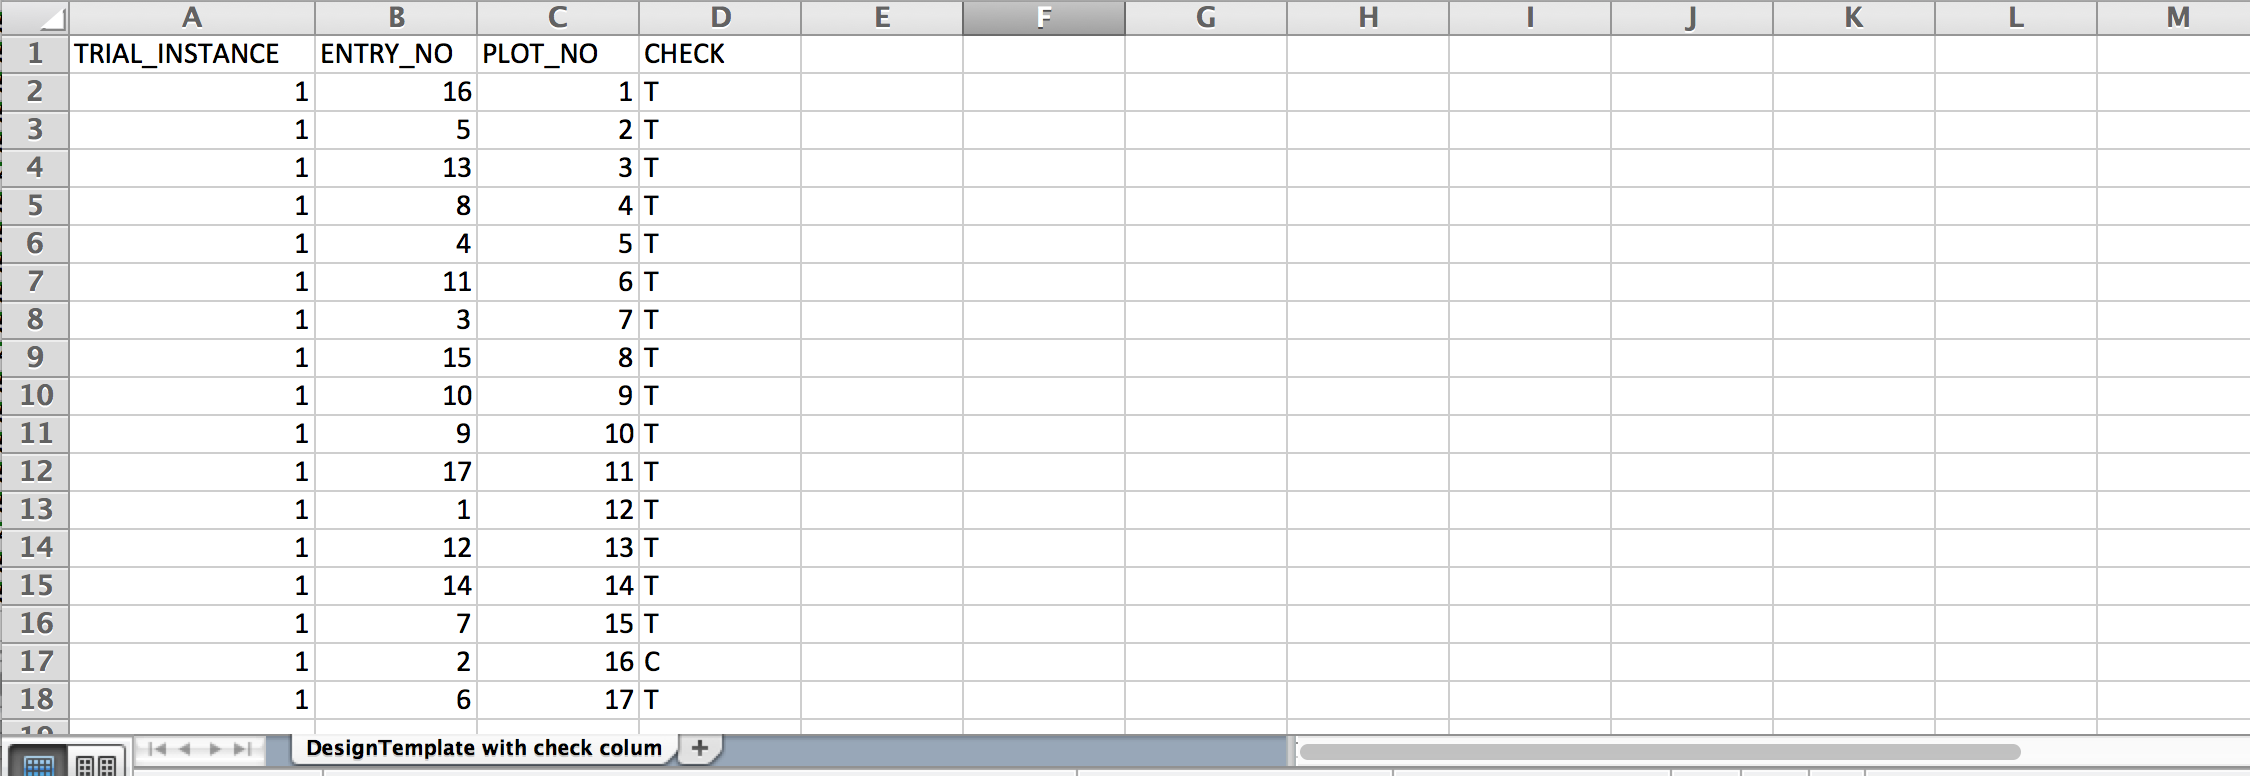
Example Custom Nursery Design File: 17 randomized germplasm entries
- Select Import Nursery Design from the Actions menu. Browse a select the edited file for upload.
- Review the variable mapping. If header names are identical to the ontology, the mapping should be perfect. Manually match variable terms to the ontology by selecting Re-map.
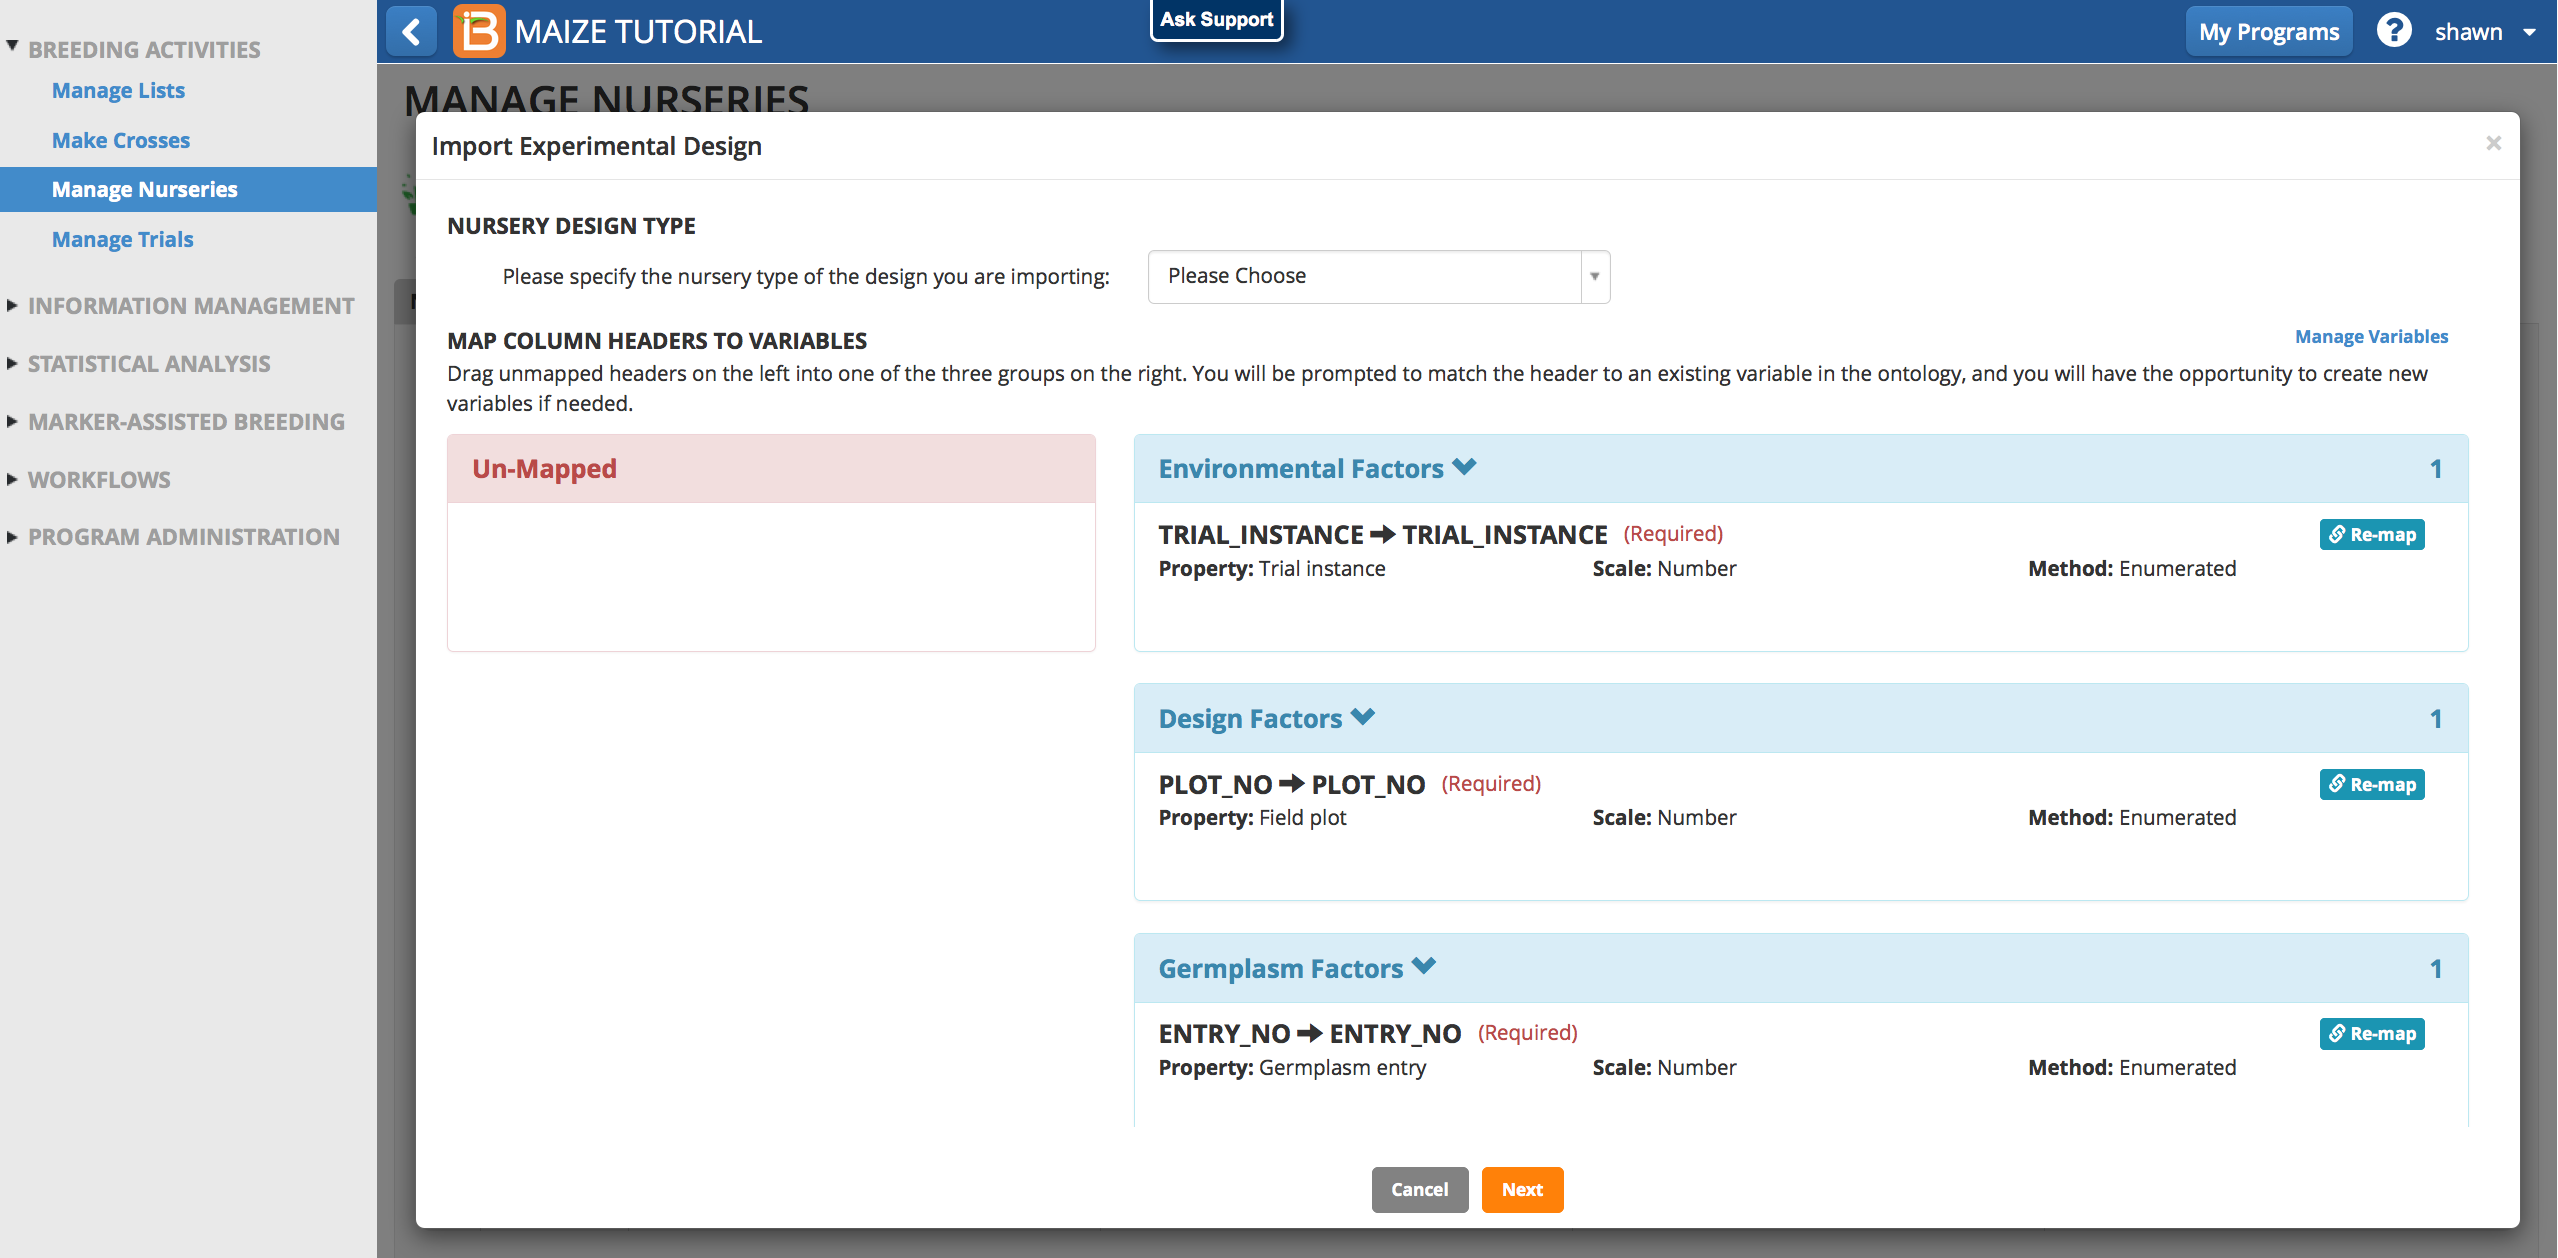
- Select Yes to load the design.

- Review design details and Finish.
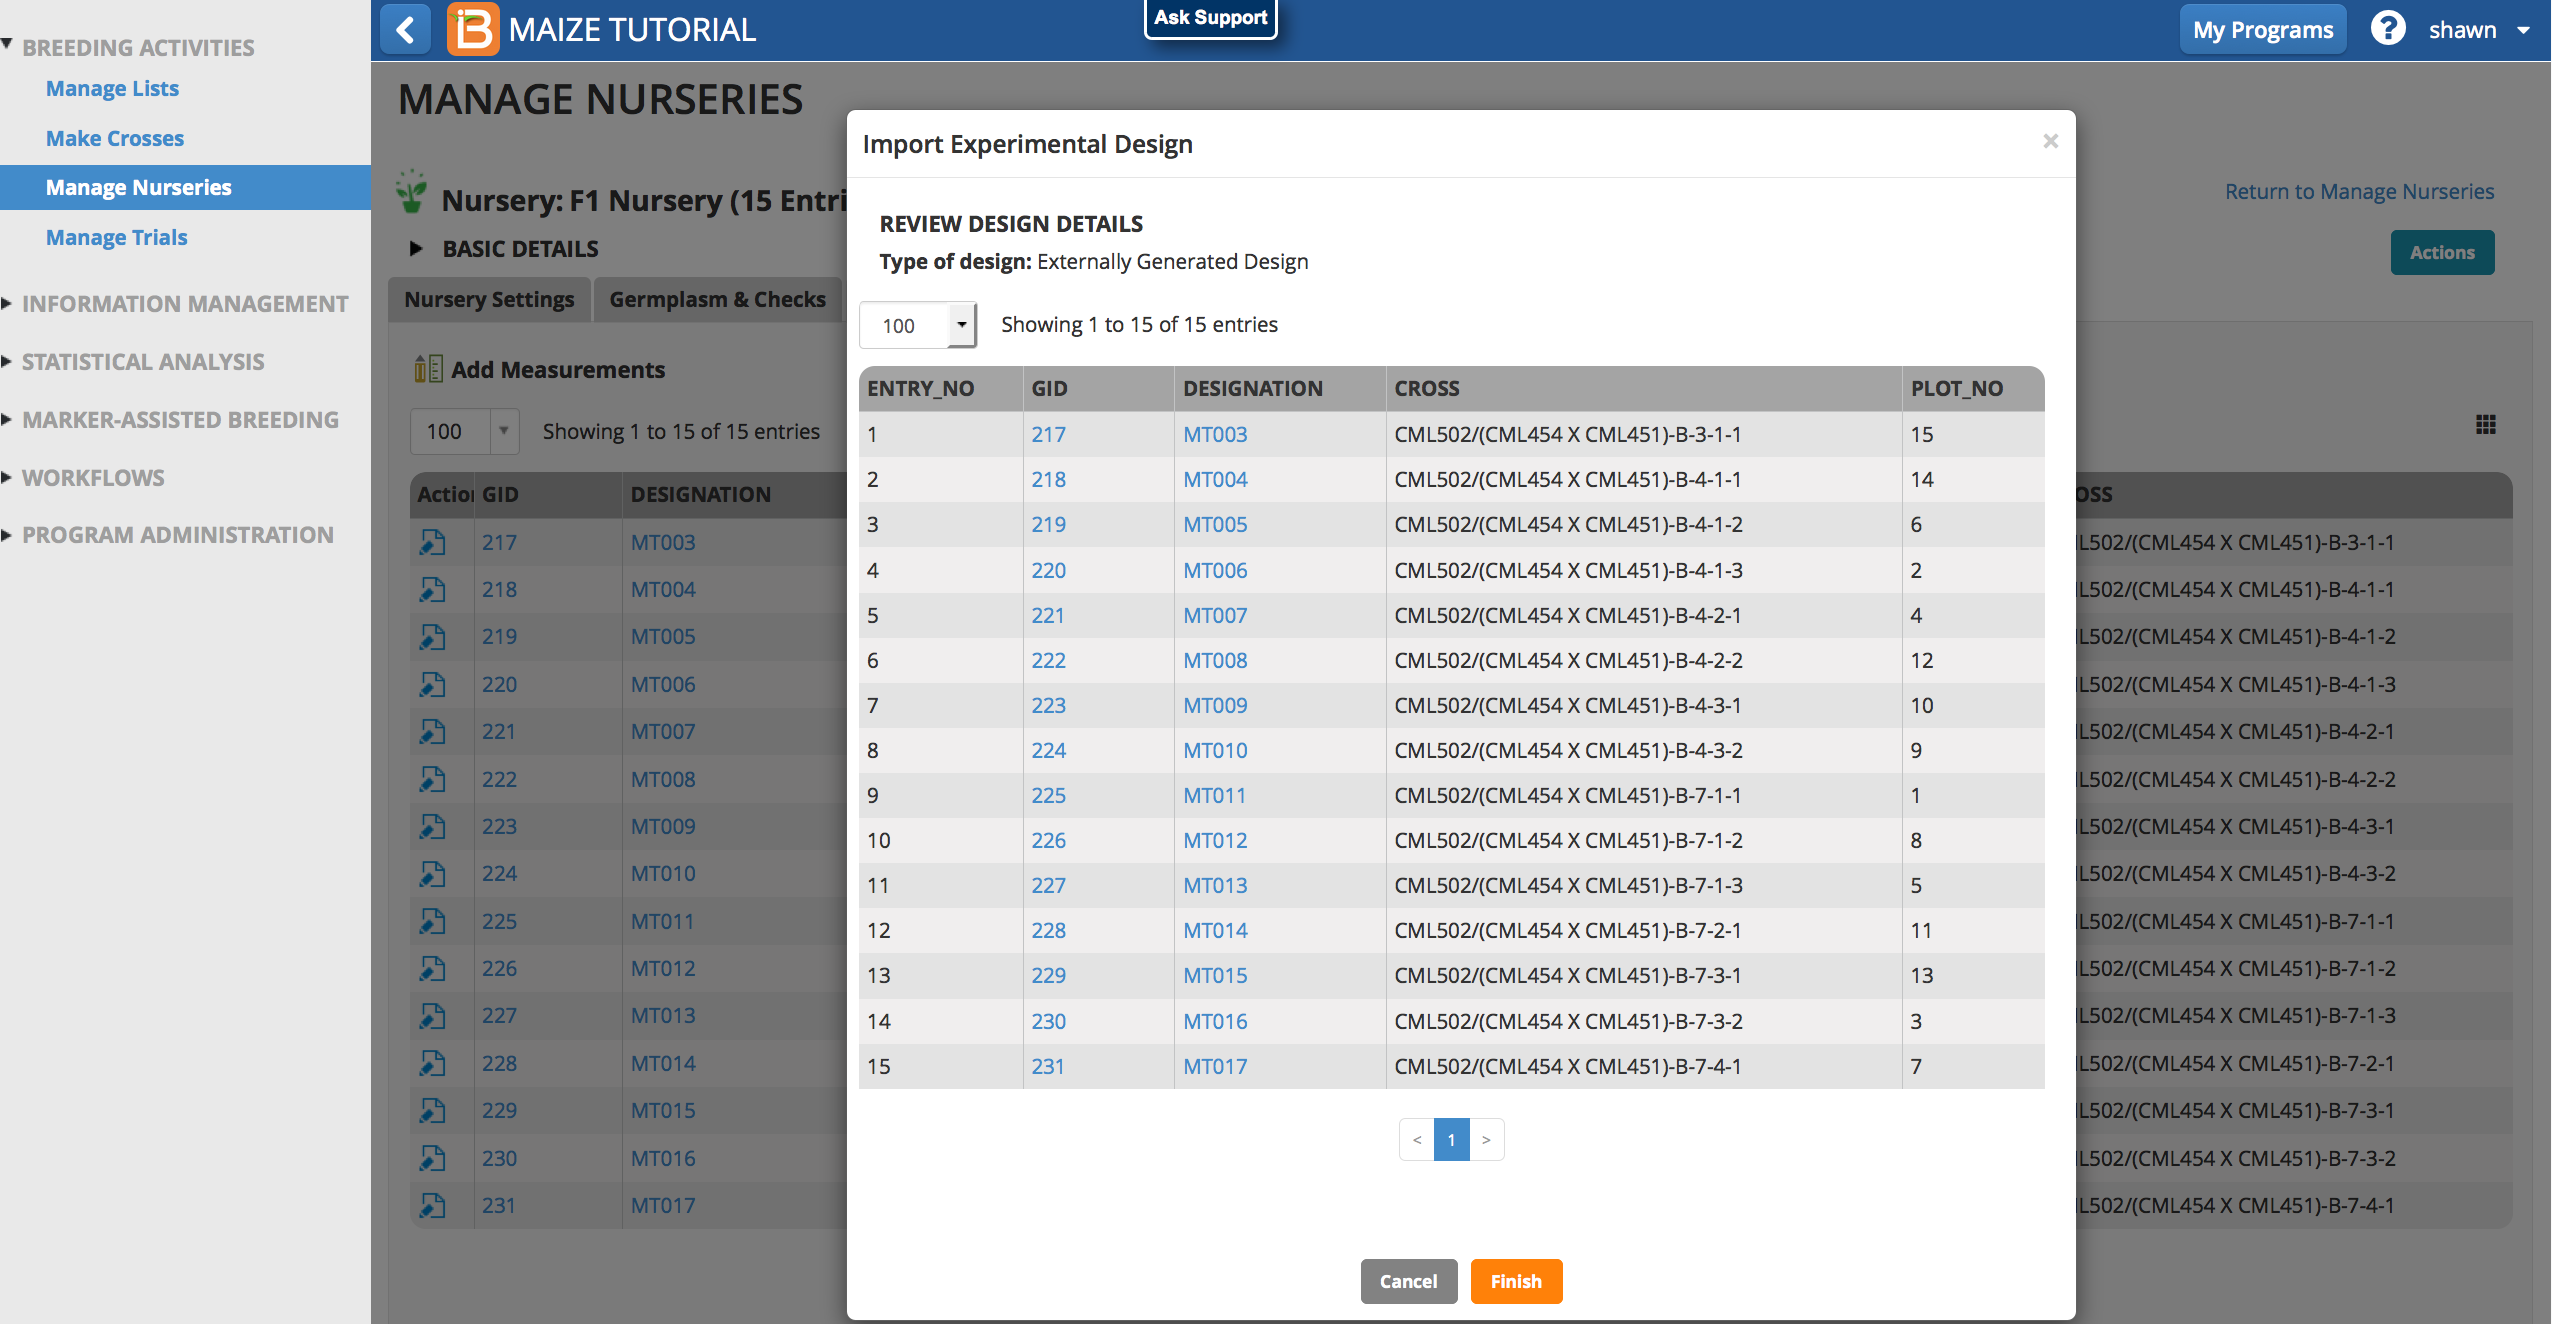
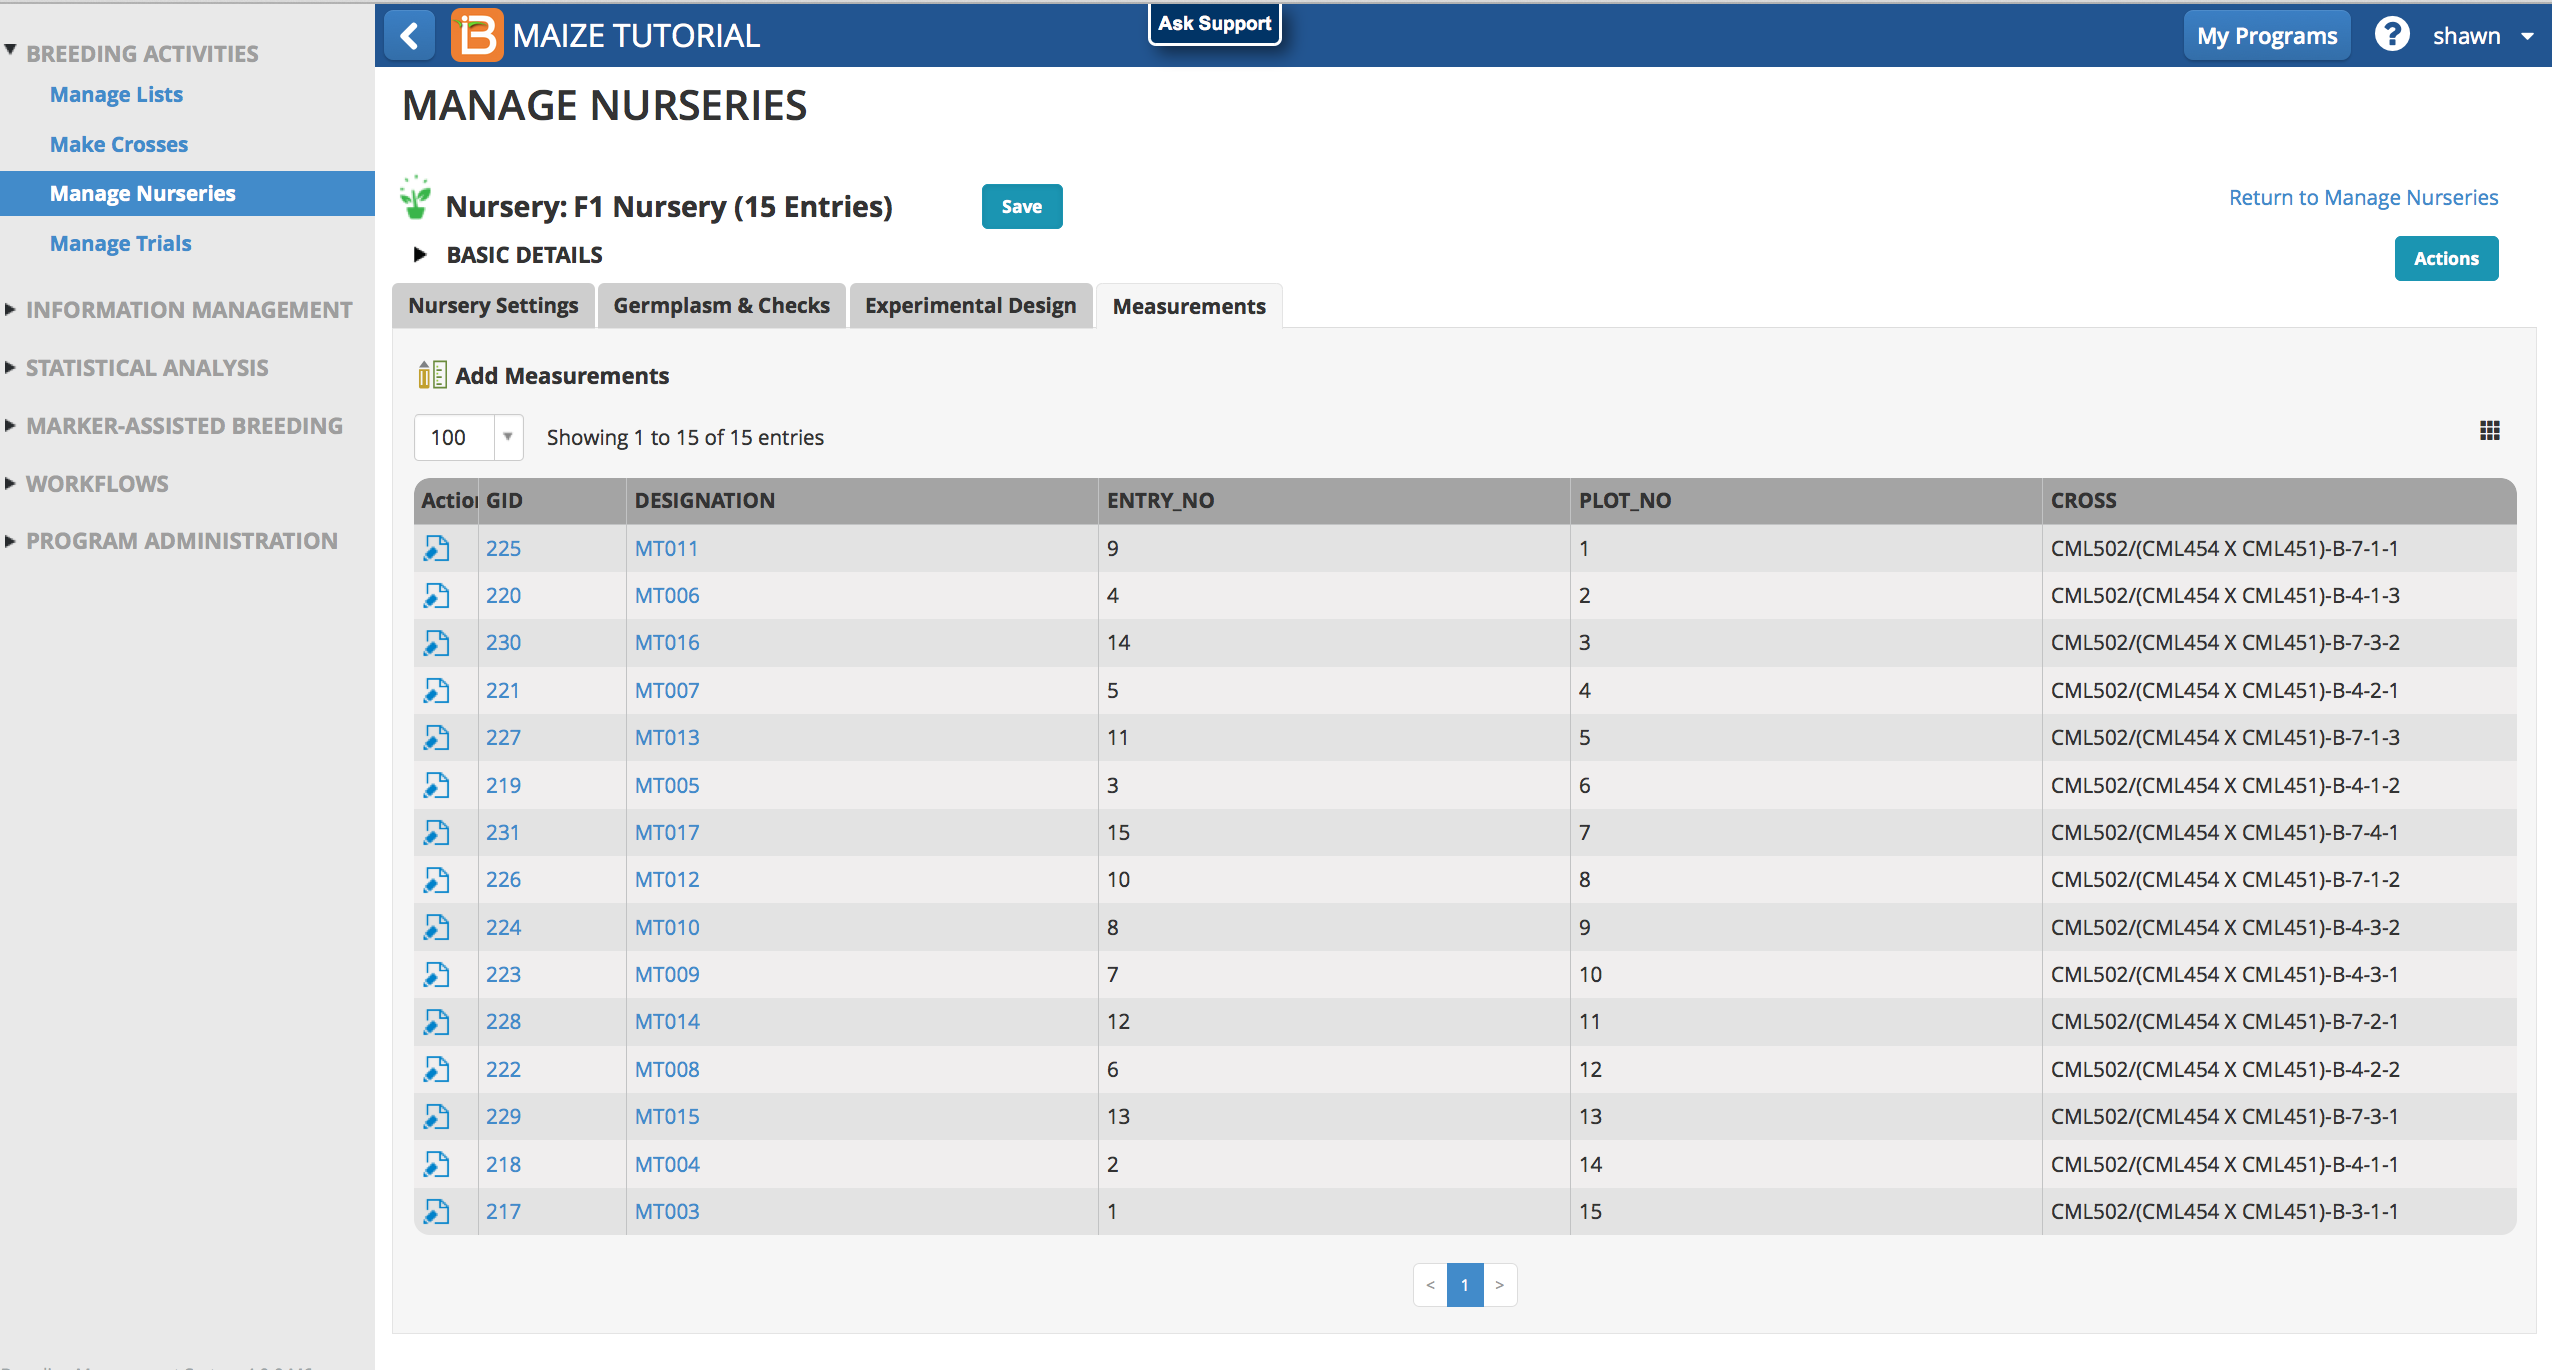
- Save the nursery to populate the measurements tab.

- The custom randomized nursery design is now stored in the BMS.
Crossing
Advancements by crossing uses generative breeding methods that increase allelic diversity and combine alleles from different progenitors. The BMS offers two methods for recording crosses. (1) The crossing template is the recommended path. (2) The design new crosses path is beta functionality still undergoing developmen
Crossing Template
The crossing template allows users to record crosses within and between studies (nurseries and trials), and allows individual crosses to be described by different methods. Use the crossing template (.xls) to record bi-parental crosses.
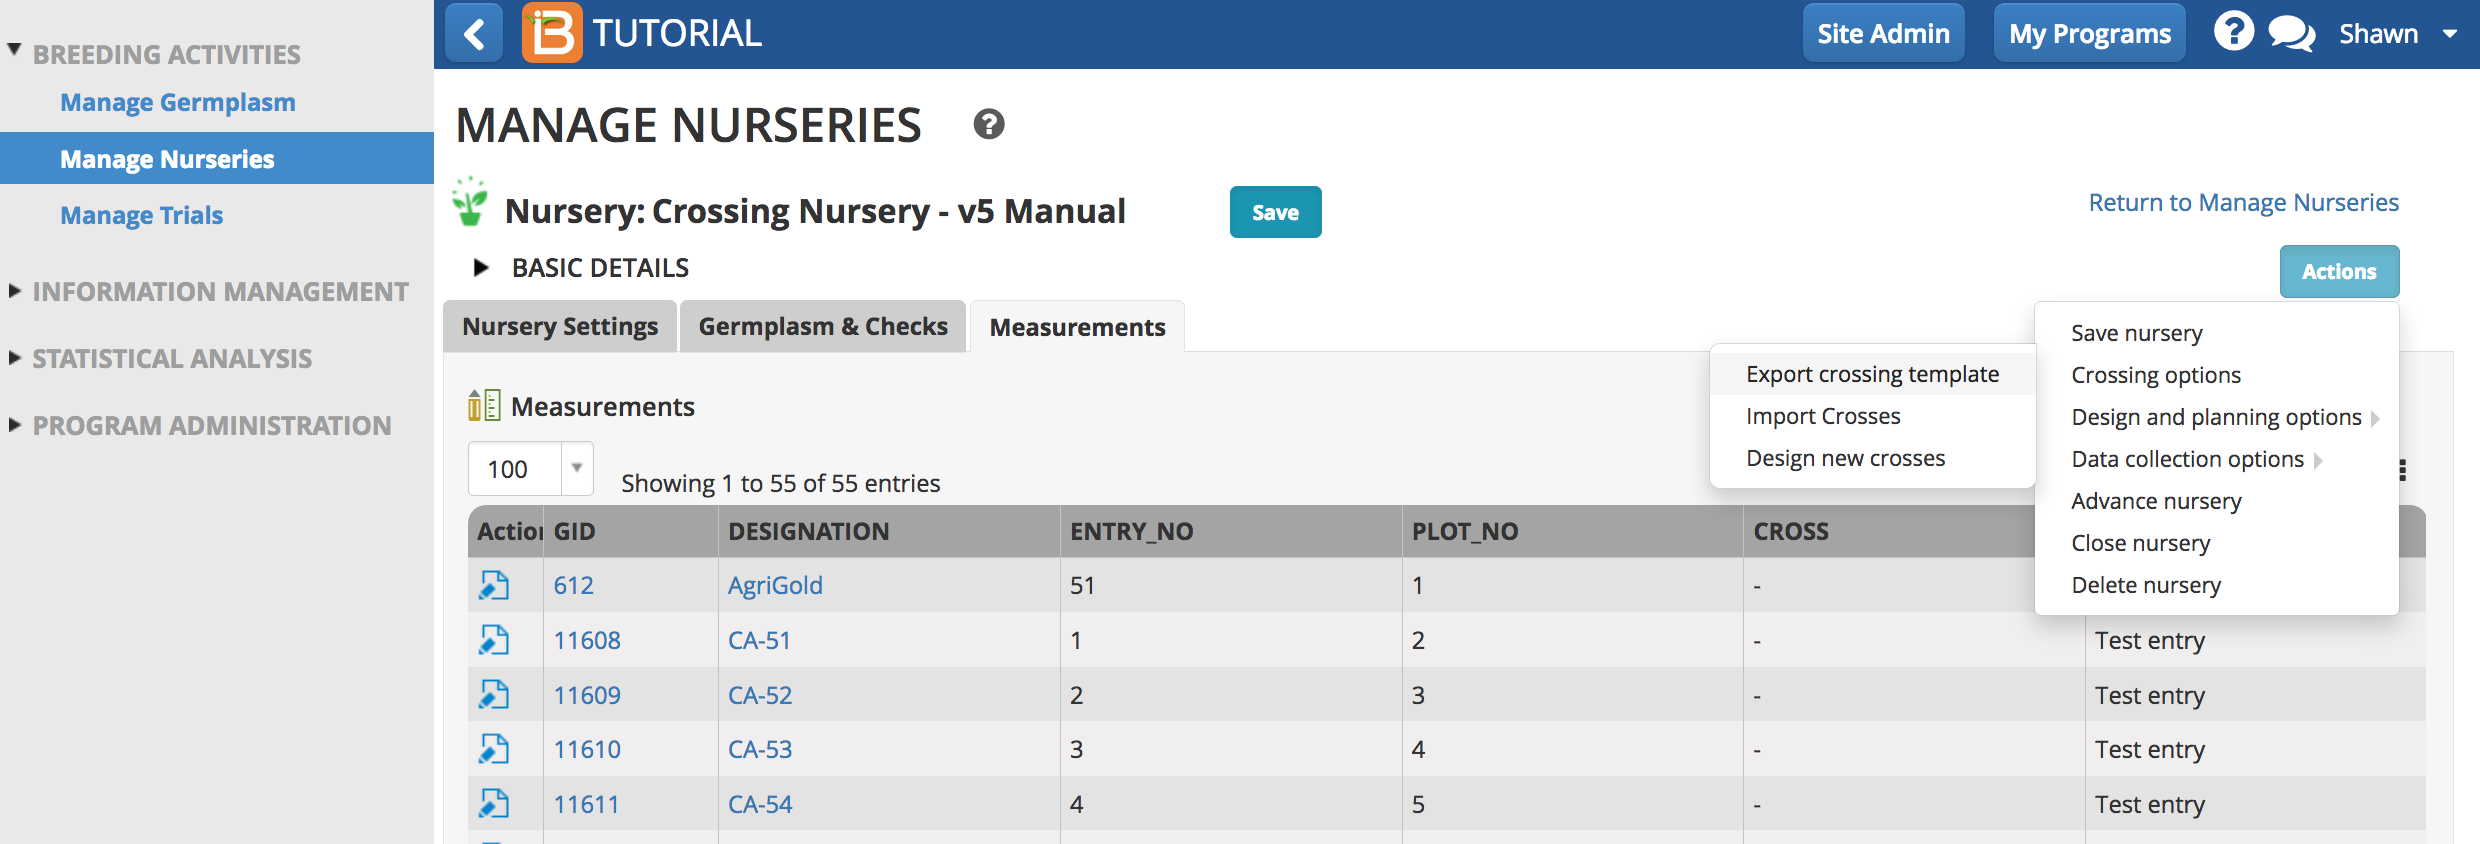
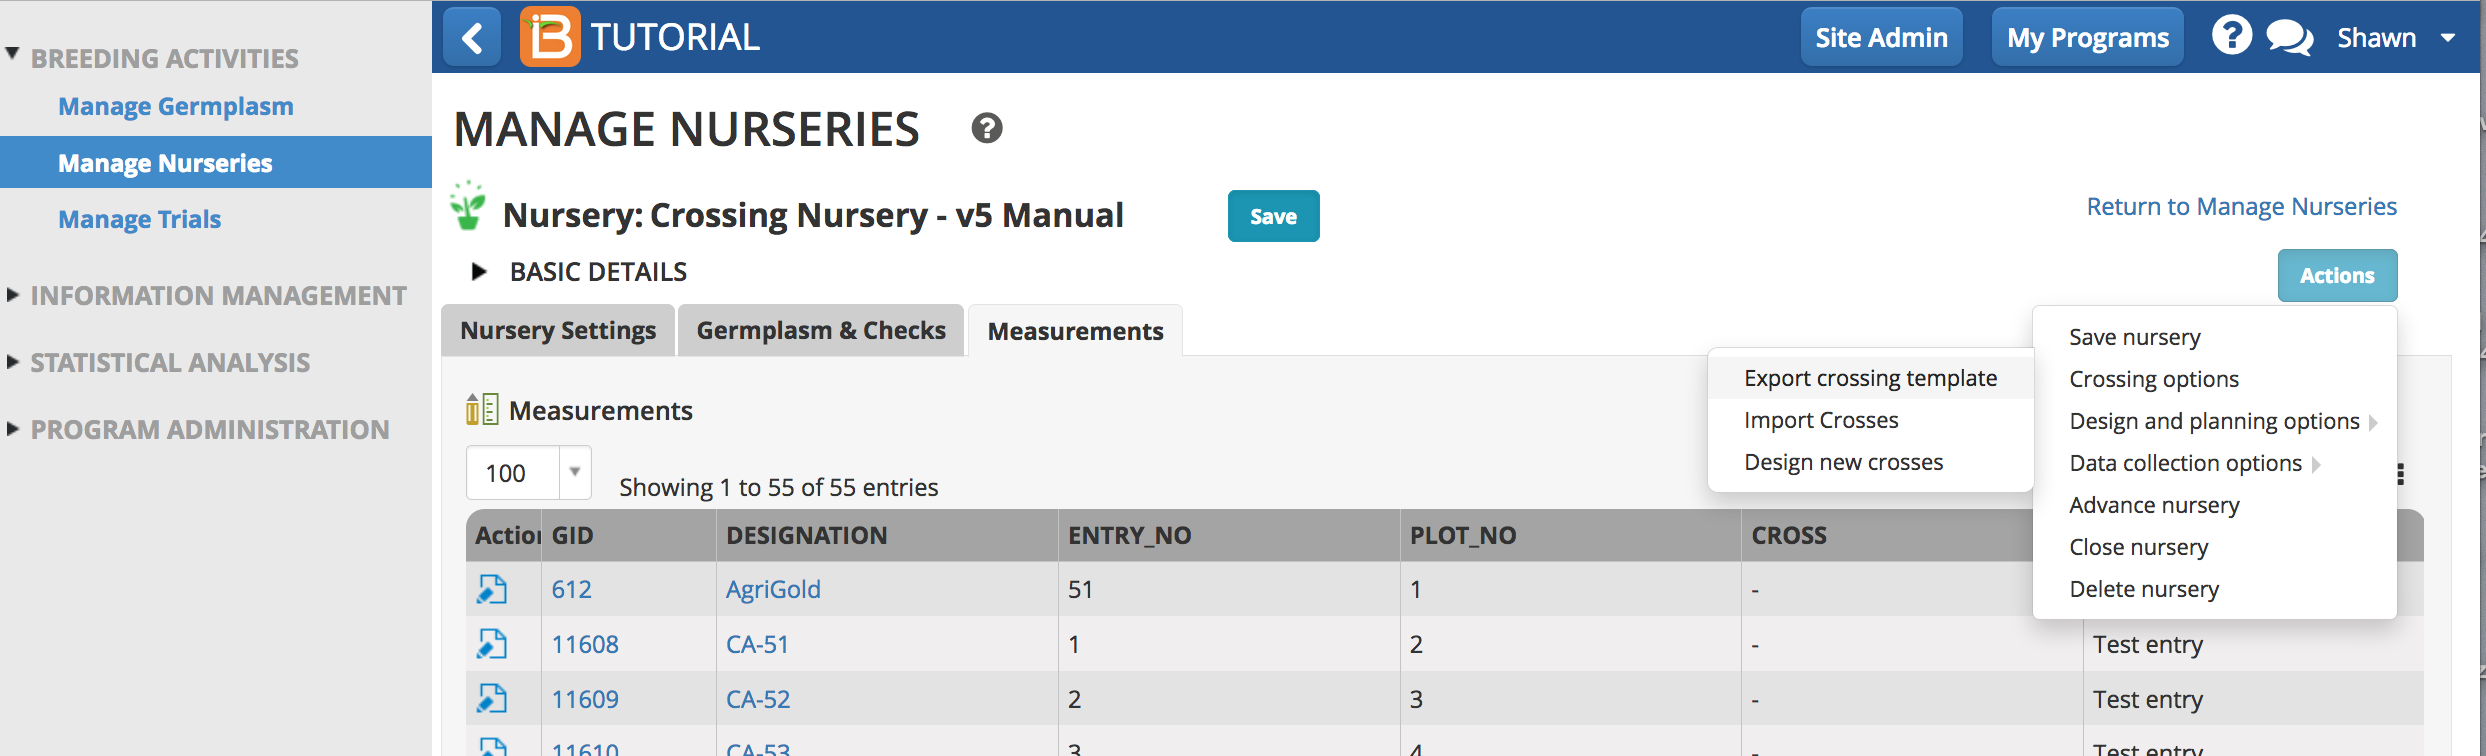
Export
- Select Export Crossing Template. Open the .xls file in Excel.
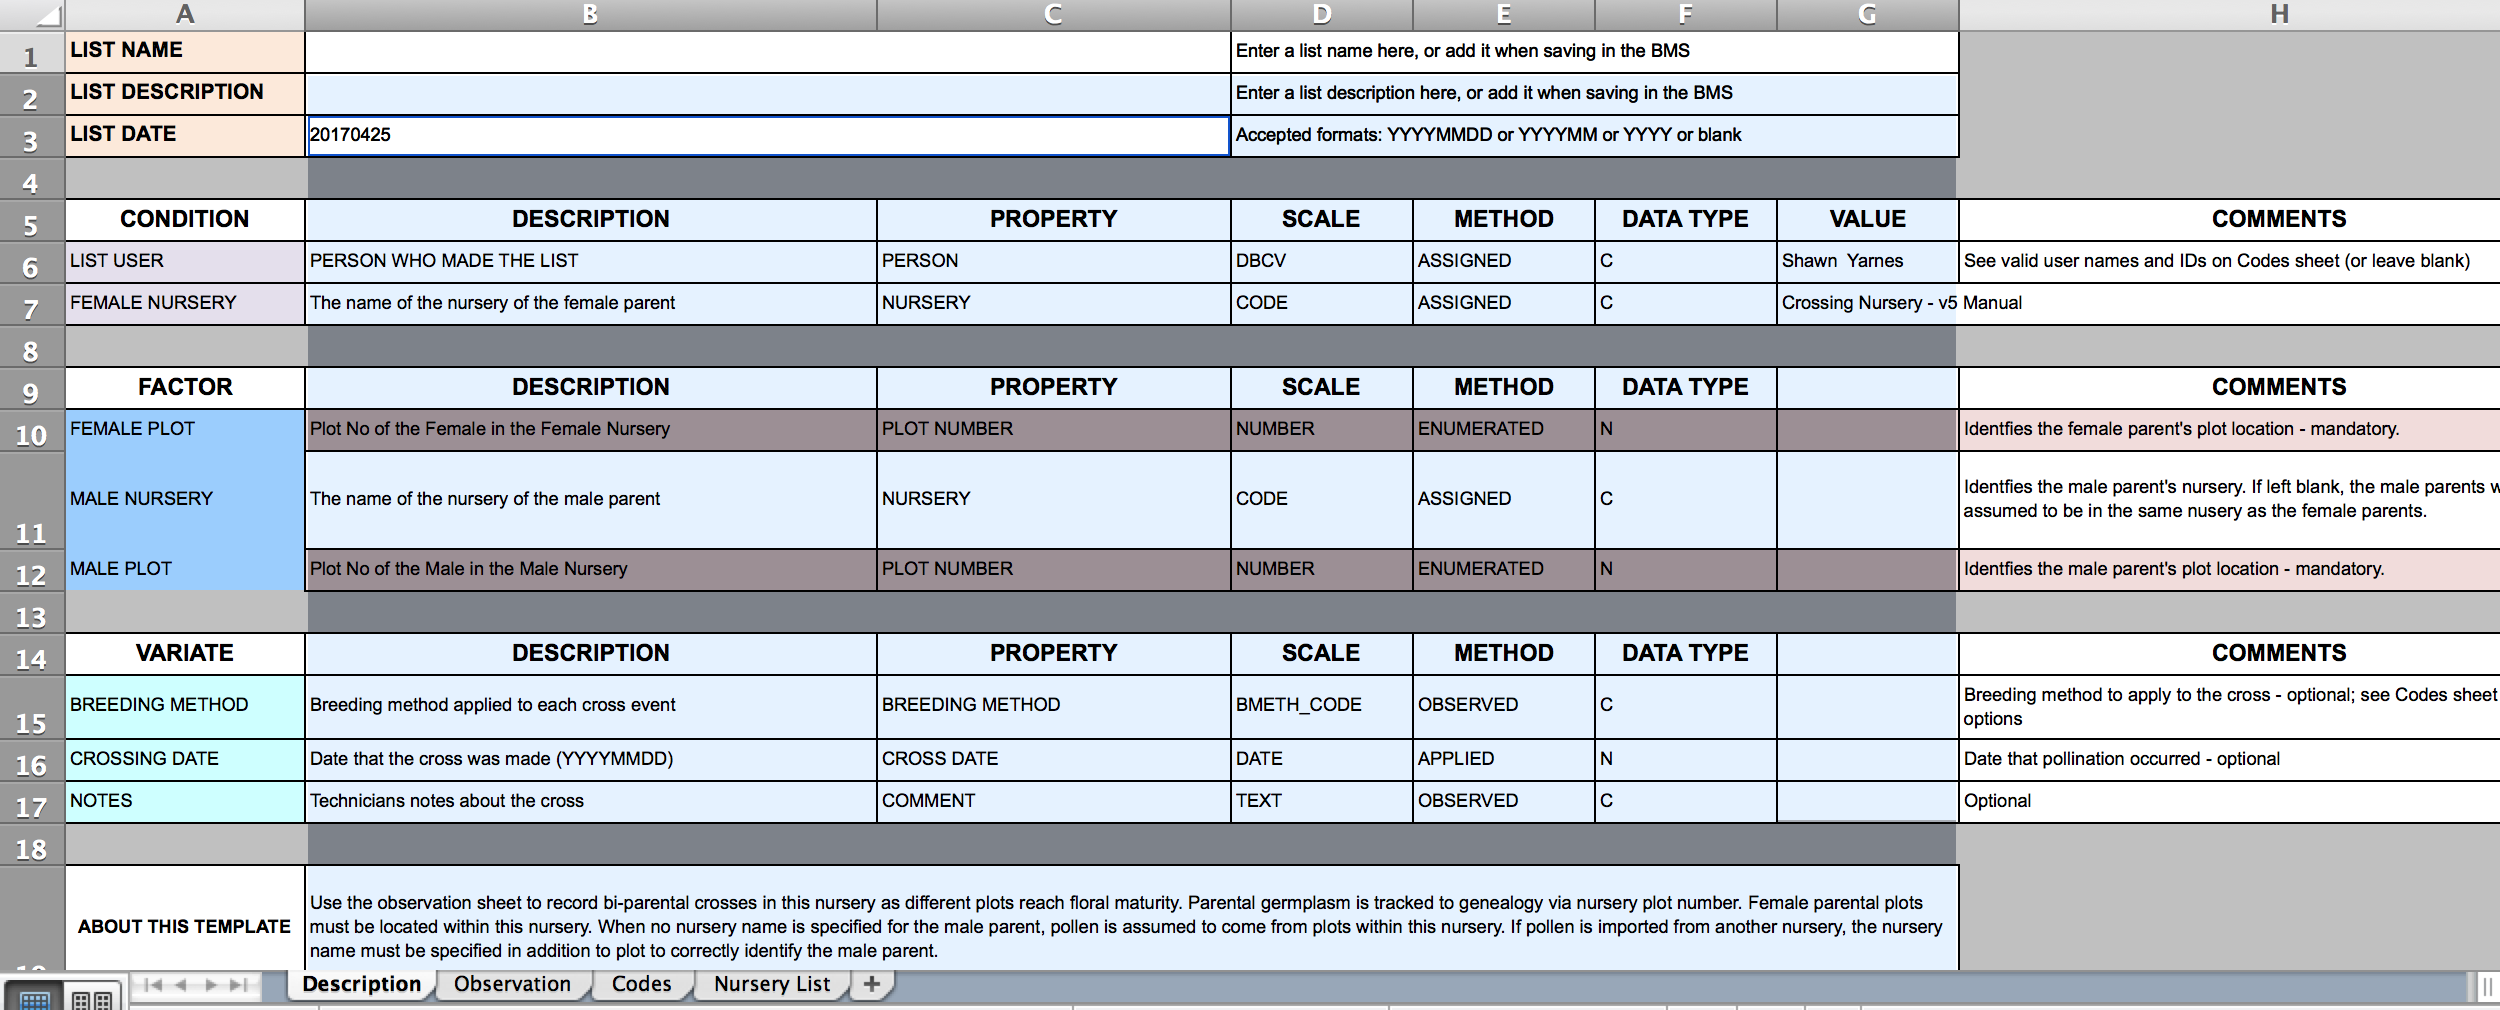
Description Sheet
The description sheet provides crossing record metadata. Description sheet editing is optional, such as to add to record additional variates.
Observation Sheet
The plot number for the male and female plants (template cells highlighted in pink) is mandatory data that must be added. Parental germplasm is tracked to genealogy via nursery plot number. Female parental plots must be located within the associated nursery. When no nursery name is specified for the male parent, pollen is assumed to come from plots within this nursery. If pollen is imported from another nursery, the nursery name must be specified in addition to plot to correctly identify the male parent. Optional information includes default columns of data.

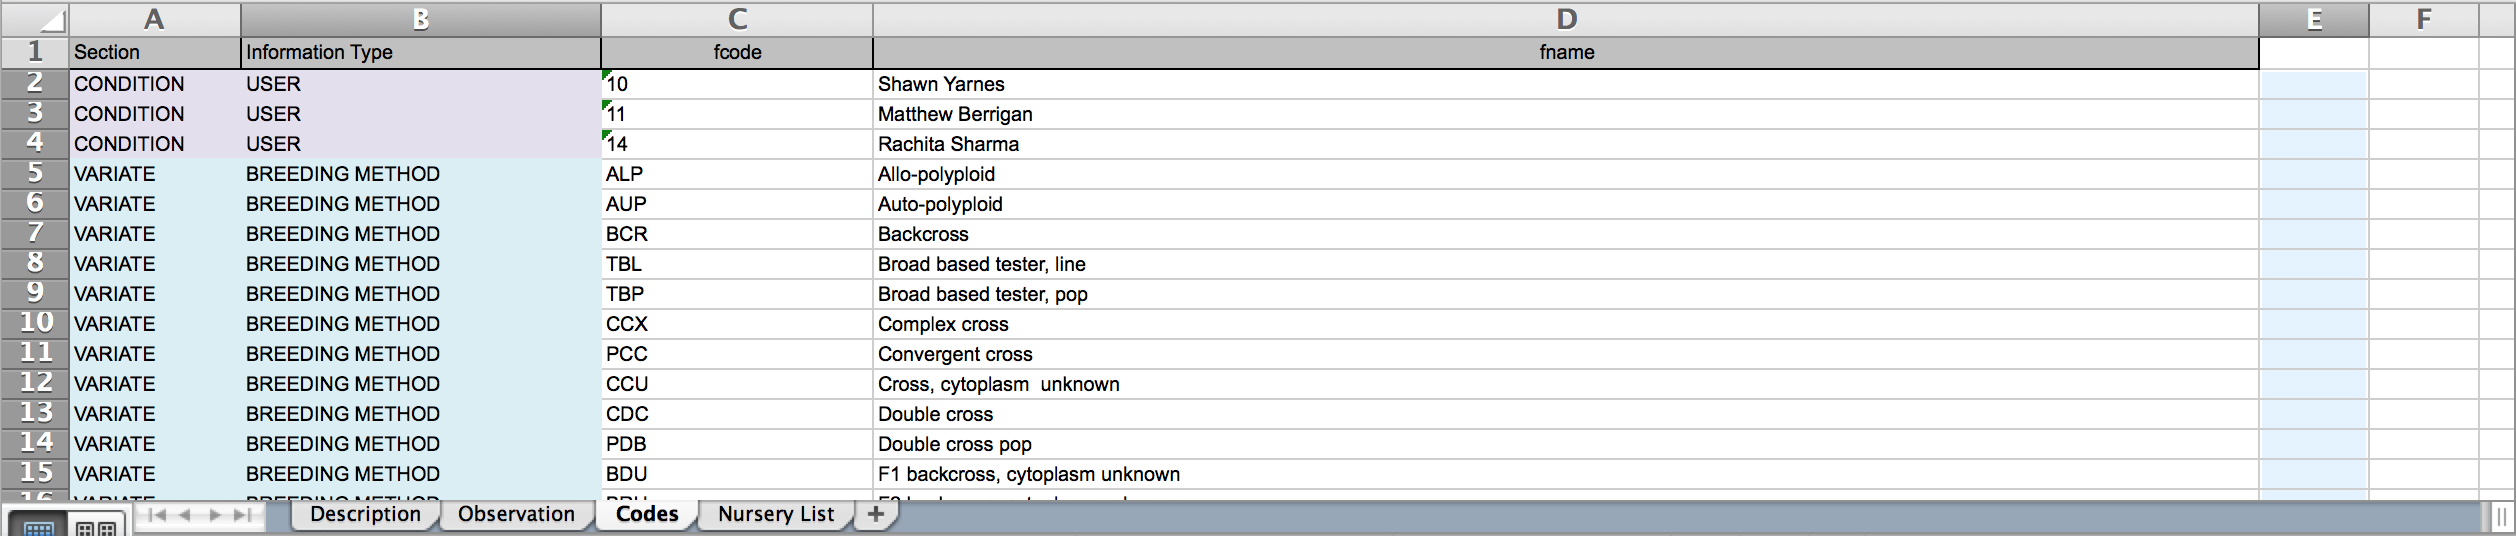
Codes Sheet
The codes sheet provides all the available users and breeding methods available.
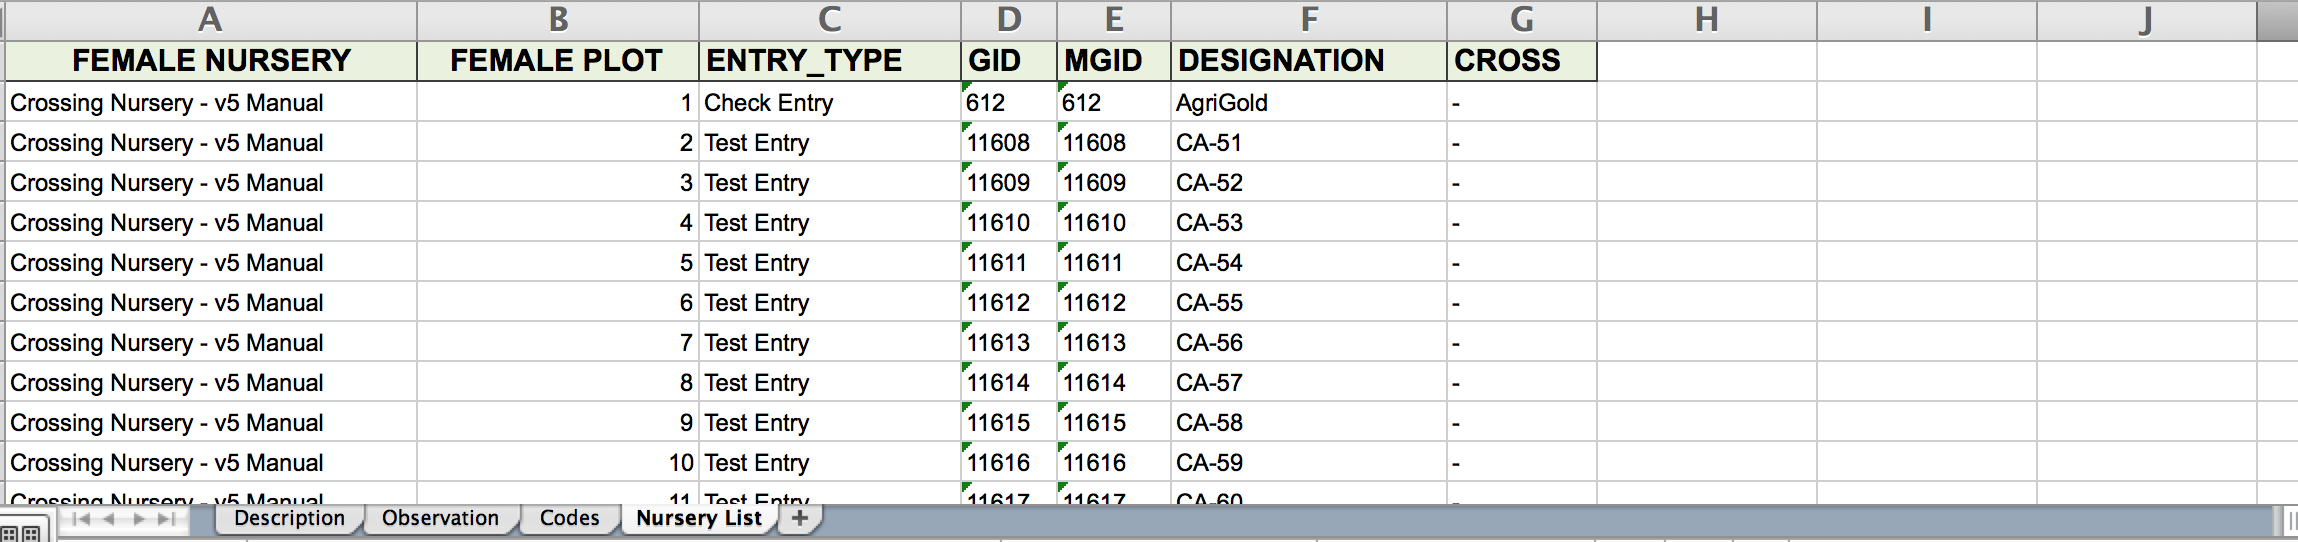
Nursery List
The nursery list contains details that allow for orientation in the female nursery. All females are expected to reside in the designated nursery. Any or all of this information can be pasted in the observation sheet to help the crossing process.
Observation
- Enter mandatory data (female and male plot numbers) into the observation sheet.
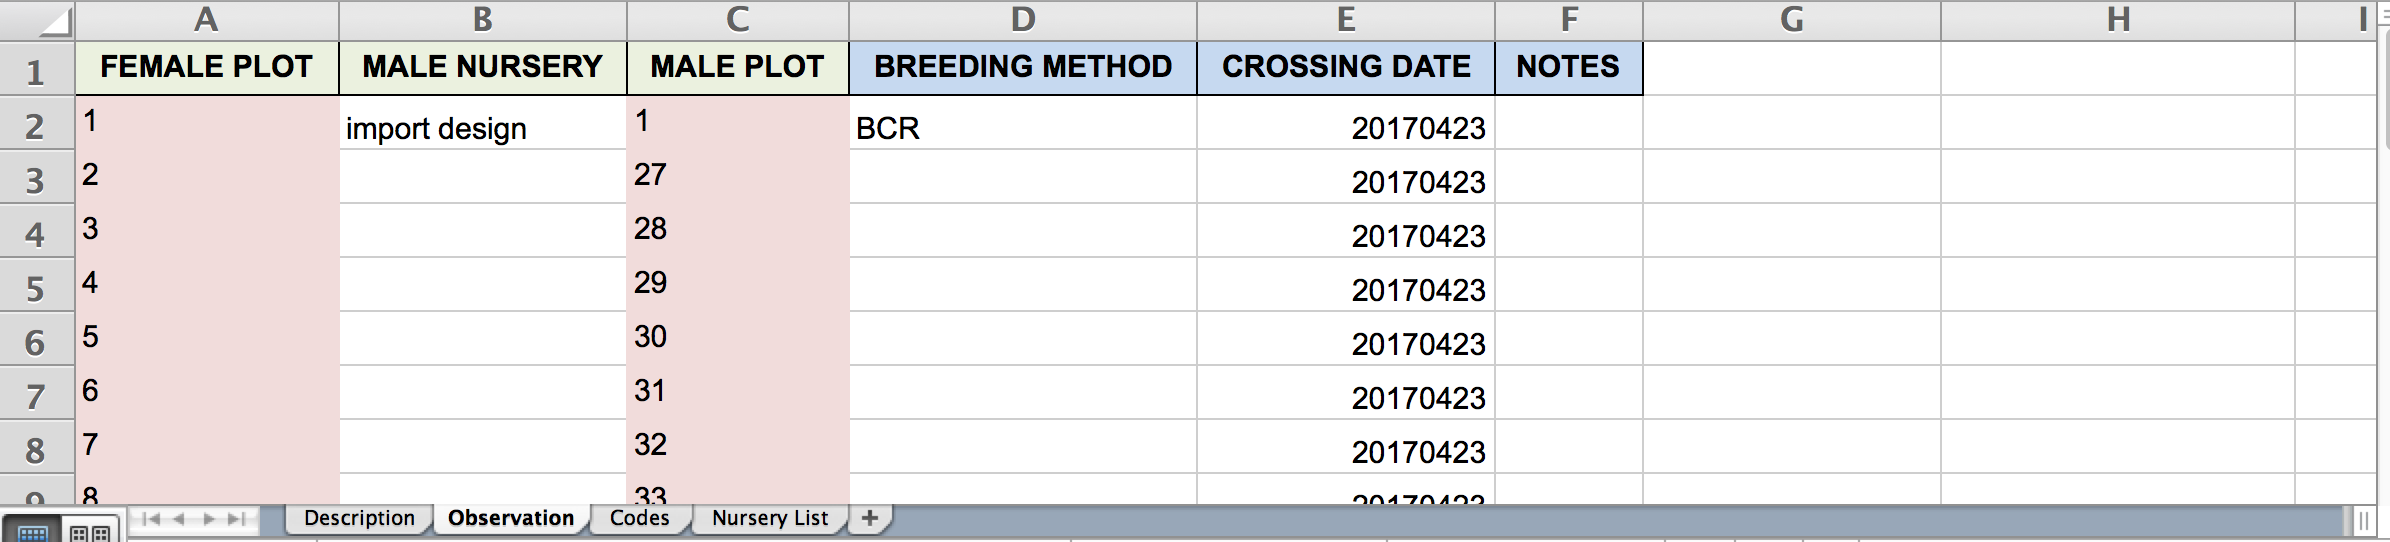
Crossing Record with Observations:
- Specify MALE PLOTS with MALE NURSERY to cross with pollen from another the nursery with females planted in the current nursery. Example: First cross in the list.
- MALE PLOTS without MALE NURSERY specified are assumed to be located in the nursery specified by the description sheet. Example: All crosses, but the first.
- Breeding method can be specified per cross. Example: First cross in the list is a backcross (BCR)
- When breeding method is not specified per cross, a single breeding method will be specified in the user interface and applied to all crosses. Example: All crosses, but the first.
- Crossing Date: Year, month, day (YYYYMMDD)
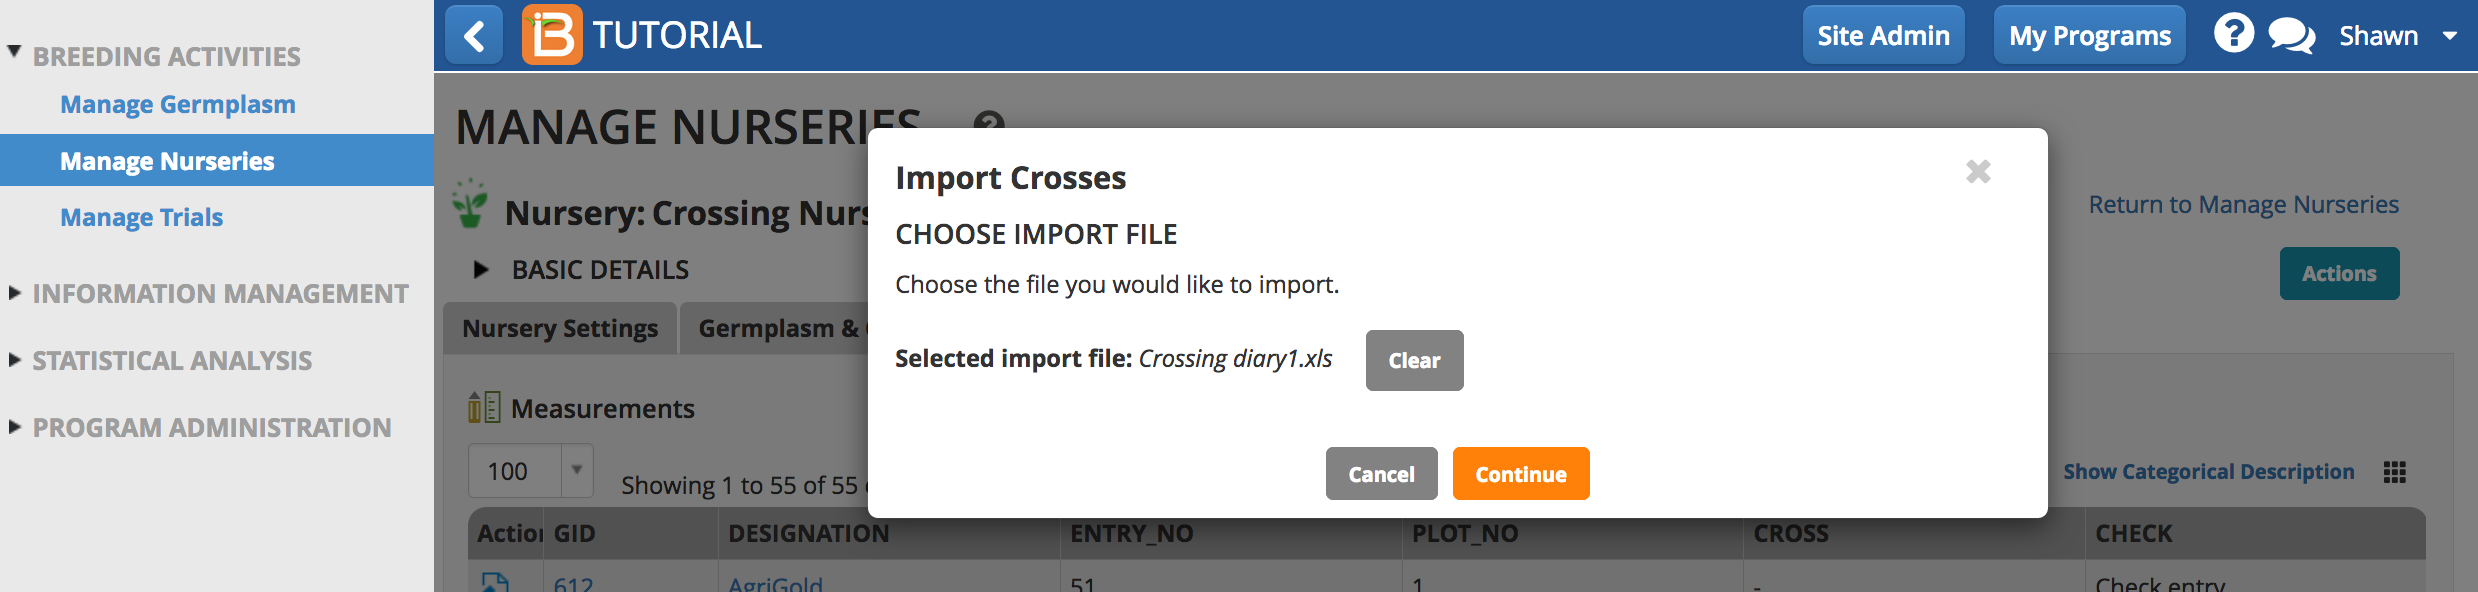
Import Crosses
- Select Import Crosses from the Actions menu.

- Choose import file and select Next.
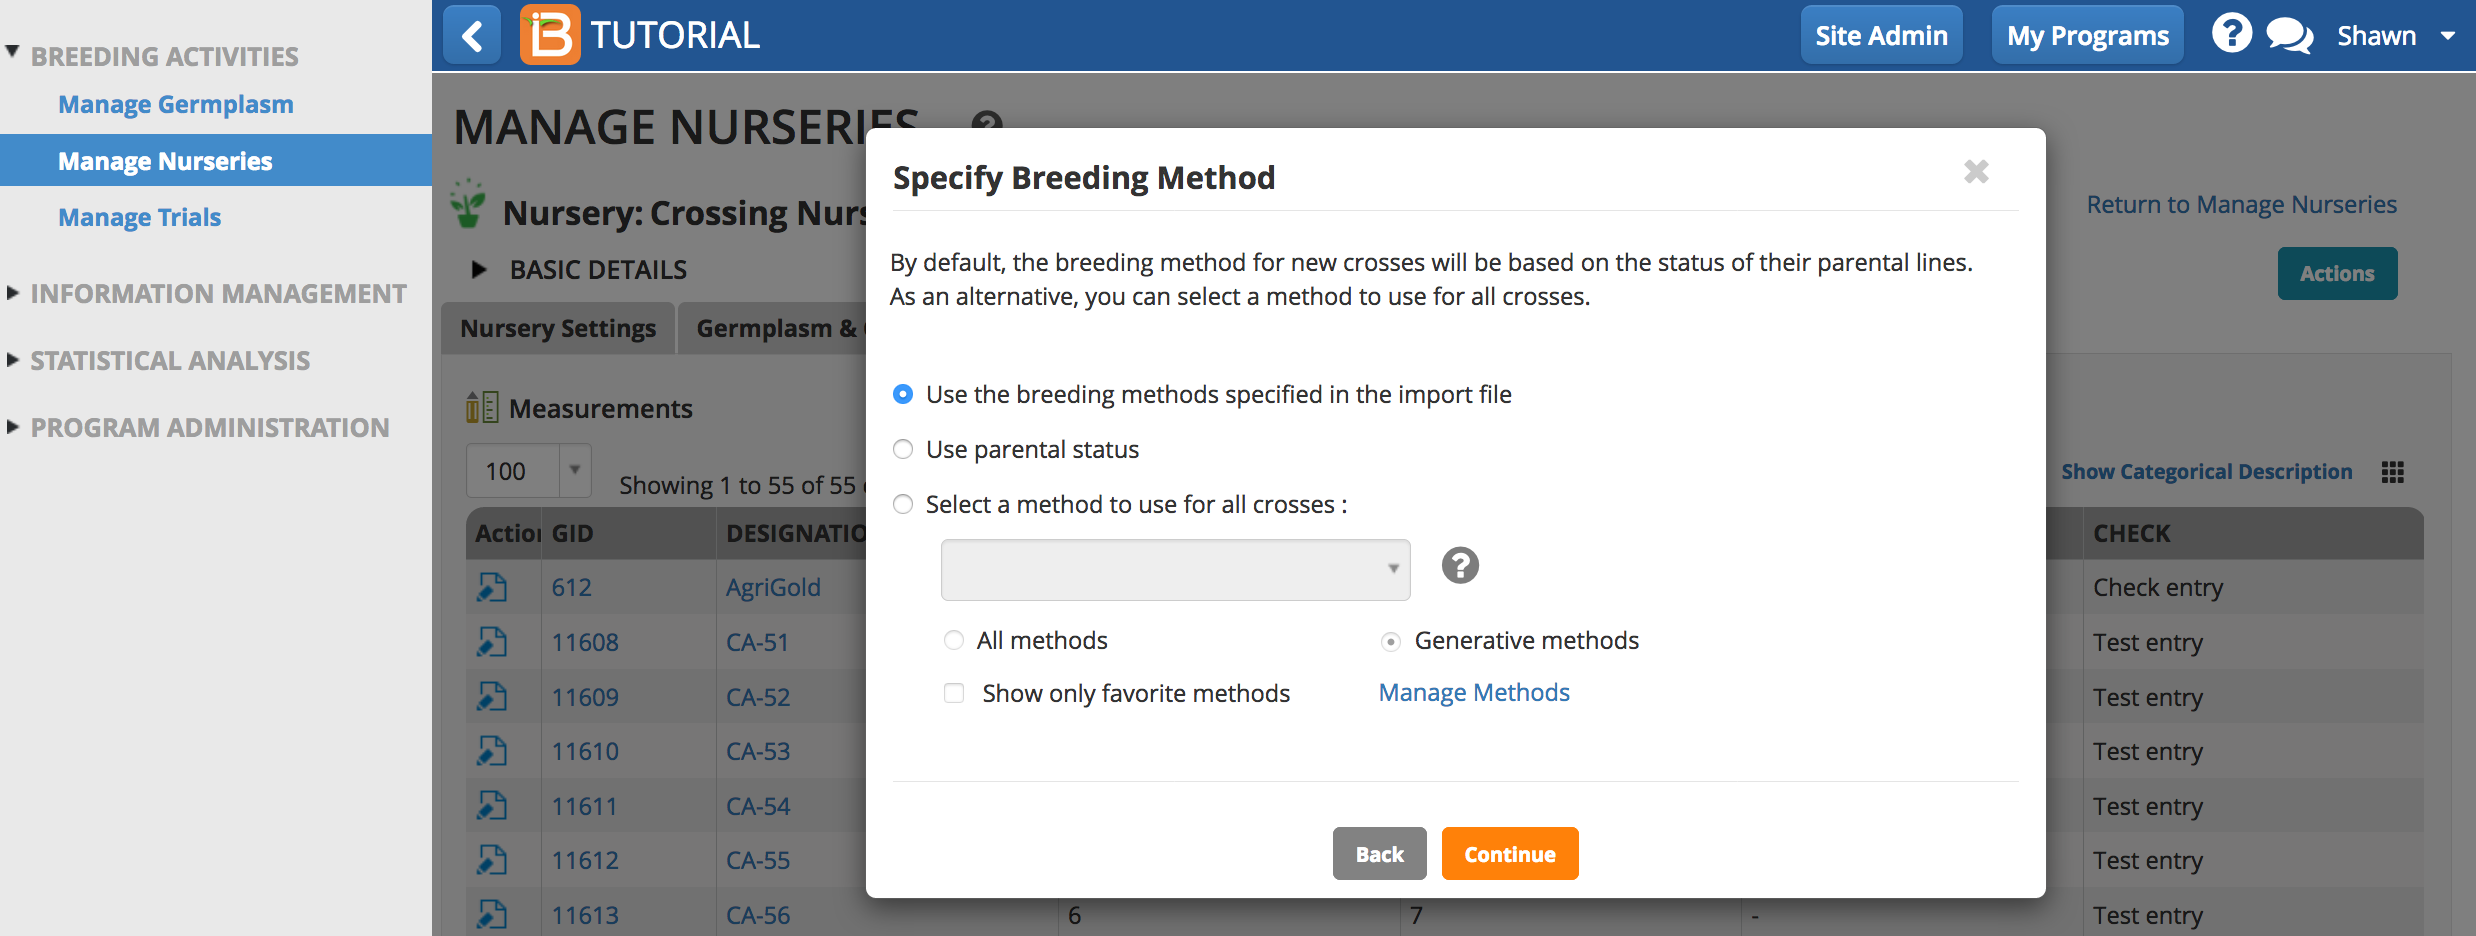
- Specify how the breeding method(s) will be applied to the imported crosses.
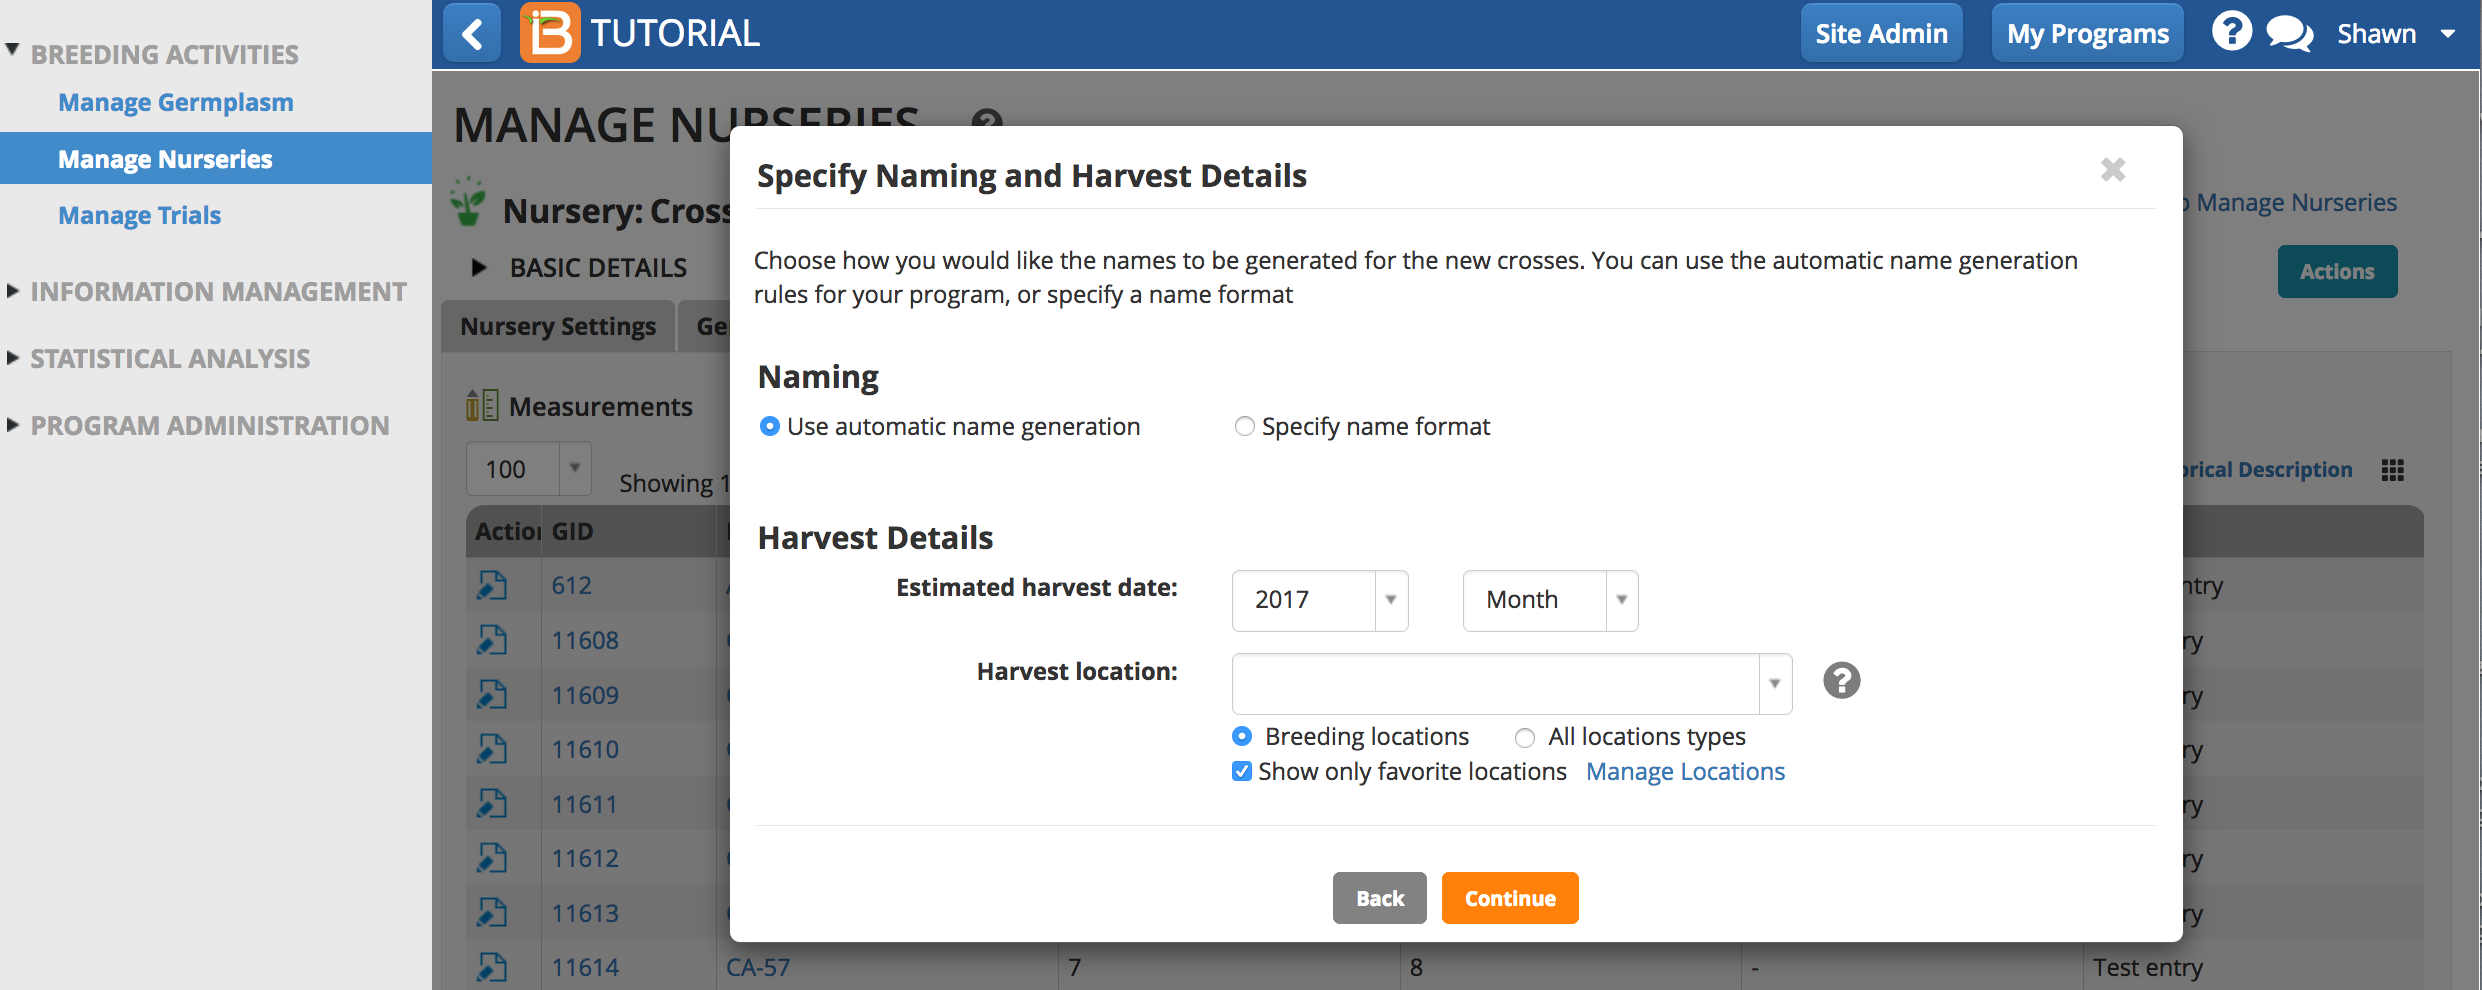
- Specify the naming conventions and harvest details, and Continue. Most breeders will use the automatic naming conventions customized for their breeding institute.
- Review the crosses and select Finish.
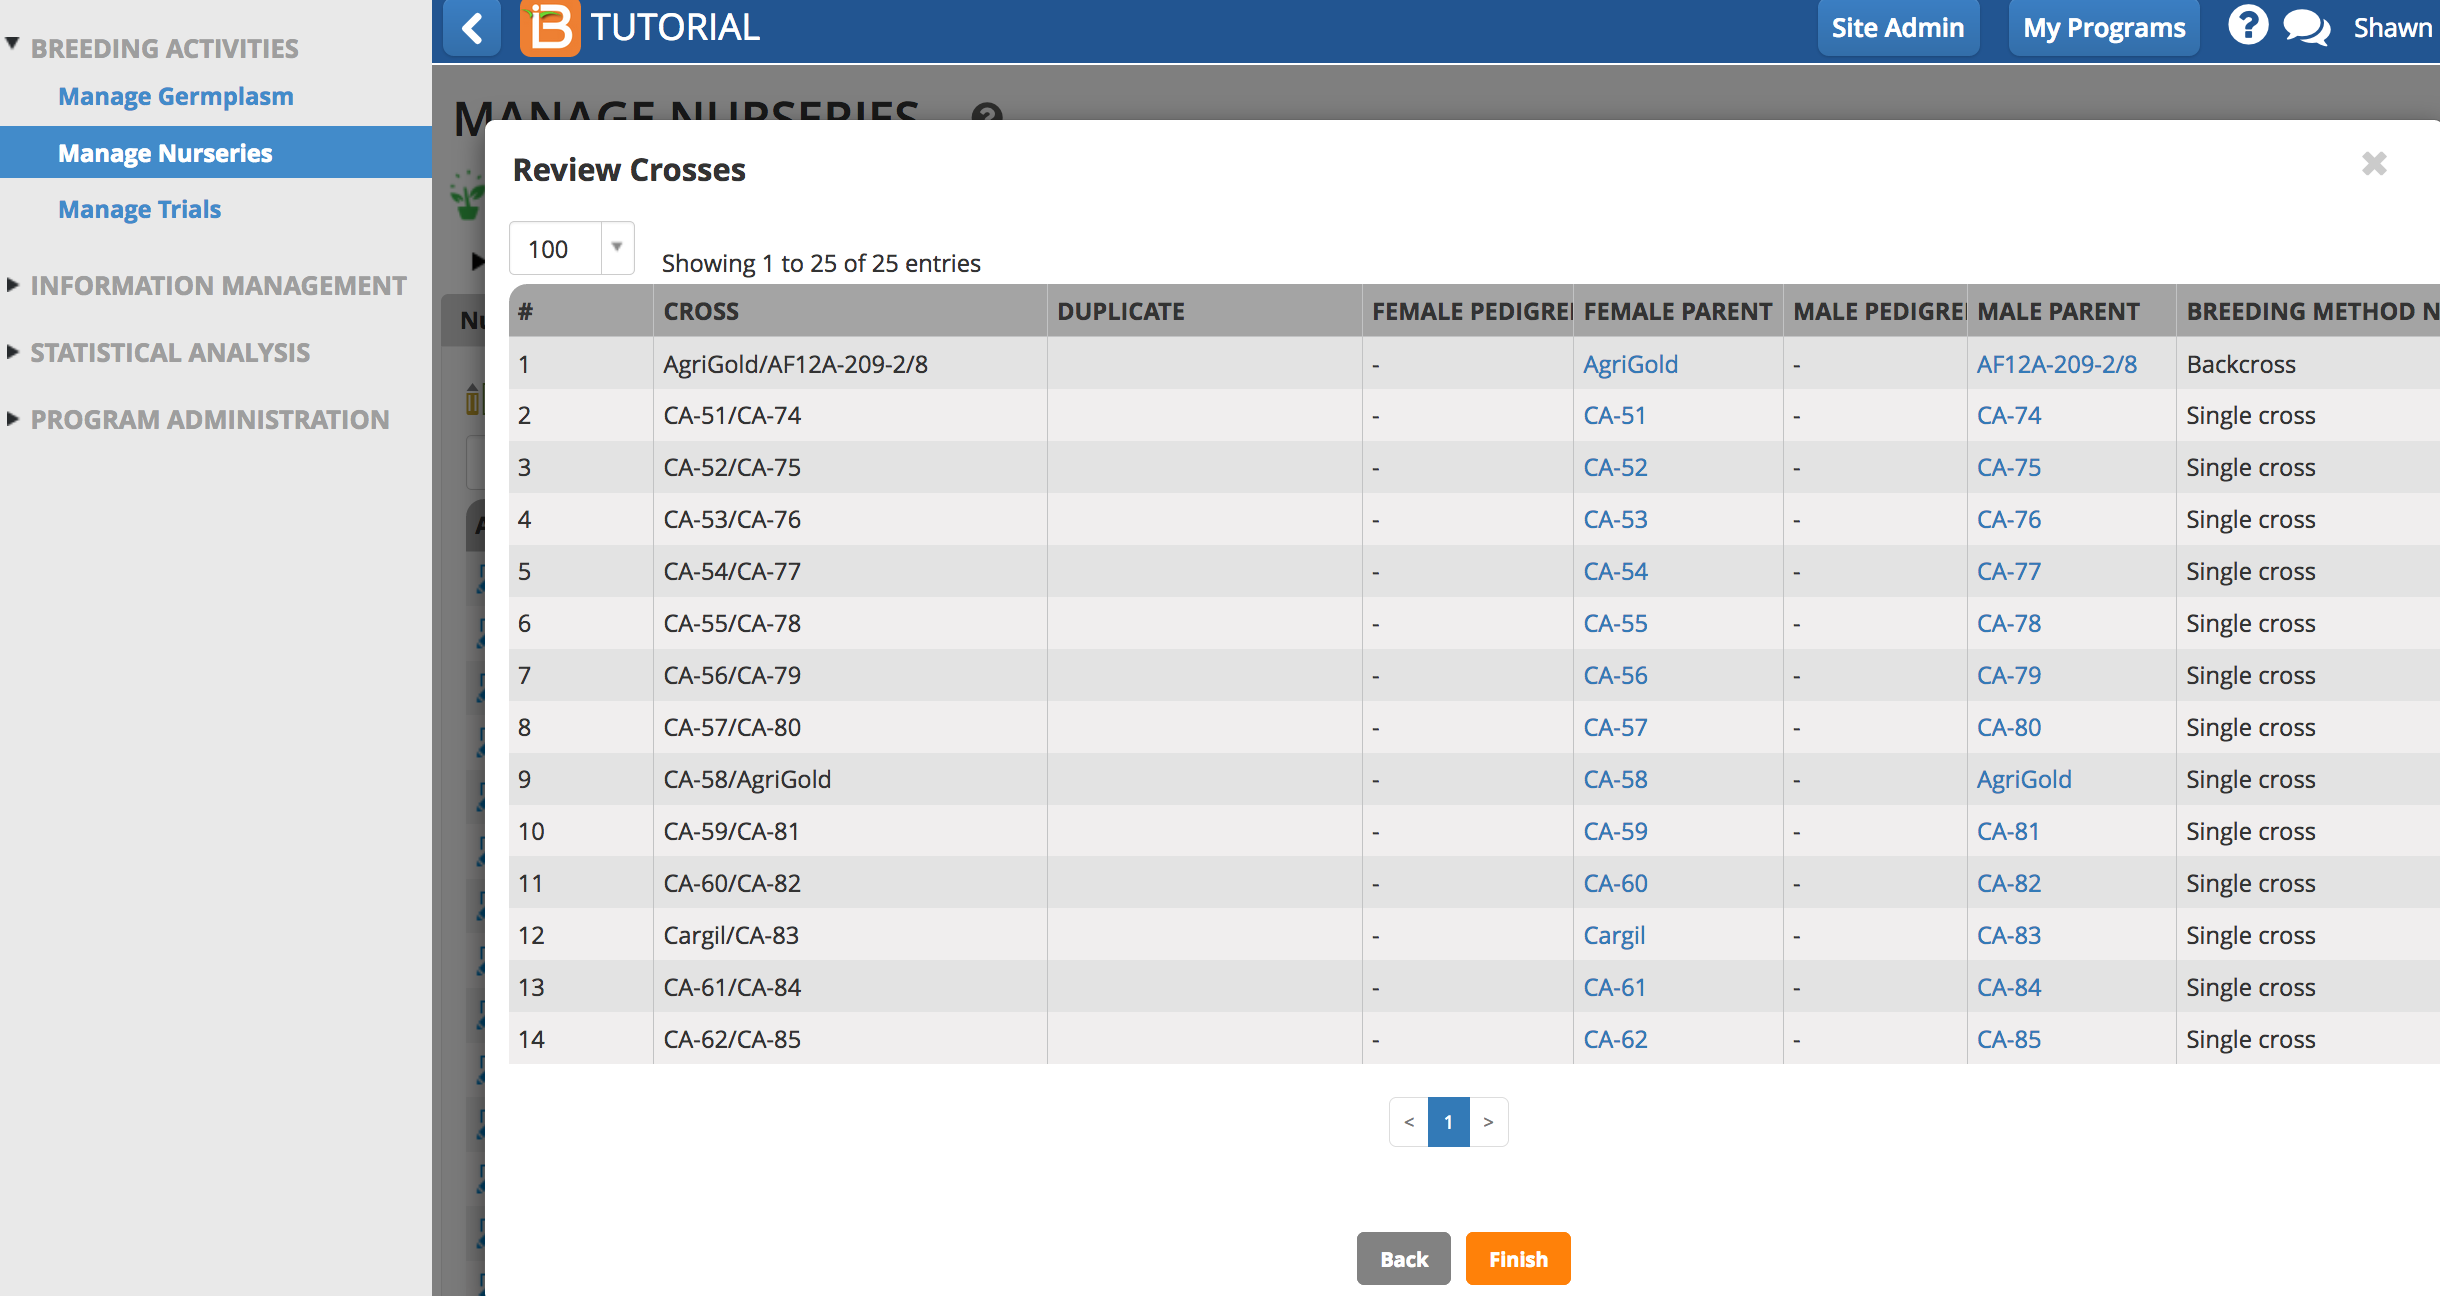
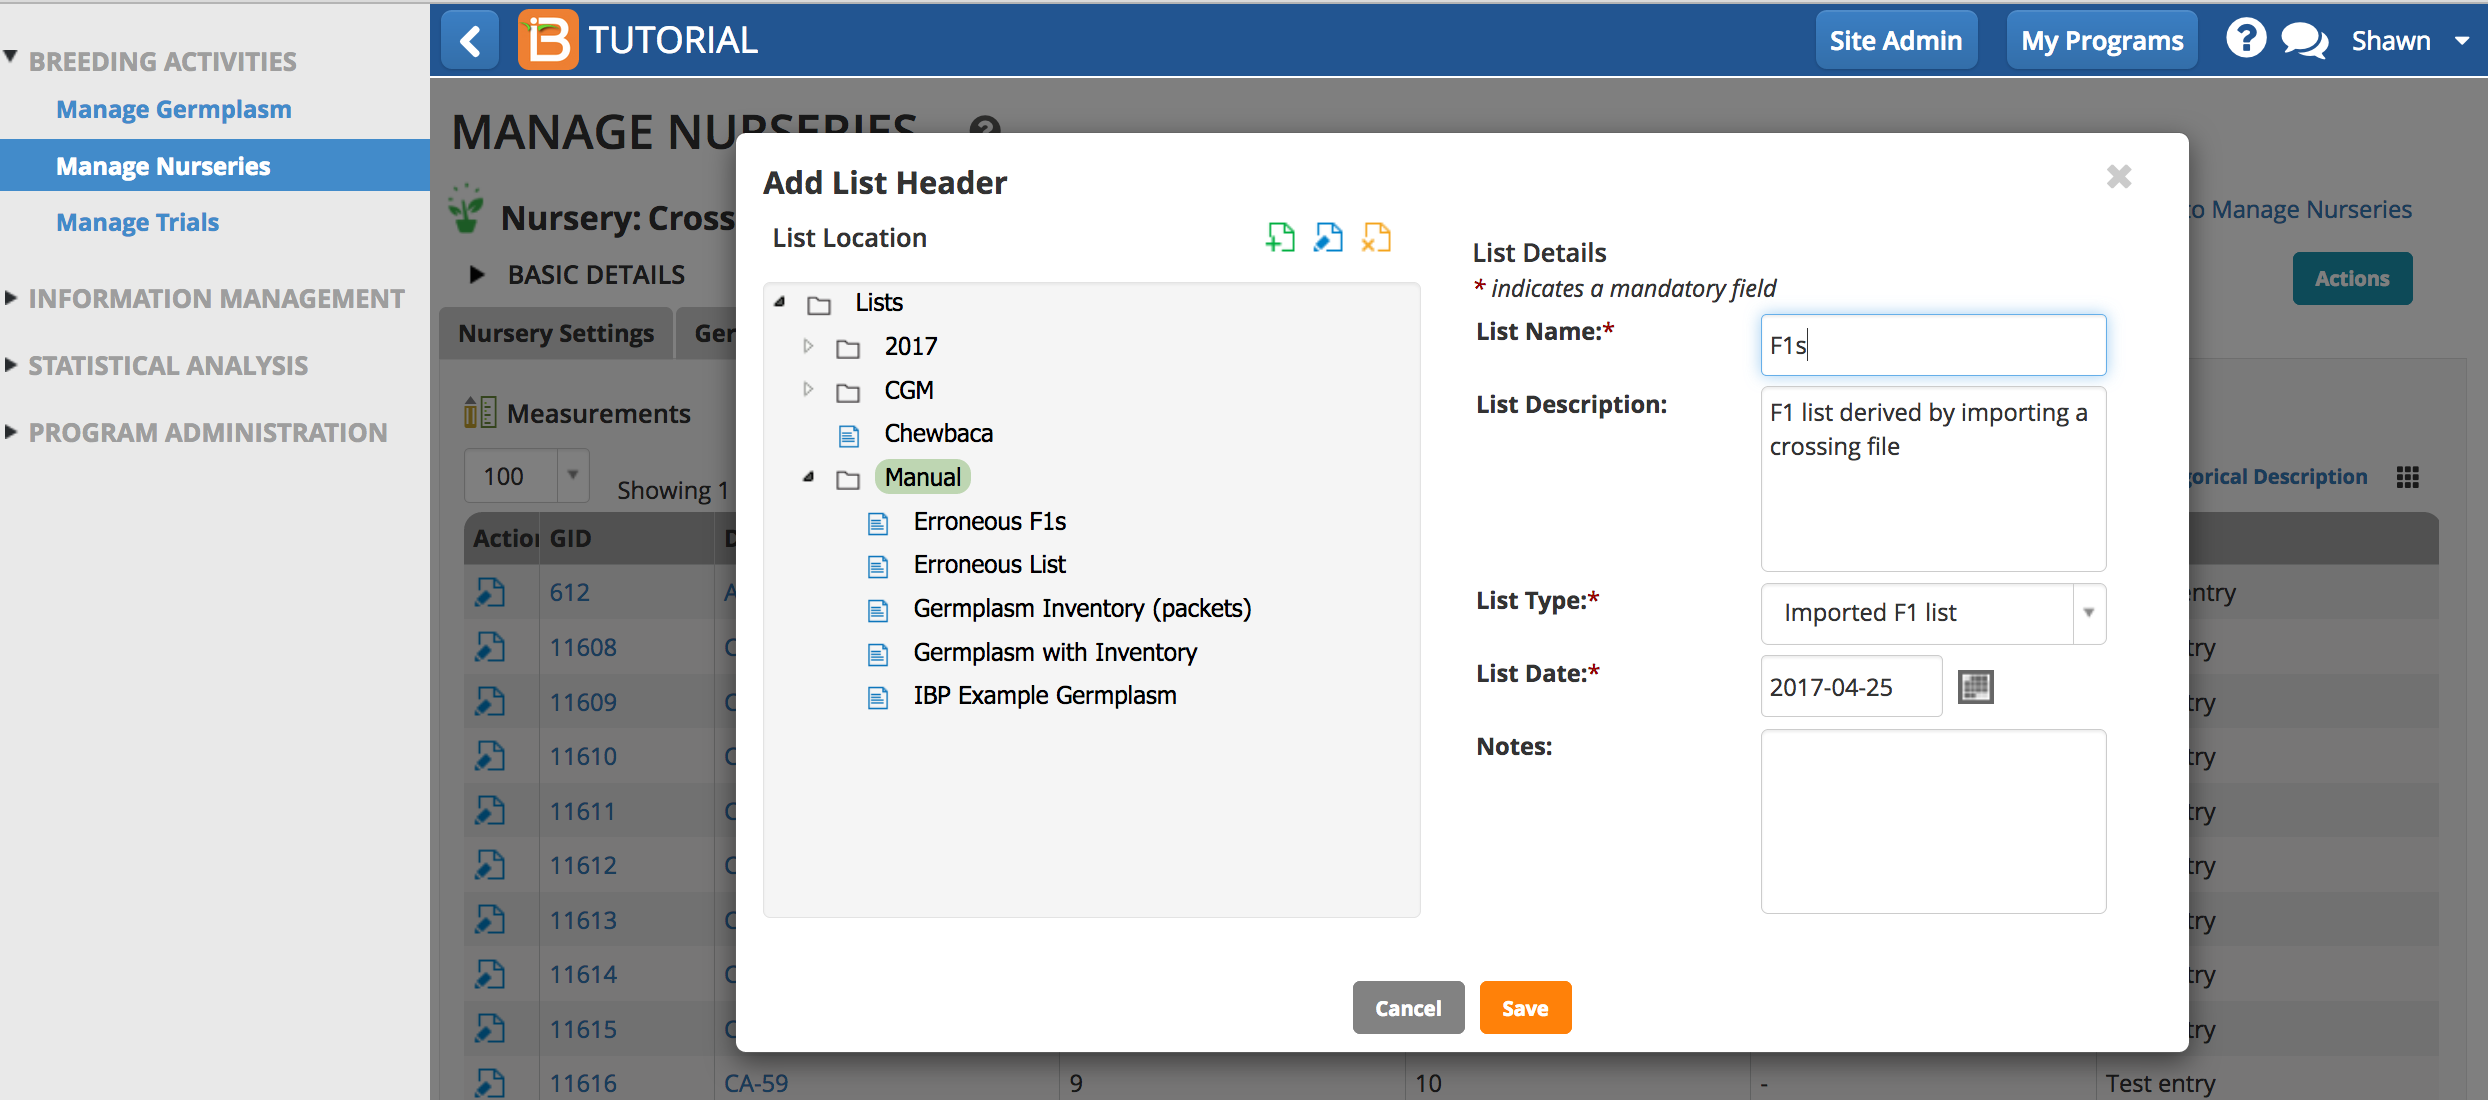
- Save the list.
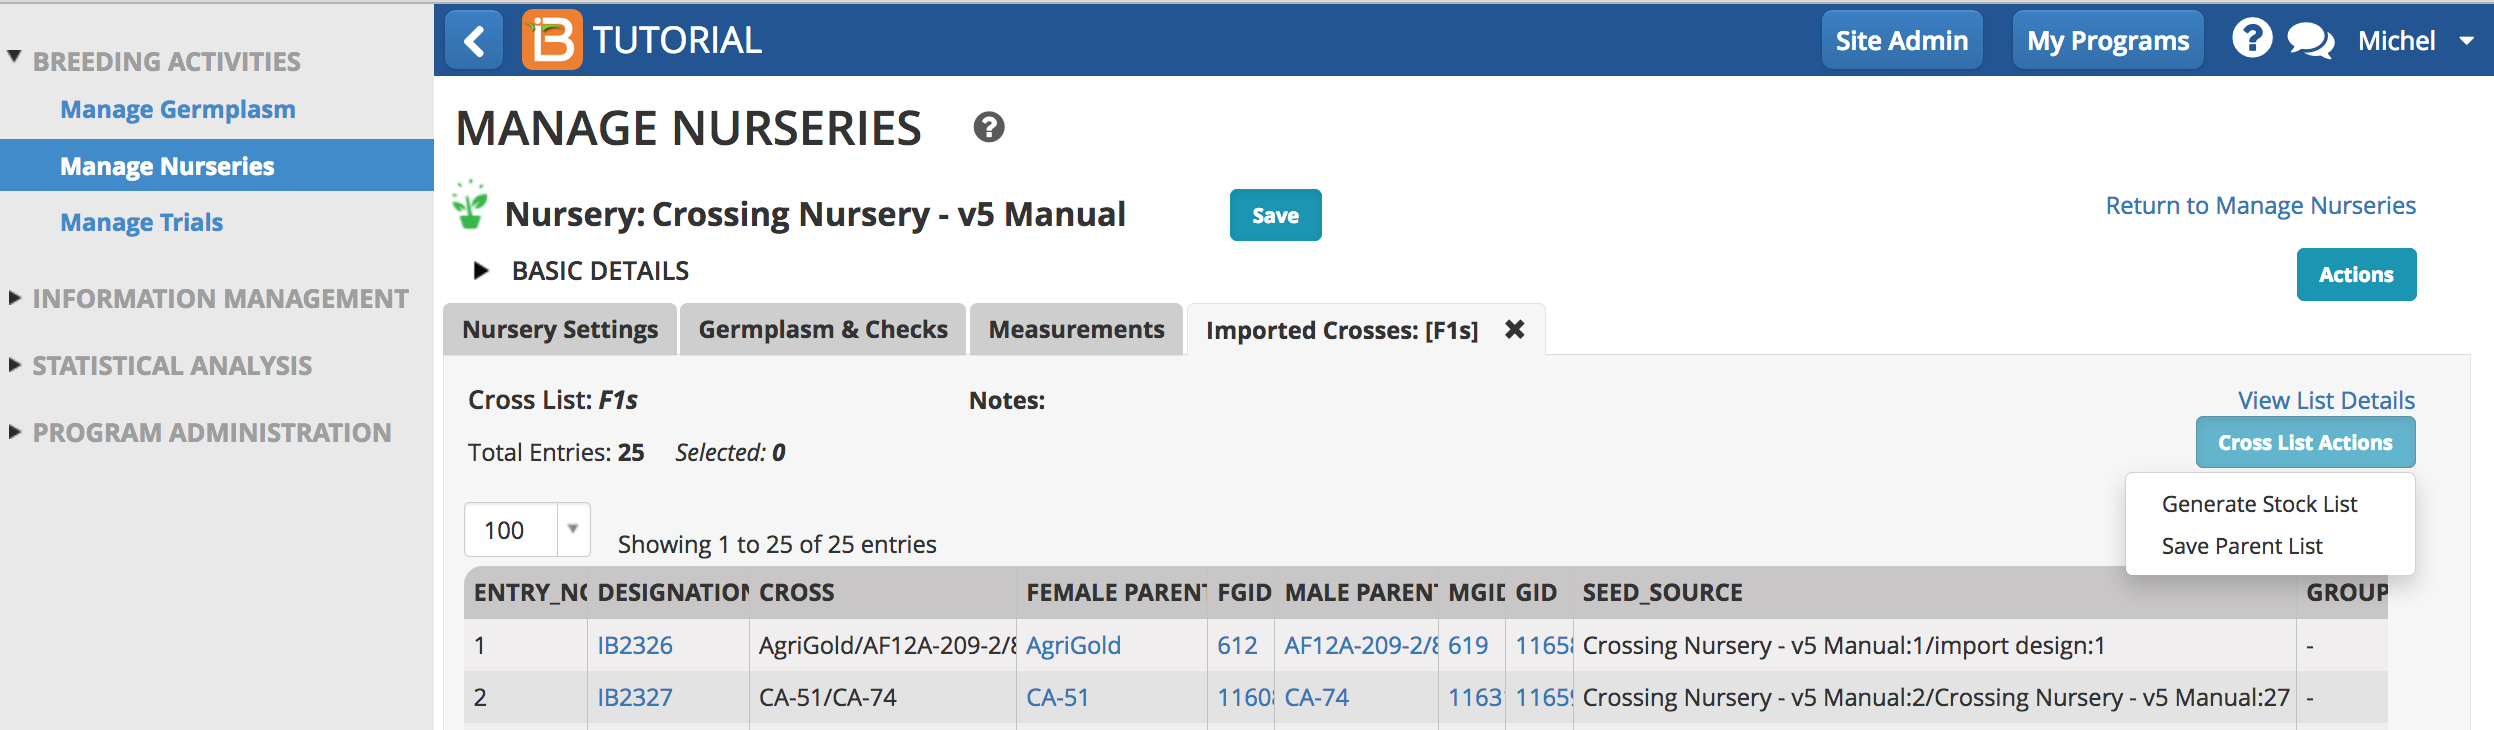
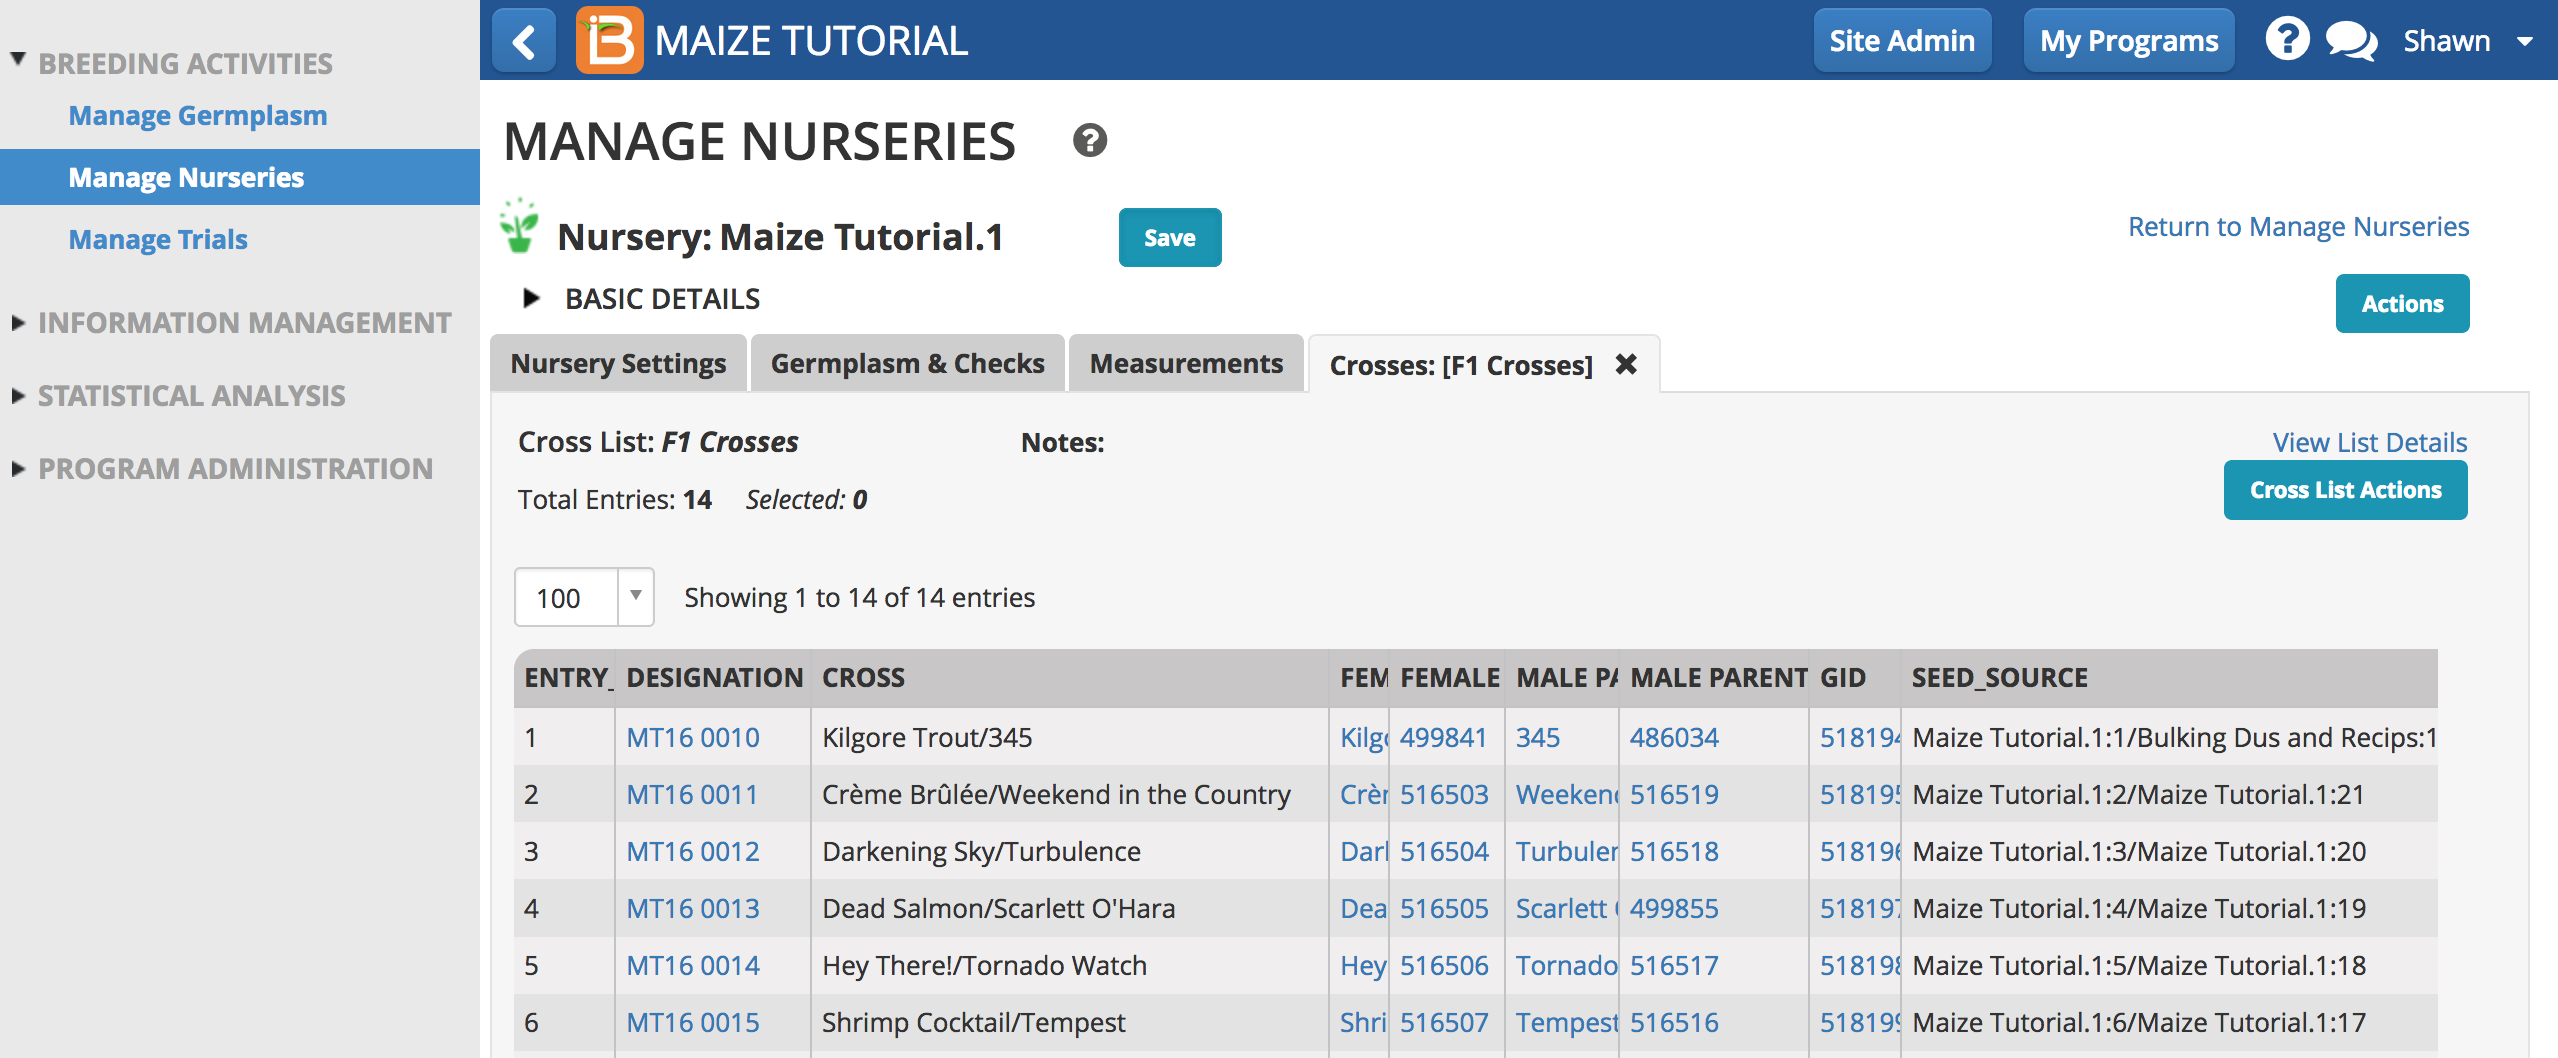
- The imported cross list is now available for review from within the nursery also from Manage Germplasm.
- Review imported crosses. Any crosses without breeding method specified in the import template will reveal a pending status.
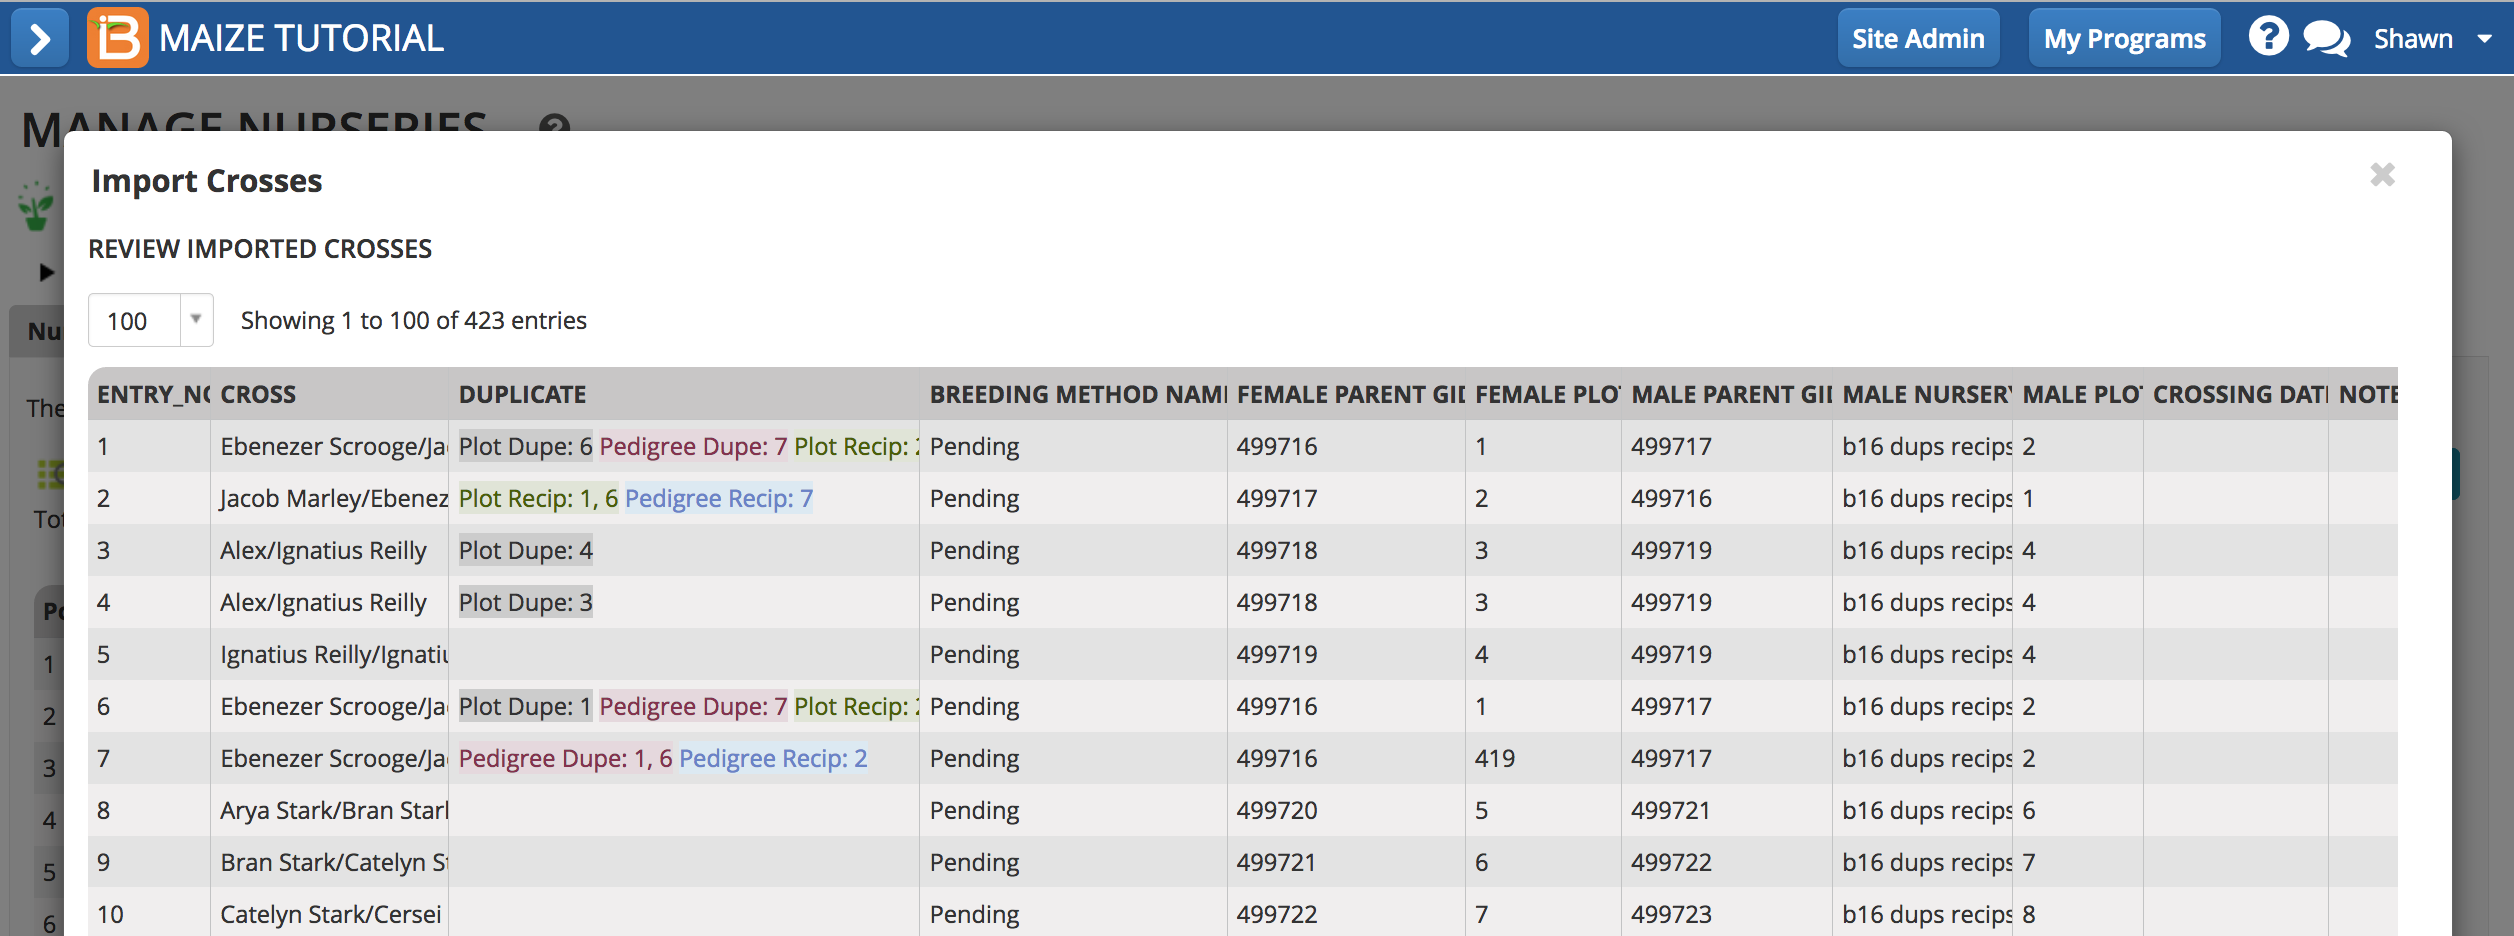
Duplicate & Reciprocal Cross Detection
The BMS detects duplicate and reciprocal crosses during cross design import.
- Plot duplicates: When a cross is preformed more than once between the same plots in a nursery
- Pedigree duplicates: When germplasm with a single GID is planted in multiple nursery plots and involved in duplicate crosses
- Plot reciprocals: When a reciprocal cross is preformed between the same plots in a nursery (example: plot1 X plot2 & plot2 x plot 1)
- Pedigree reciprocals: When a reciprocal cross is preformed between the same germplasm (example: GID1x GID2 & GID2 x GID1)
Design Crosses - BETA
The Design Crosses tool is under development (Beta). Expect improved/expanded functionality in future BMS versions.
- When nursery germplasm has been saved, the create new crosses option becomes active.

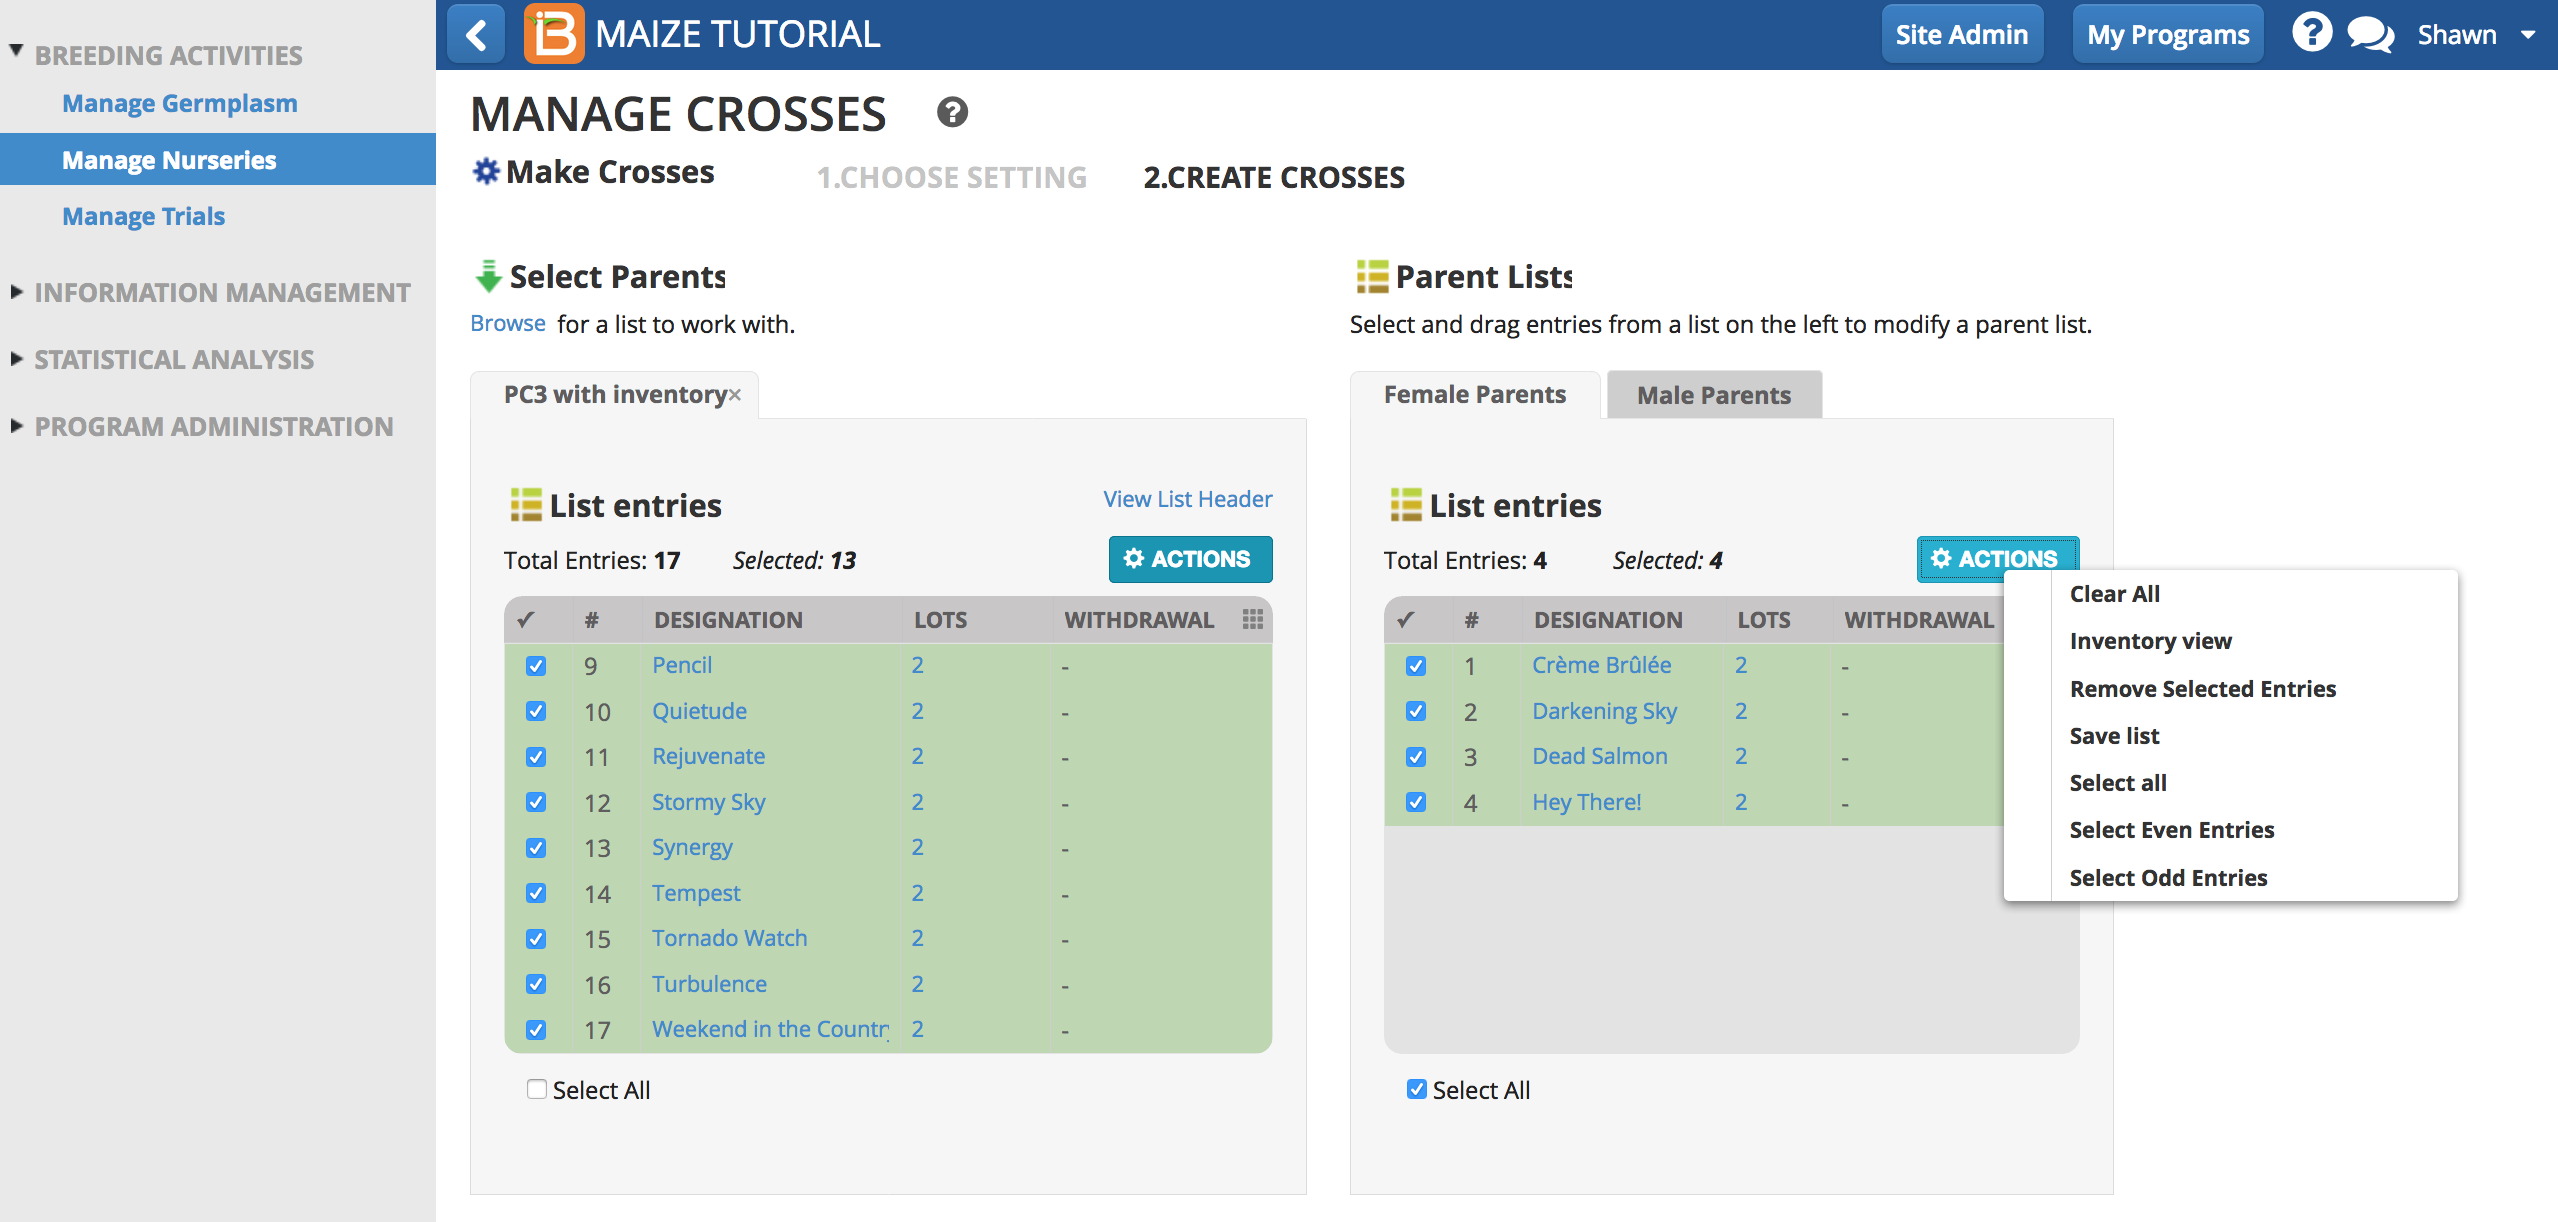
Specify Parents
- Browse for germplasm and select parents by dragging and dropping to the appropriate female and male parental lists. Manage and edit parental germplasm from the Actions menu.
Specify Crossing Methods
The Breeding Management System supports numerous mating schemes.
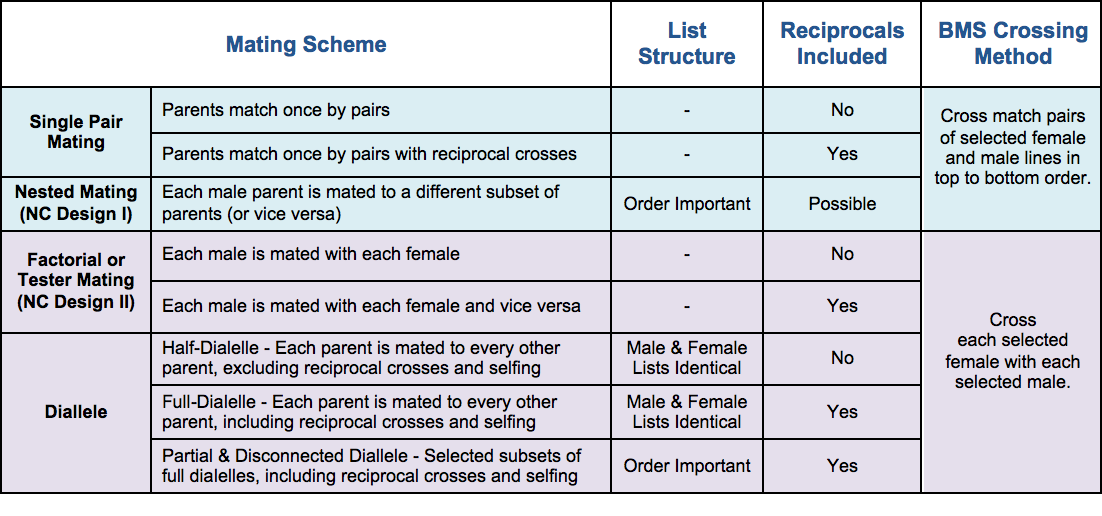 Mating Scheme definitions adapted from Fikrit Isik’s Plant Breeding Course Notes
- Choose a crossing method and whether to include reciprocal crosses or to exclude selfing from the crosses. Select Make Crosses. Save the crossing list and select return to nursery.

Advance Crosses
Advance a cross by applying a generative method. By default, the breeding methods unspecified in the cross template will be based on the status of their parental lines. Otherwise, the option to select a single method for all pending Breeding Methods is available.
Default Breeding Methods
- Single Cross: Both parents are inbred lines from different crosses.
- Double-Cross: Both parents are F1s with no parents in common.
- Triple-Cross: One parents is an single cross F1. The other parent is an inbred line and NOT a parent of the single cross F1.
- Backcross: One of the parent is an F1. The other parent is an inbred line and IS one of the parents of the F1 parent.
- Recessive Backcross: One parent is a F2, whose source is an F1. The other parents is an inbred line and IS a parent of the F1 source.

Automatic Name Generation
Automatic name generation is specified by the system administrator. See your system administrator for more details on your institution's rule-based naming conventions.
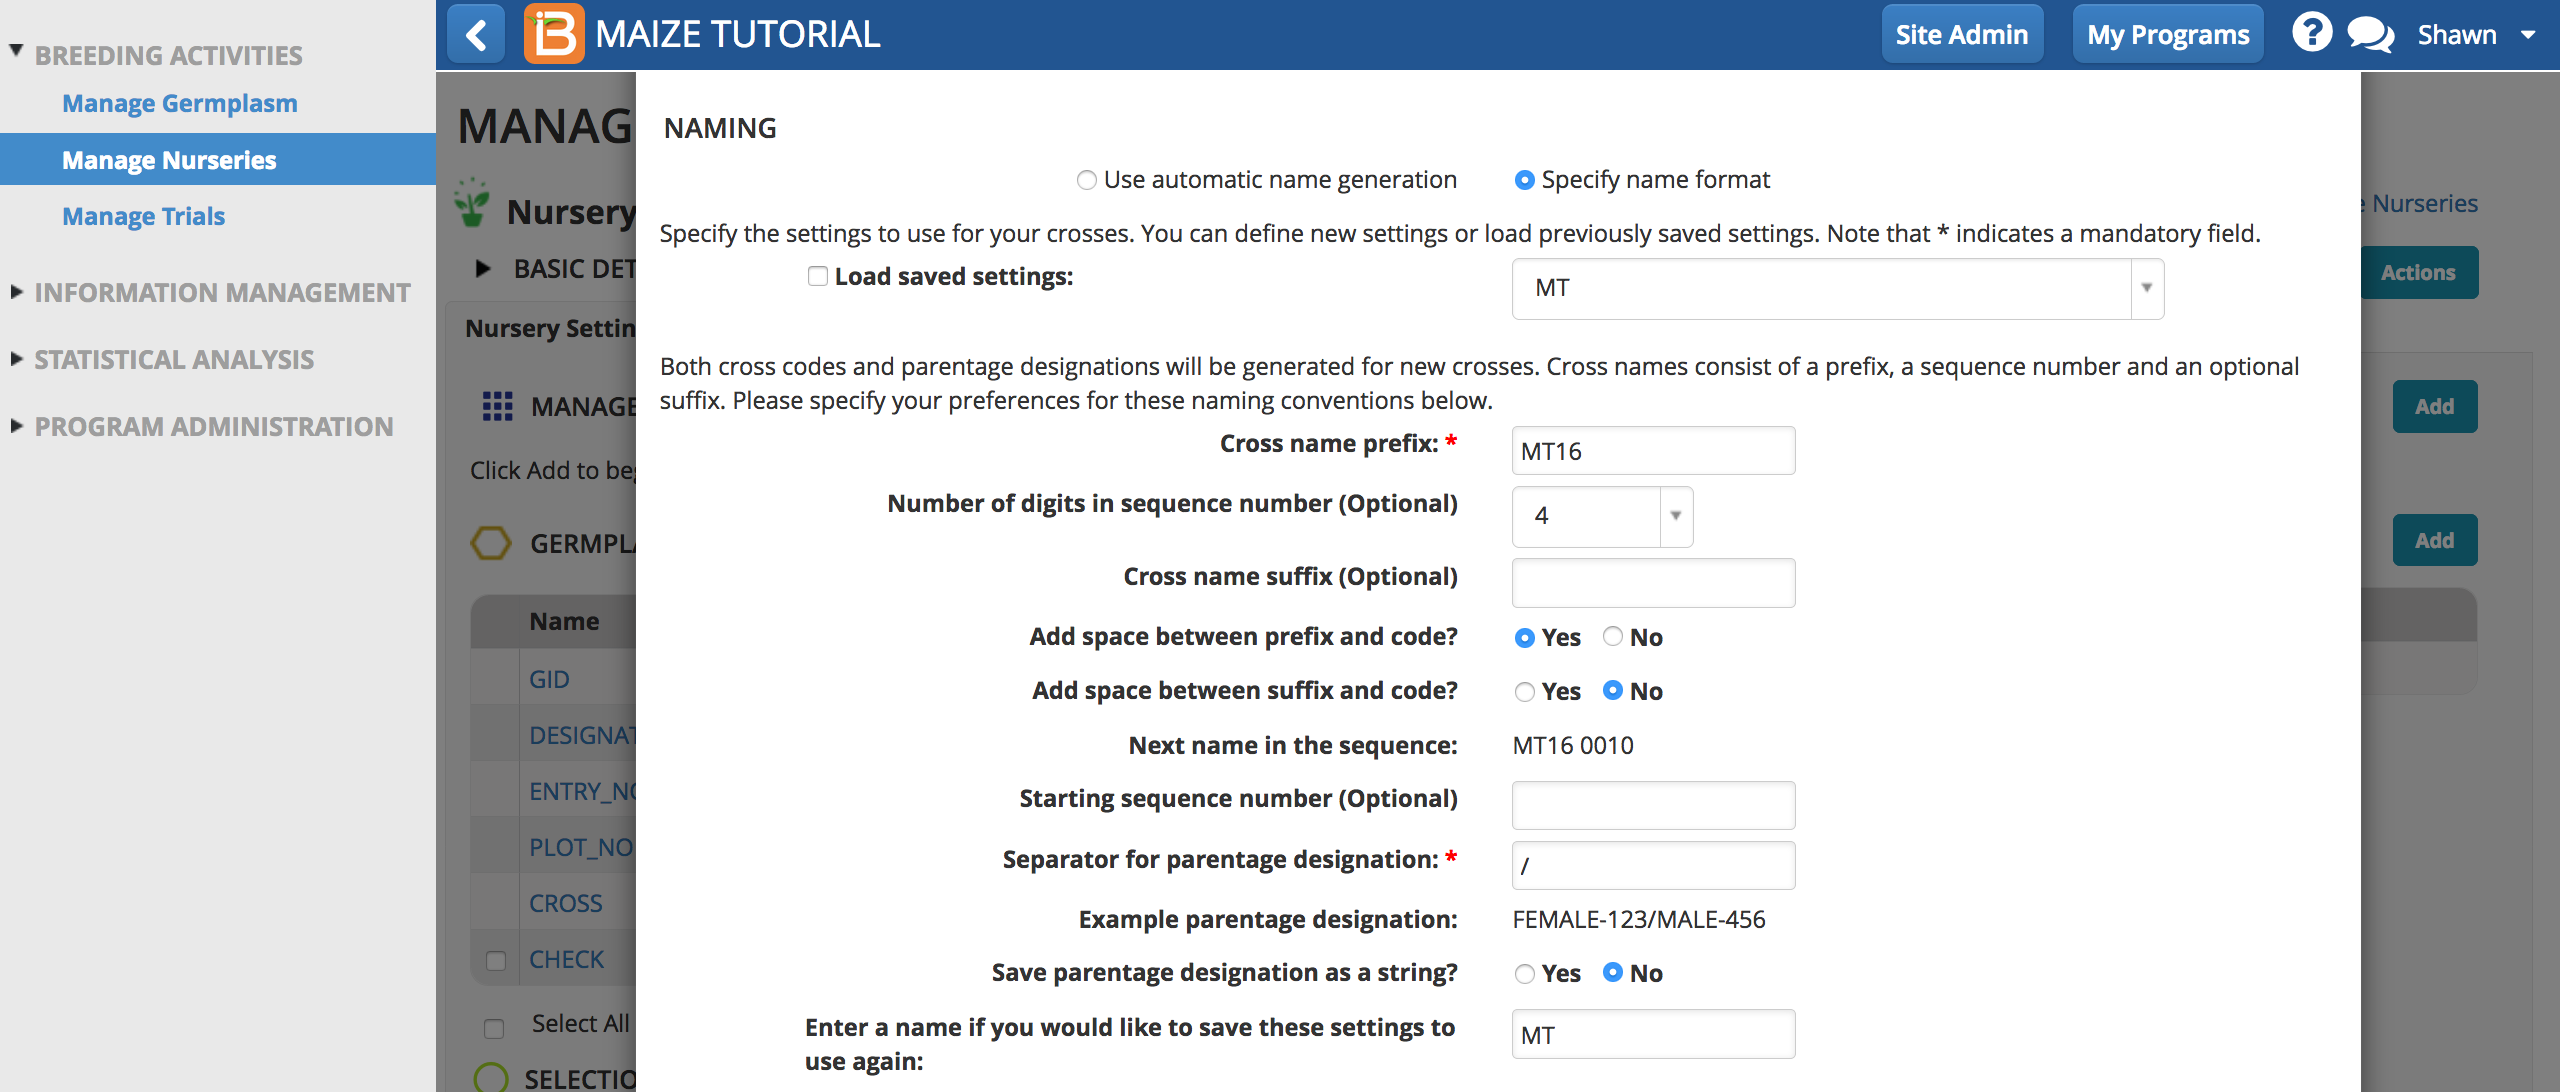
Specify Name Format
Specify name format is more flexible than automatic name generation and customizable within a breeding program. Depending on institutional management structure, you may use one option in favor of the other.
- Name formats can be saved for later use or editing.
Harvest Details
Specify expected harvest date and harvest location and select Next.

Save Crosses
Save crosses to create a new germplasm list.
The cross list can now be viewed in the associated nursery. Harvest labels and stock inventory updates can also be made.
Selection & Measurements
Advance selected nursery germplasm with the application of maintenance and derivative breeding methods.
Selection Details
- Specify selection unit in Nursery Settings and Save nursery. Also select BM_CODE_VTE if more than one breeding method is desired. If nursery germplasm has also been specified and saved, the Measurements table is updated with the selection criteria.
There are two ways to add selection unit and nursery observations to the measurements table. (1) Direct editing in the user interface and (2) export of the nursery book file for externally data entry, such a hand held tablet.
Edit Selections & Nursery Observations in User Interface
- Select the pen and pad icon in the actions column to edit the desired entry. Fill the desired data and select Update.
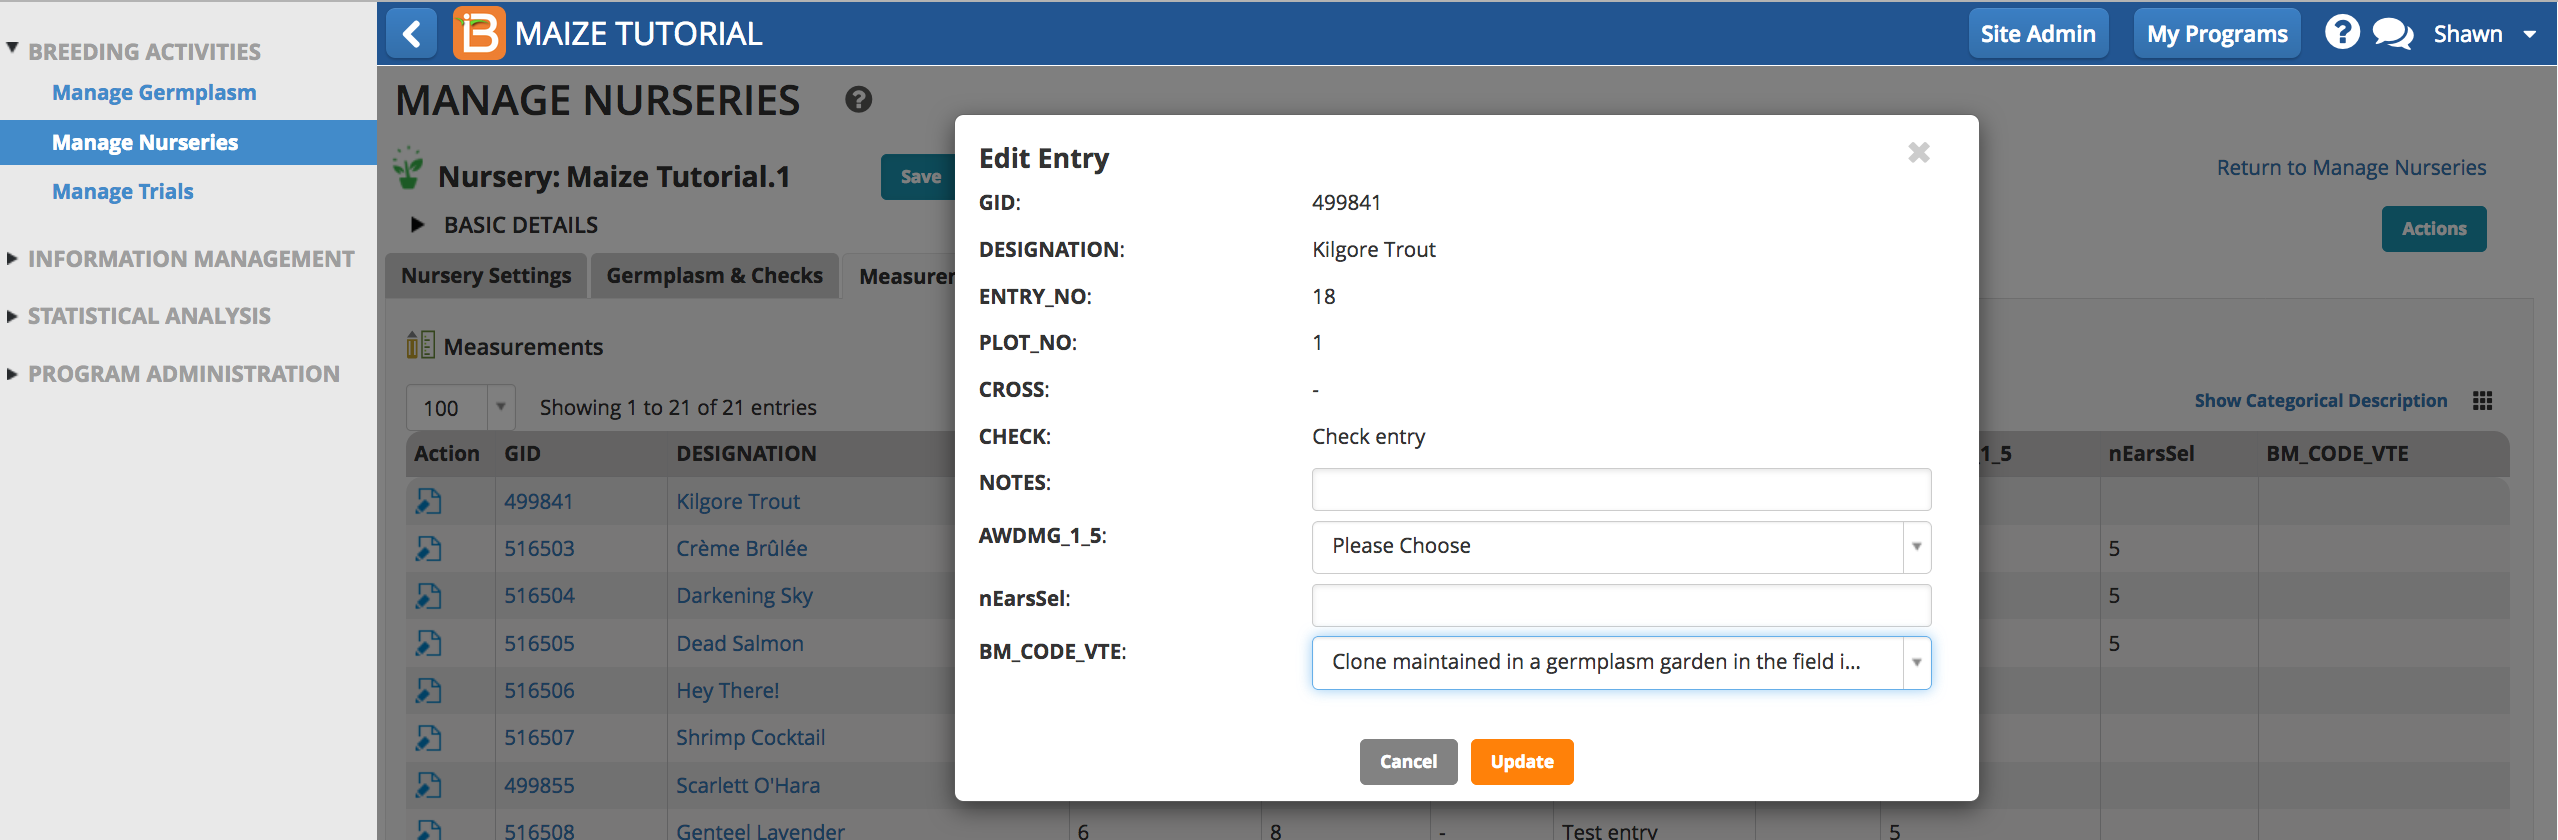
- The data is now in the Measurements table. Save nursery.
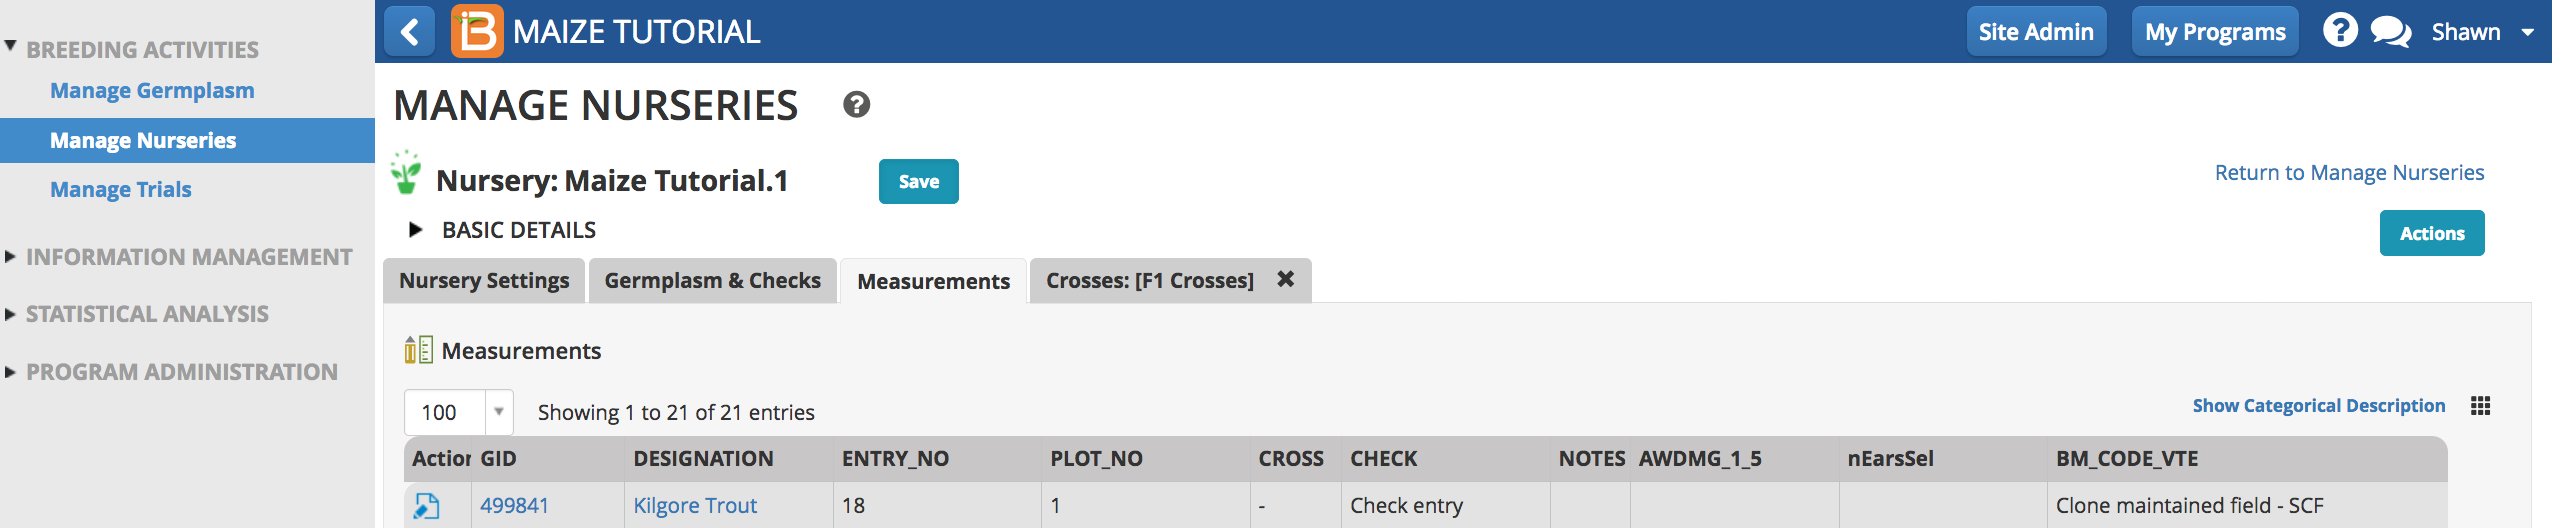
Edit Selections & Nursery Observations in Nursery Book File
Export a nursery book file for external editing.
- Select Export Nursery from the Actions menu.
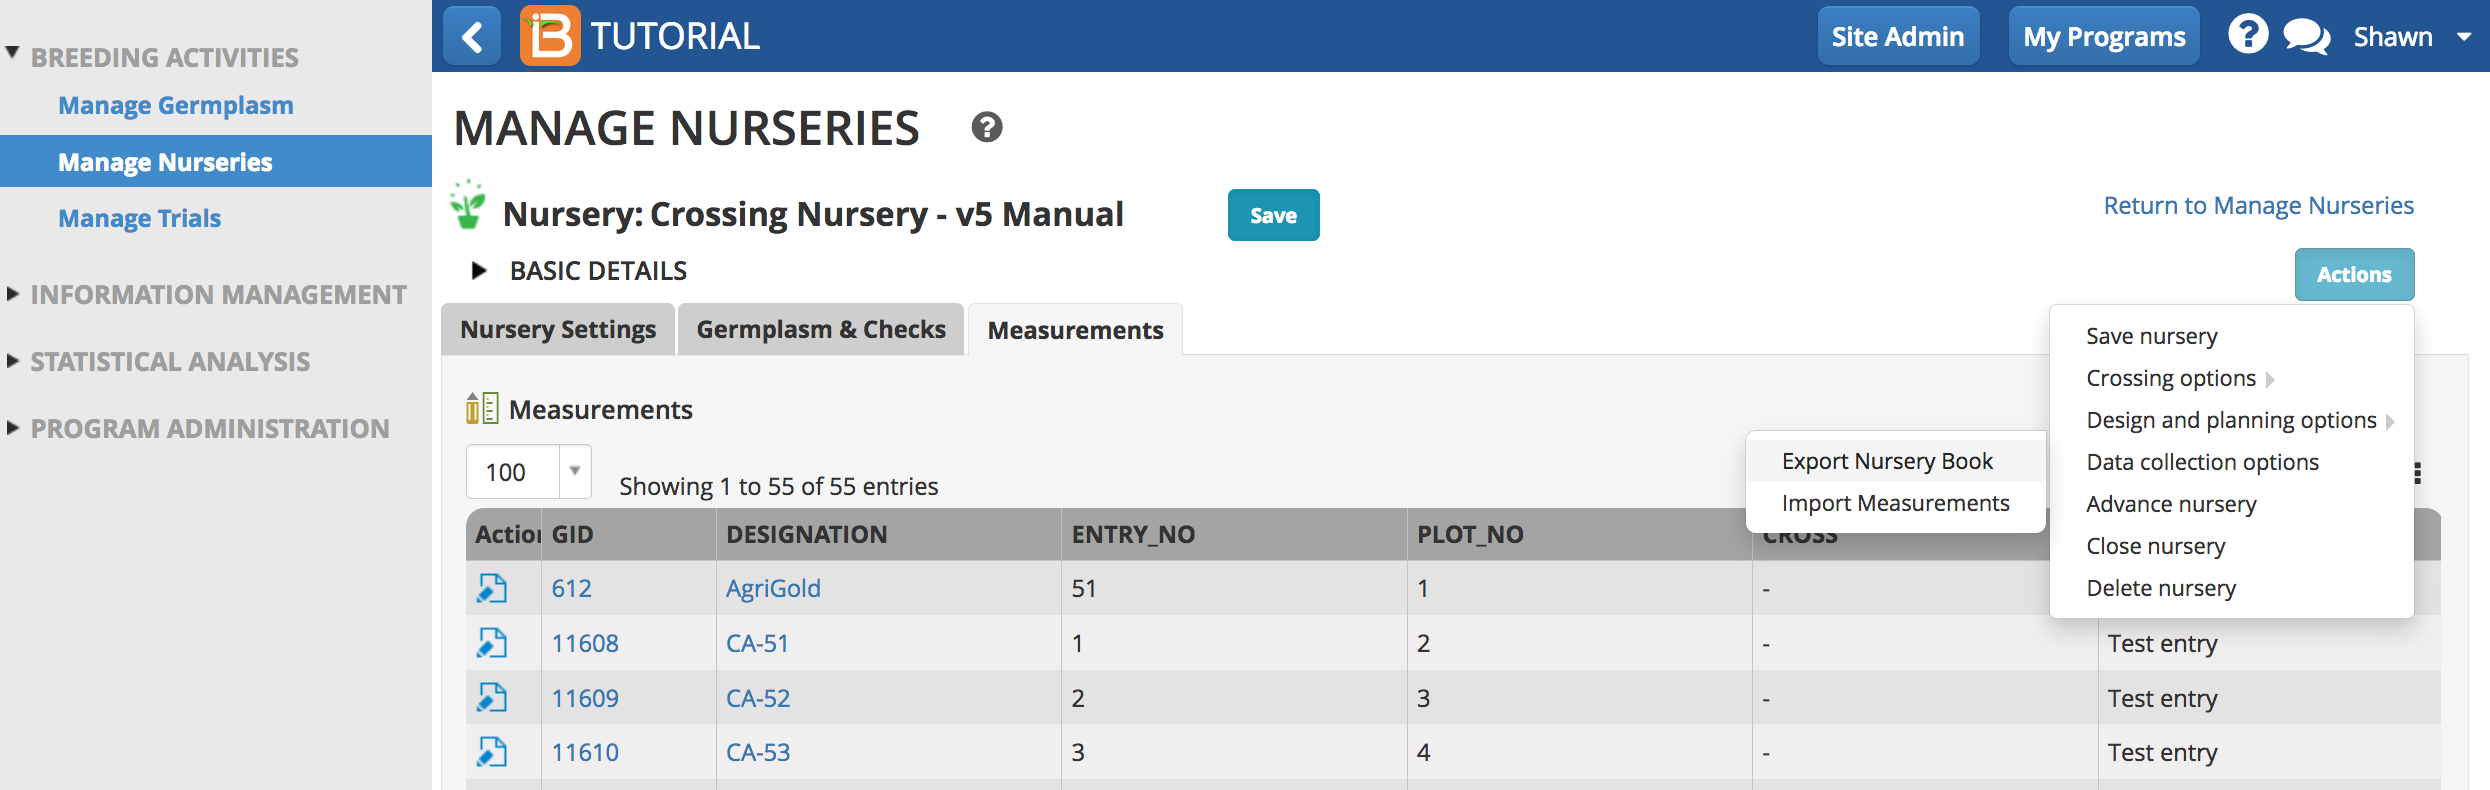
- Choose export format and data collection order from the dropdown menus. Serpentine data collection is only be available after field mapping.
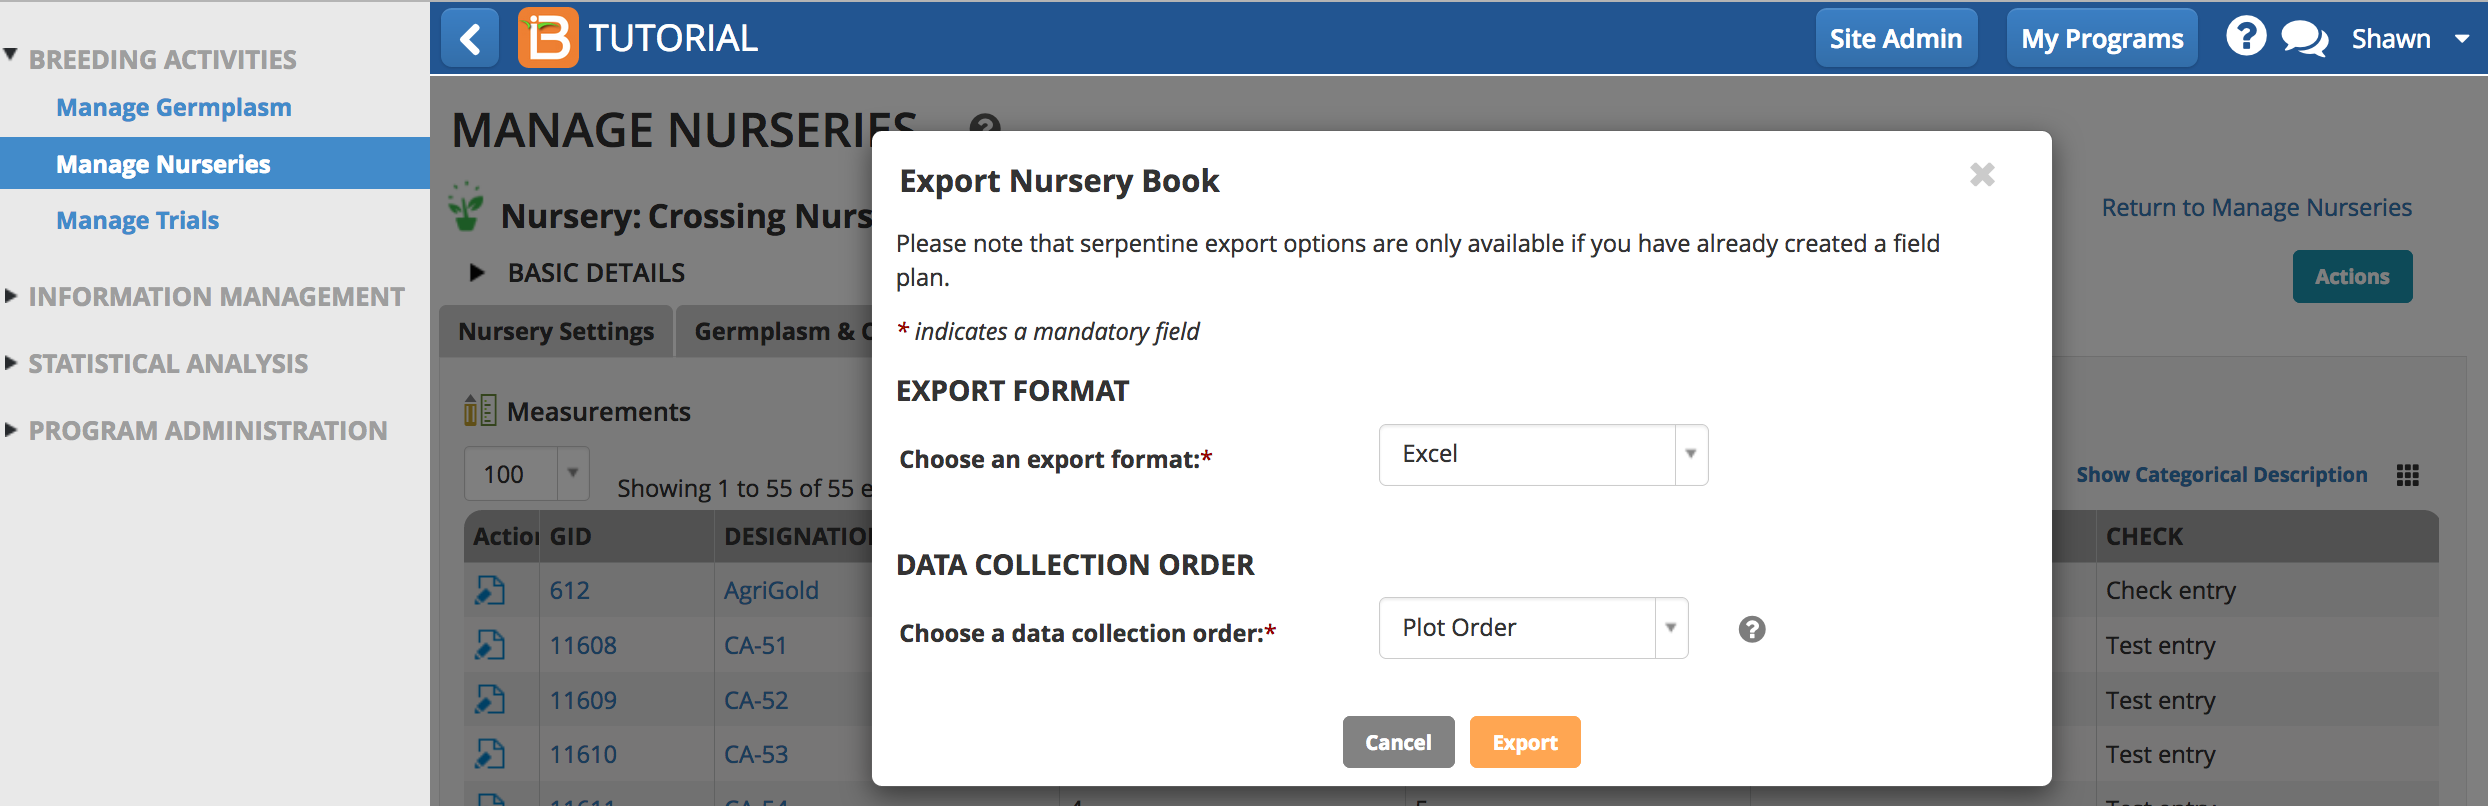
Export Formats
- CSV
- Excel
- Data Kapture
- Fieldlog/Fieldriod
- KSU Fieldbook CSV
- KSU Fieldbook Excel
- R
Data Collection Orders
- Row/Column
- Serpentine – Along Rows
- Serpentine – Along Columns
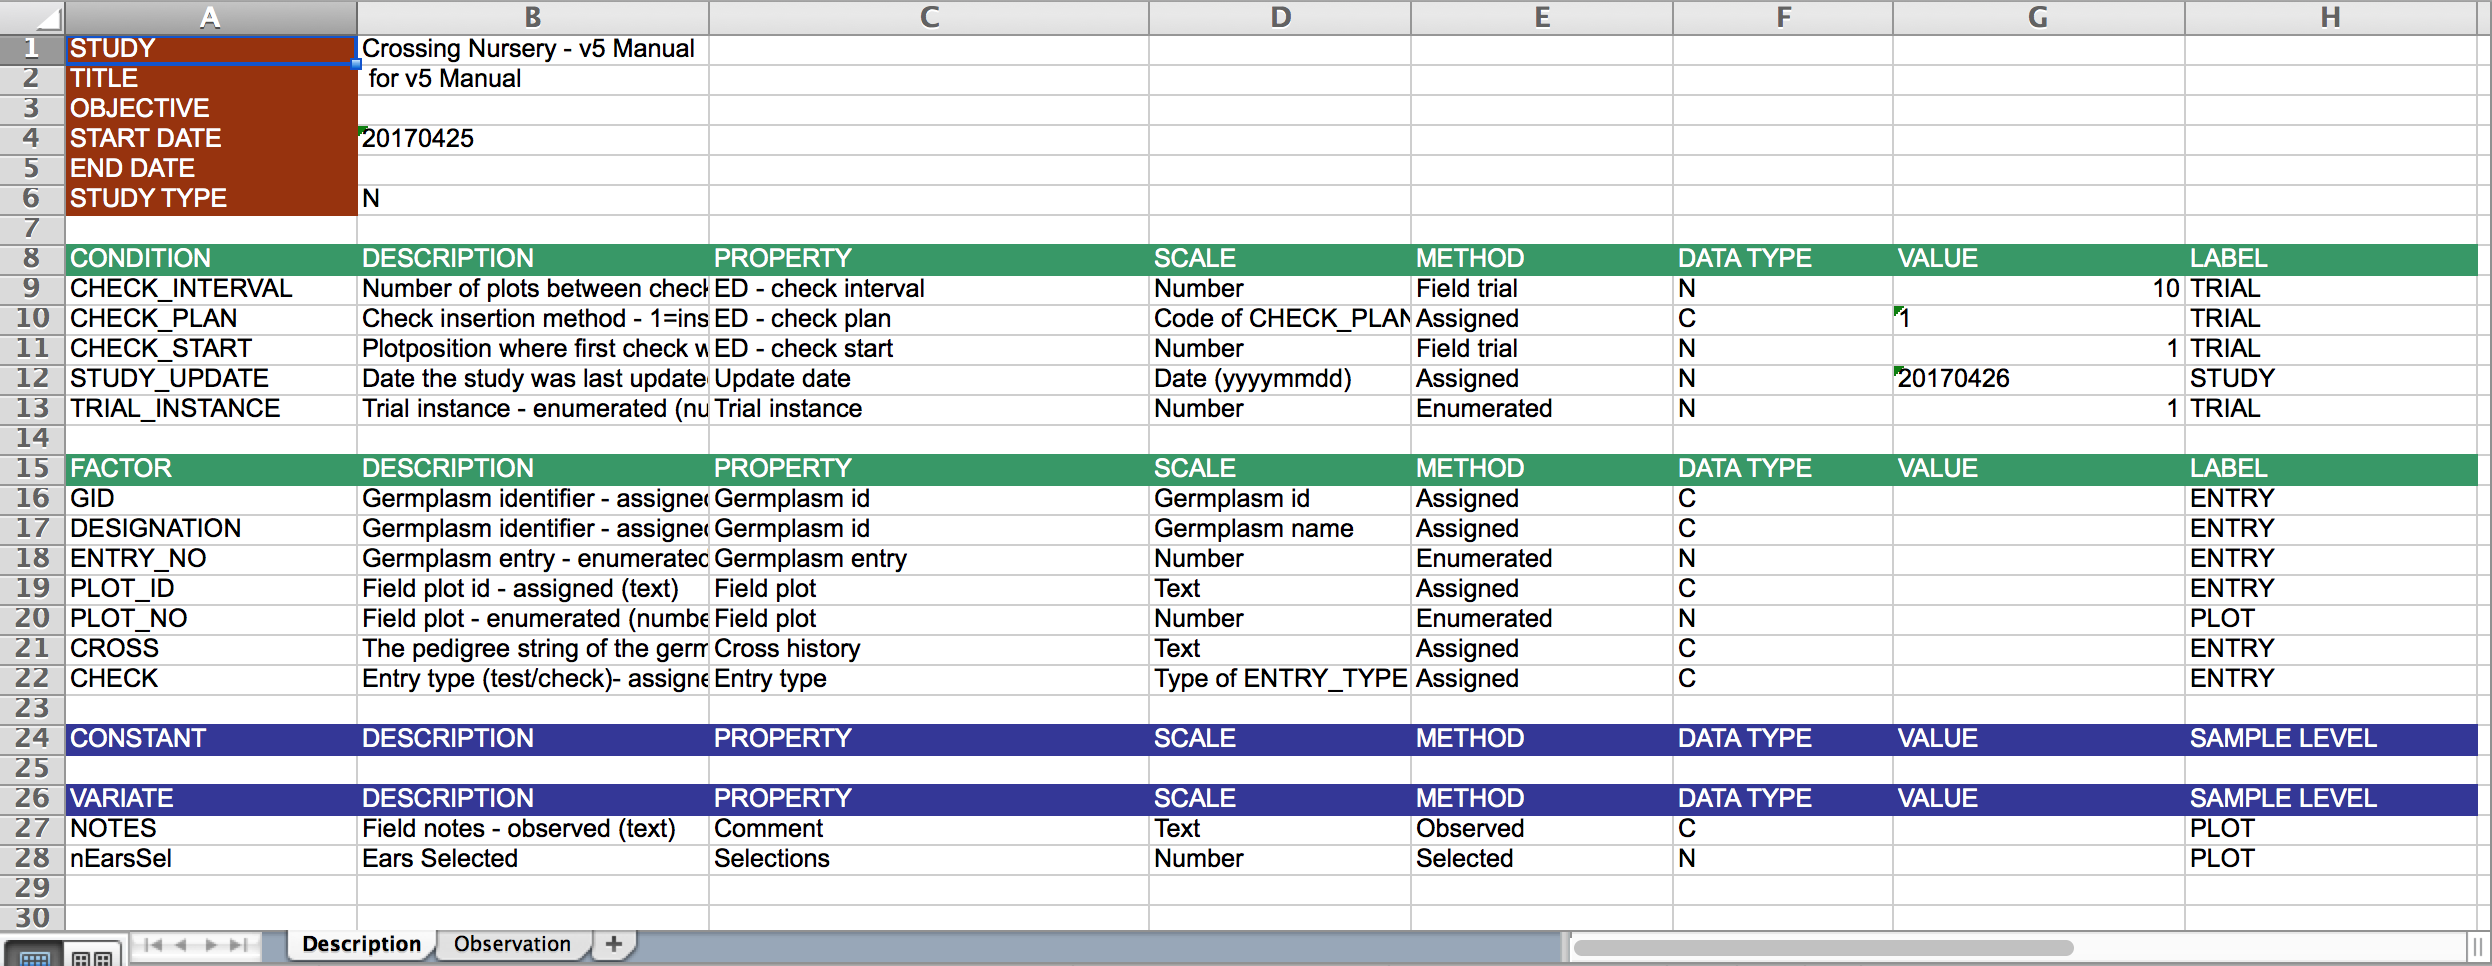
Description Sheet
The description sheet describes the nursery metadata. Unless additional customization is needed, there is no need to edit the description sheet.
Observation Sheet
The observation sheet contain empty columns of data for data entry (blue headers). Once observations and selections have been added and saved the file can be imported into the BMS.
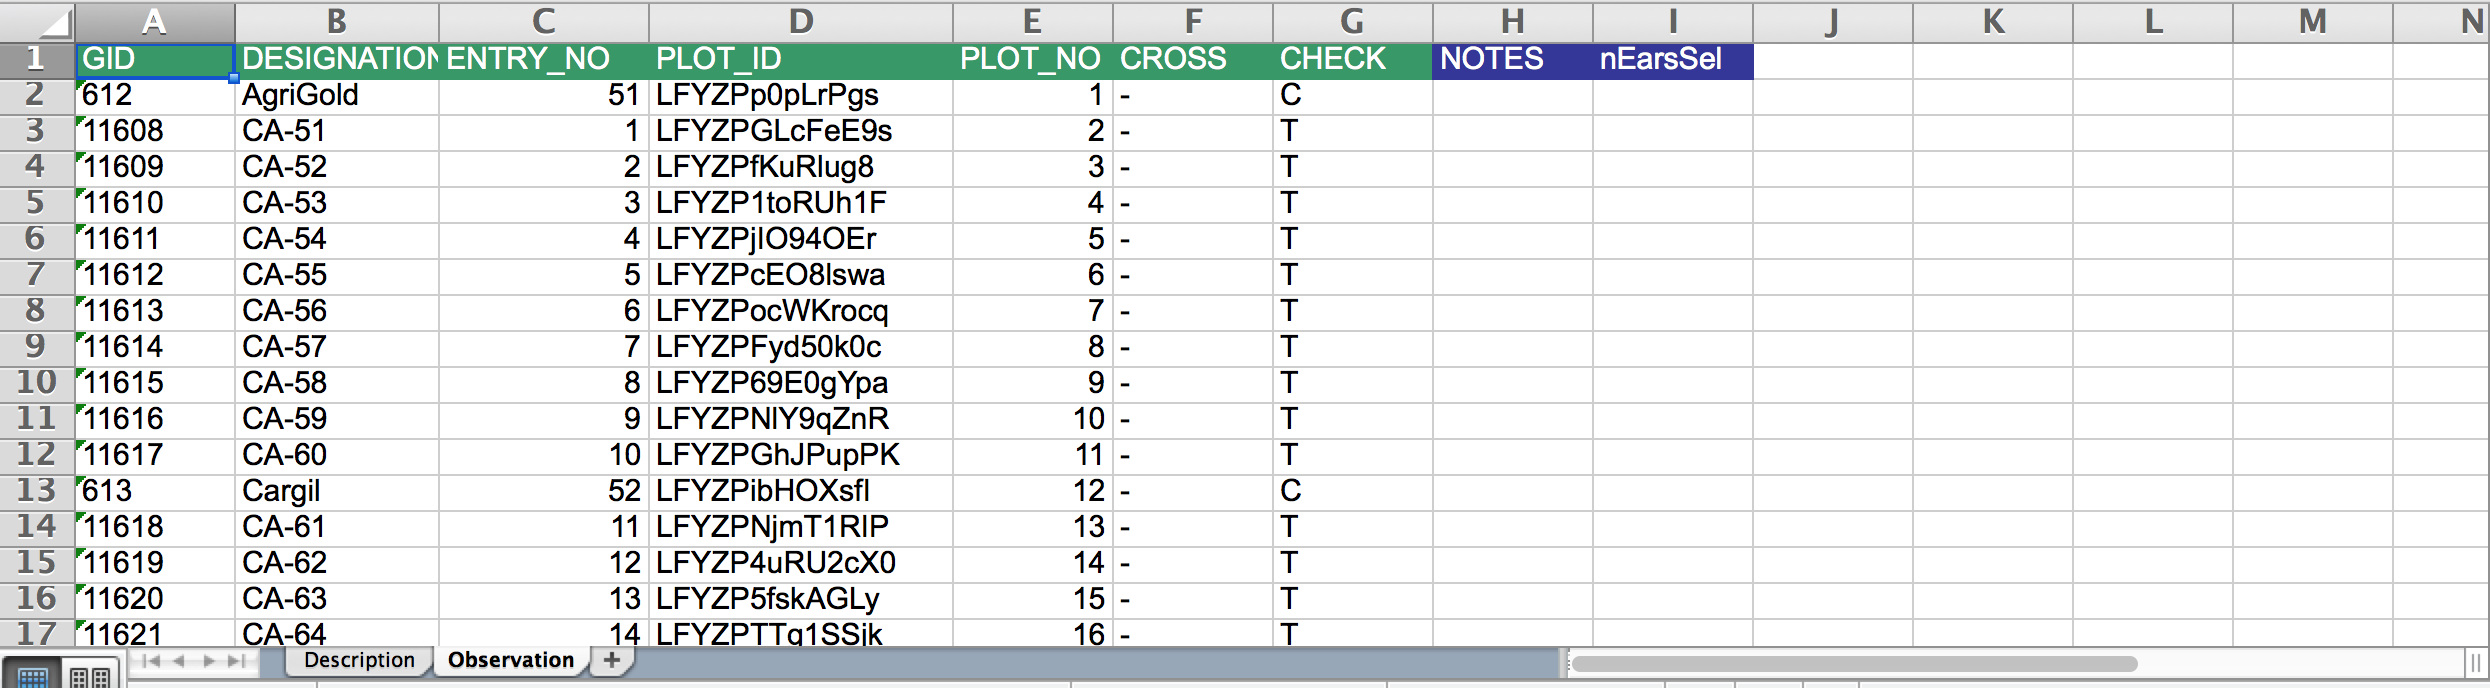
Notice the PLOT_ID column. These are non-human readable identifiers that the system uses to match plot data to the appropriate nursery.
Import Measurements & Selection Amounts
Measurements and selection amounts are matched the nursery by the unique plot identifier, PLOT_ID.
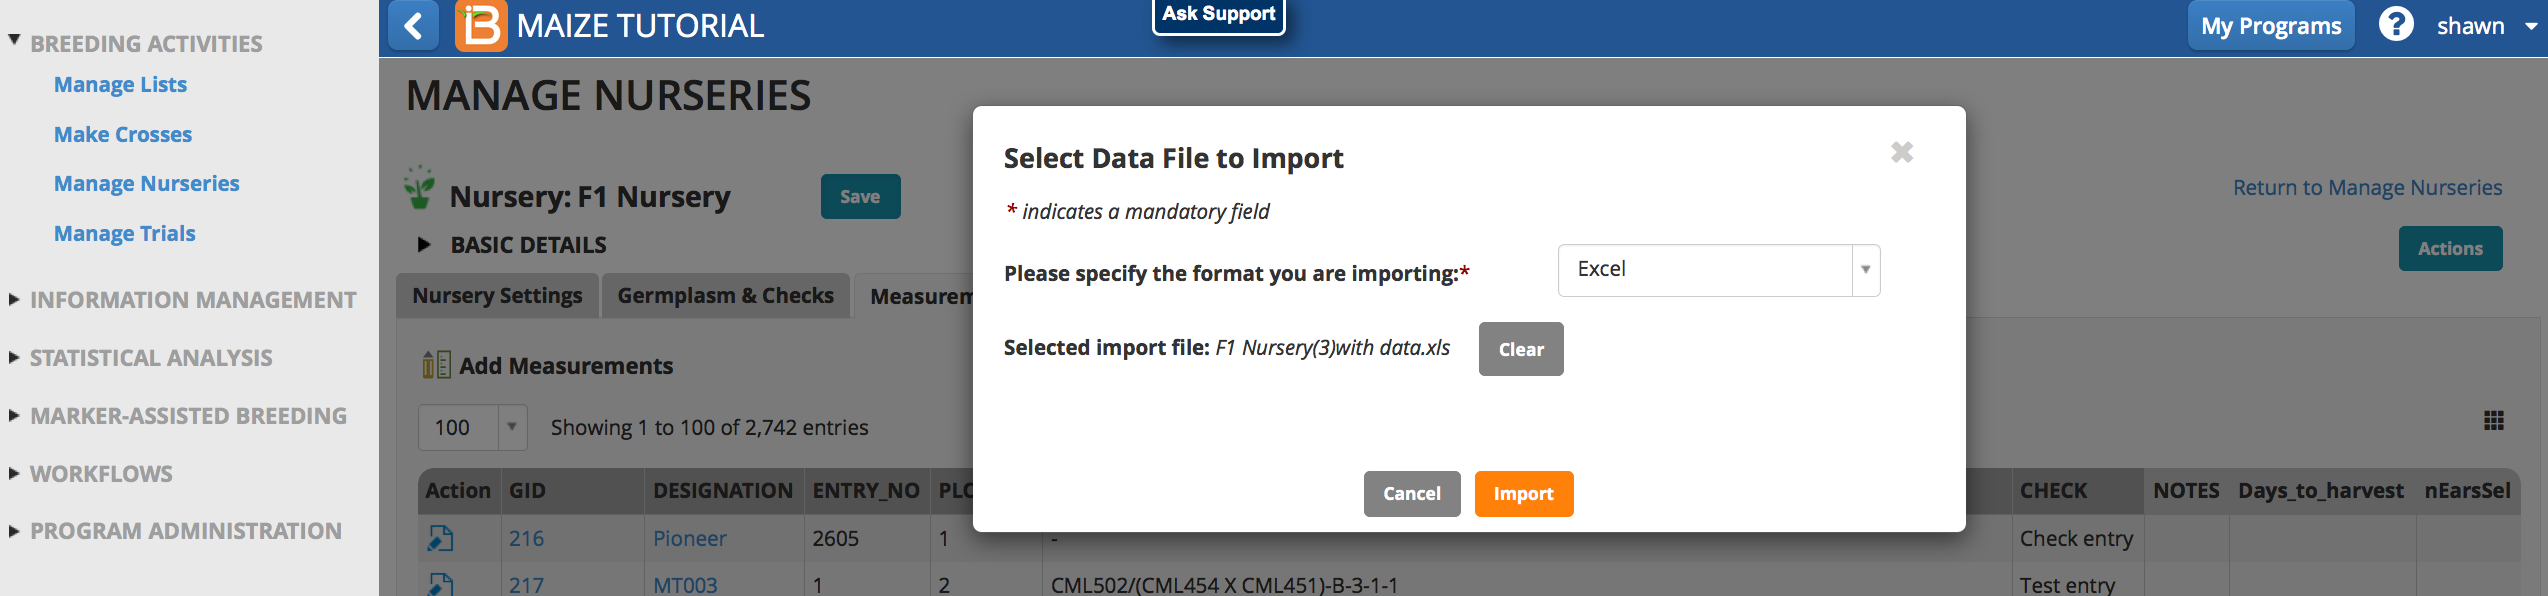
- Select Import measurements from the Actions menu. Browse to the data file and Open. Select Import.
- Measurements and selection data populates BMS measurements table. Select Save to upload the data to the BMS database.
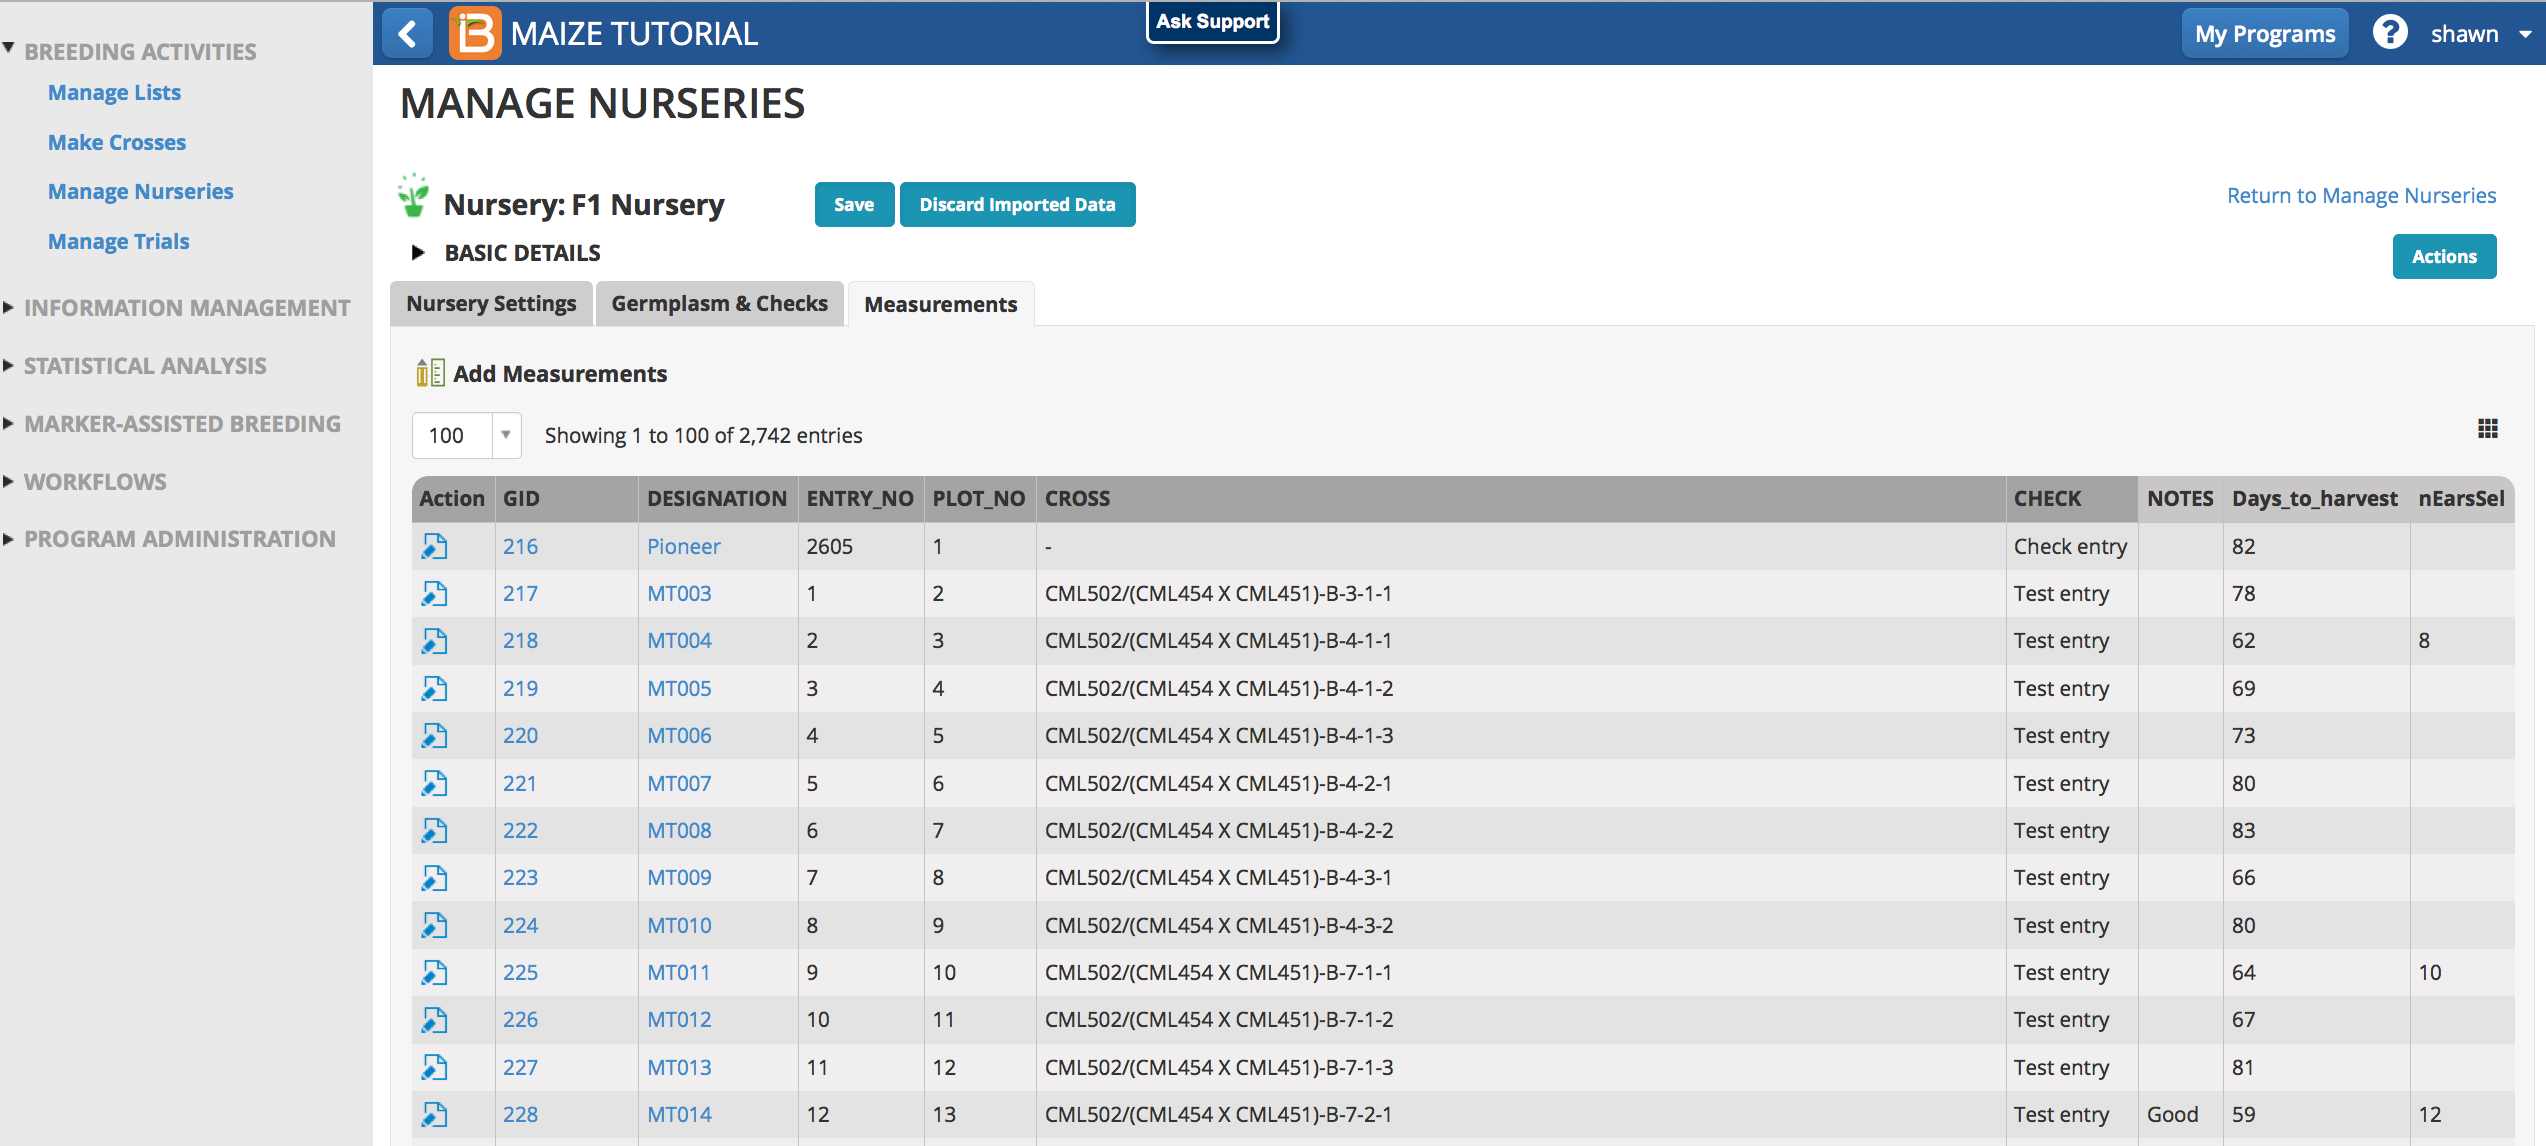
Once nursery data is loaded into the database and saved, the associated germplasm and checks can no longer be edited.

Advance Selections
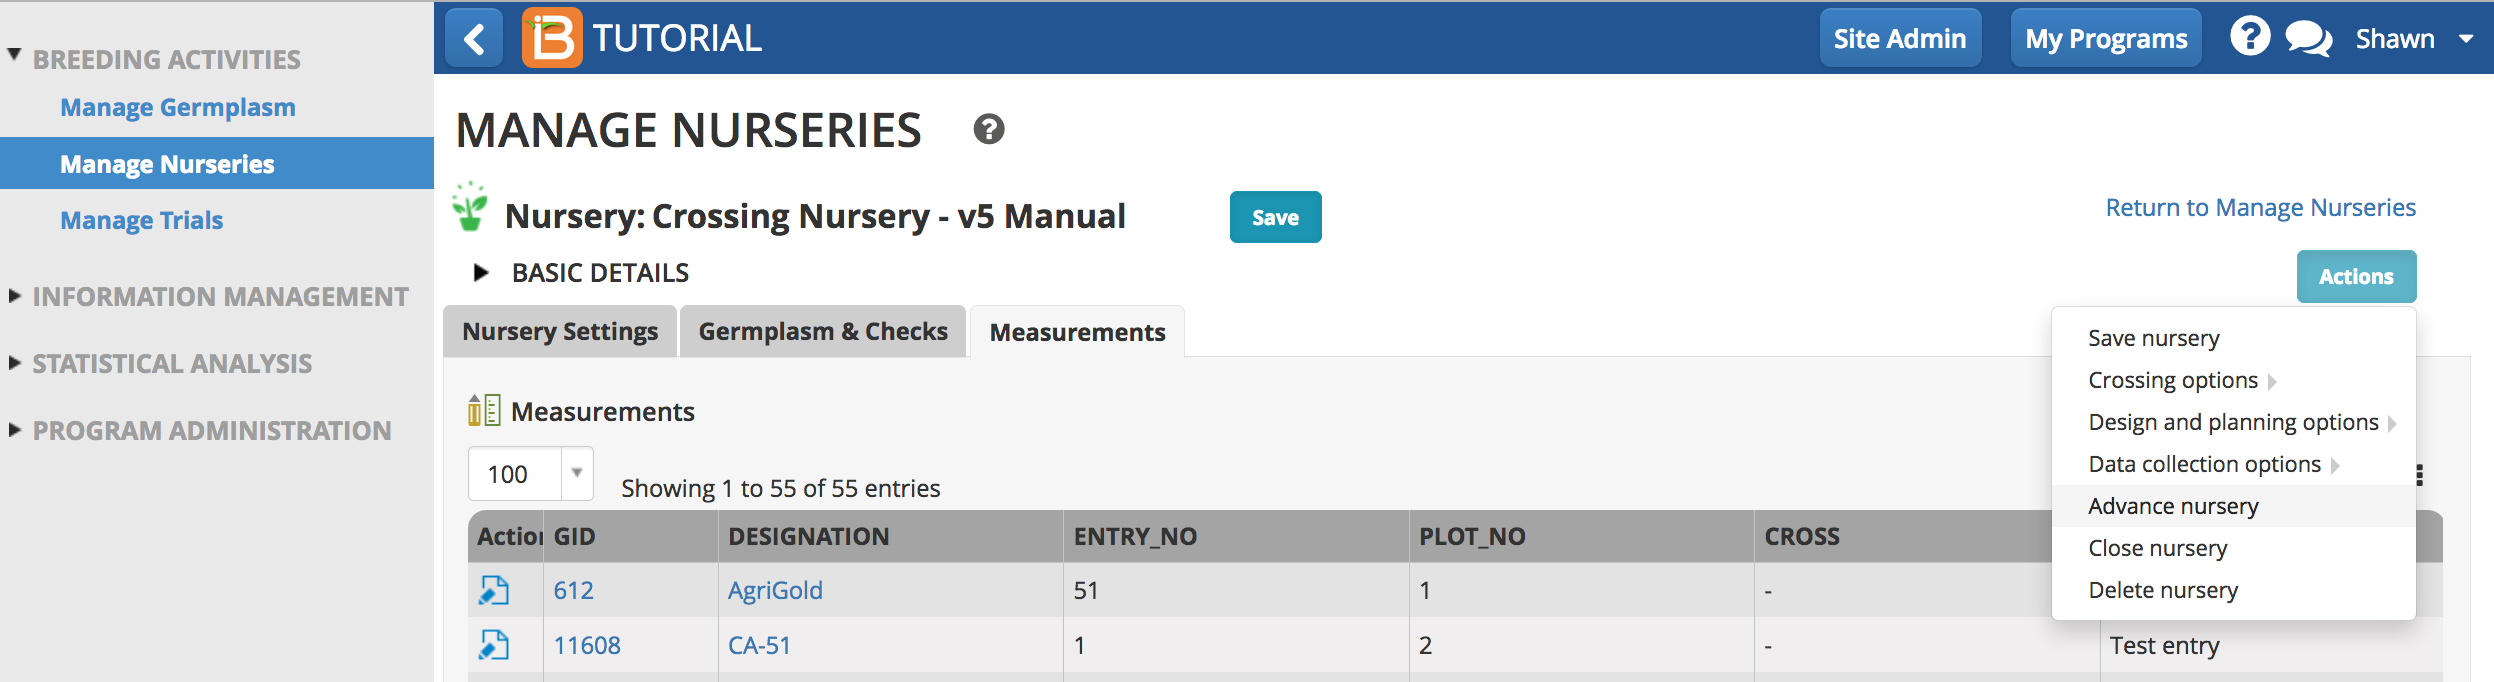
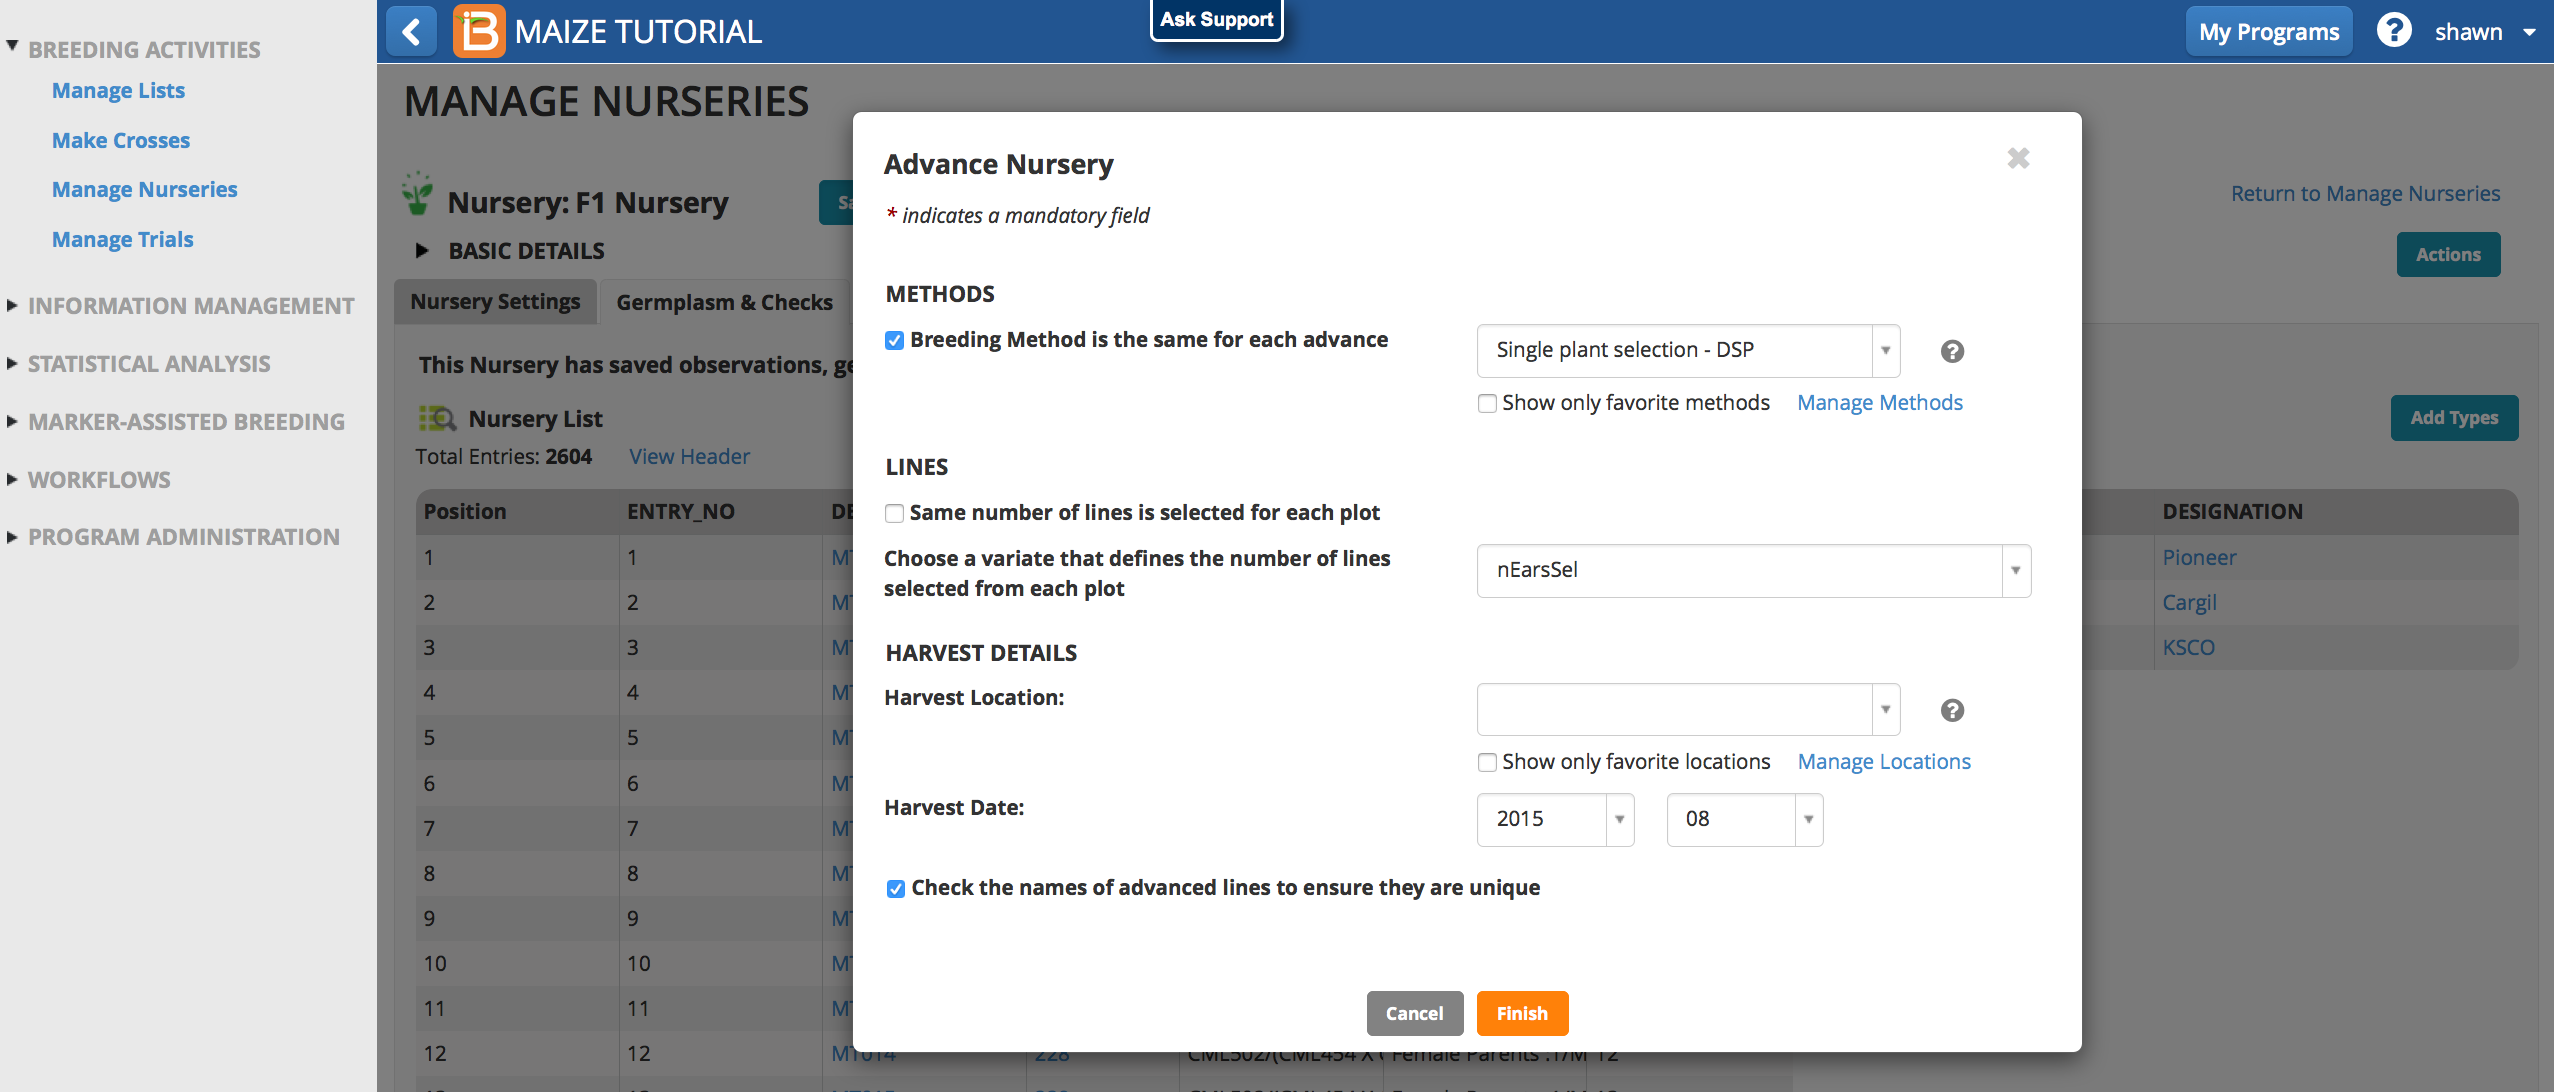
- Select Advance Nursery from the Actions button dropdown menu.
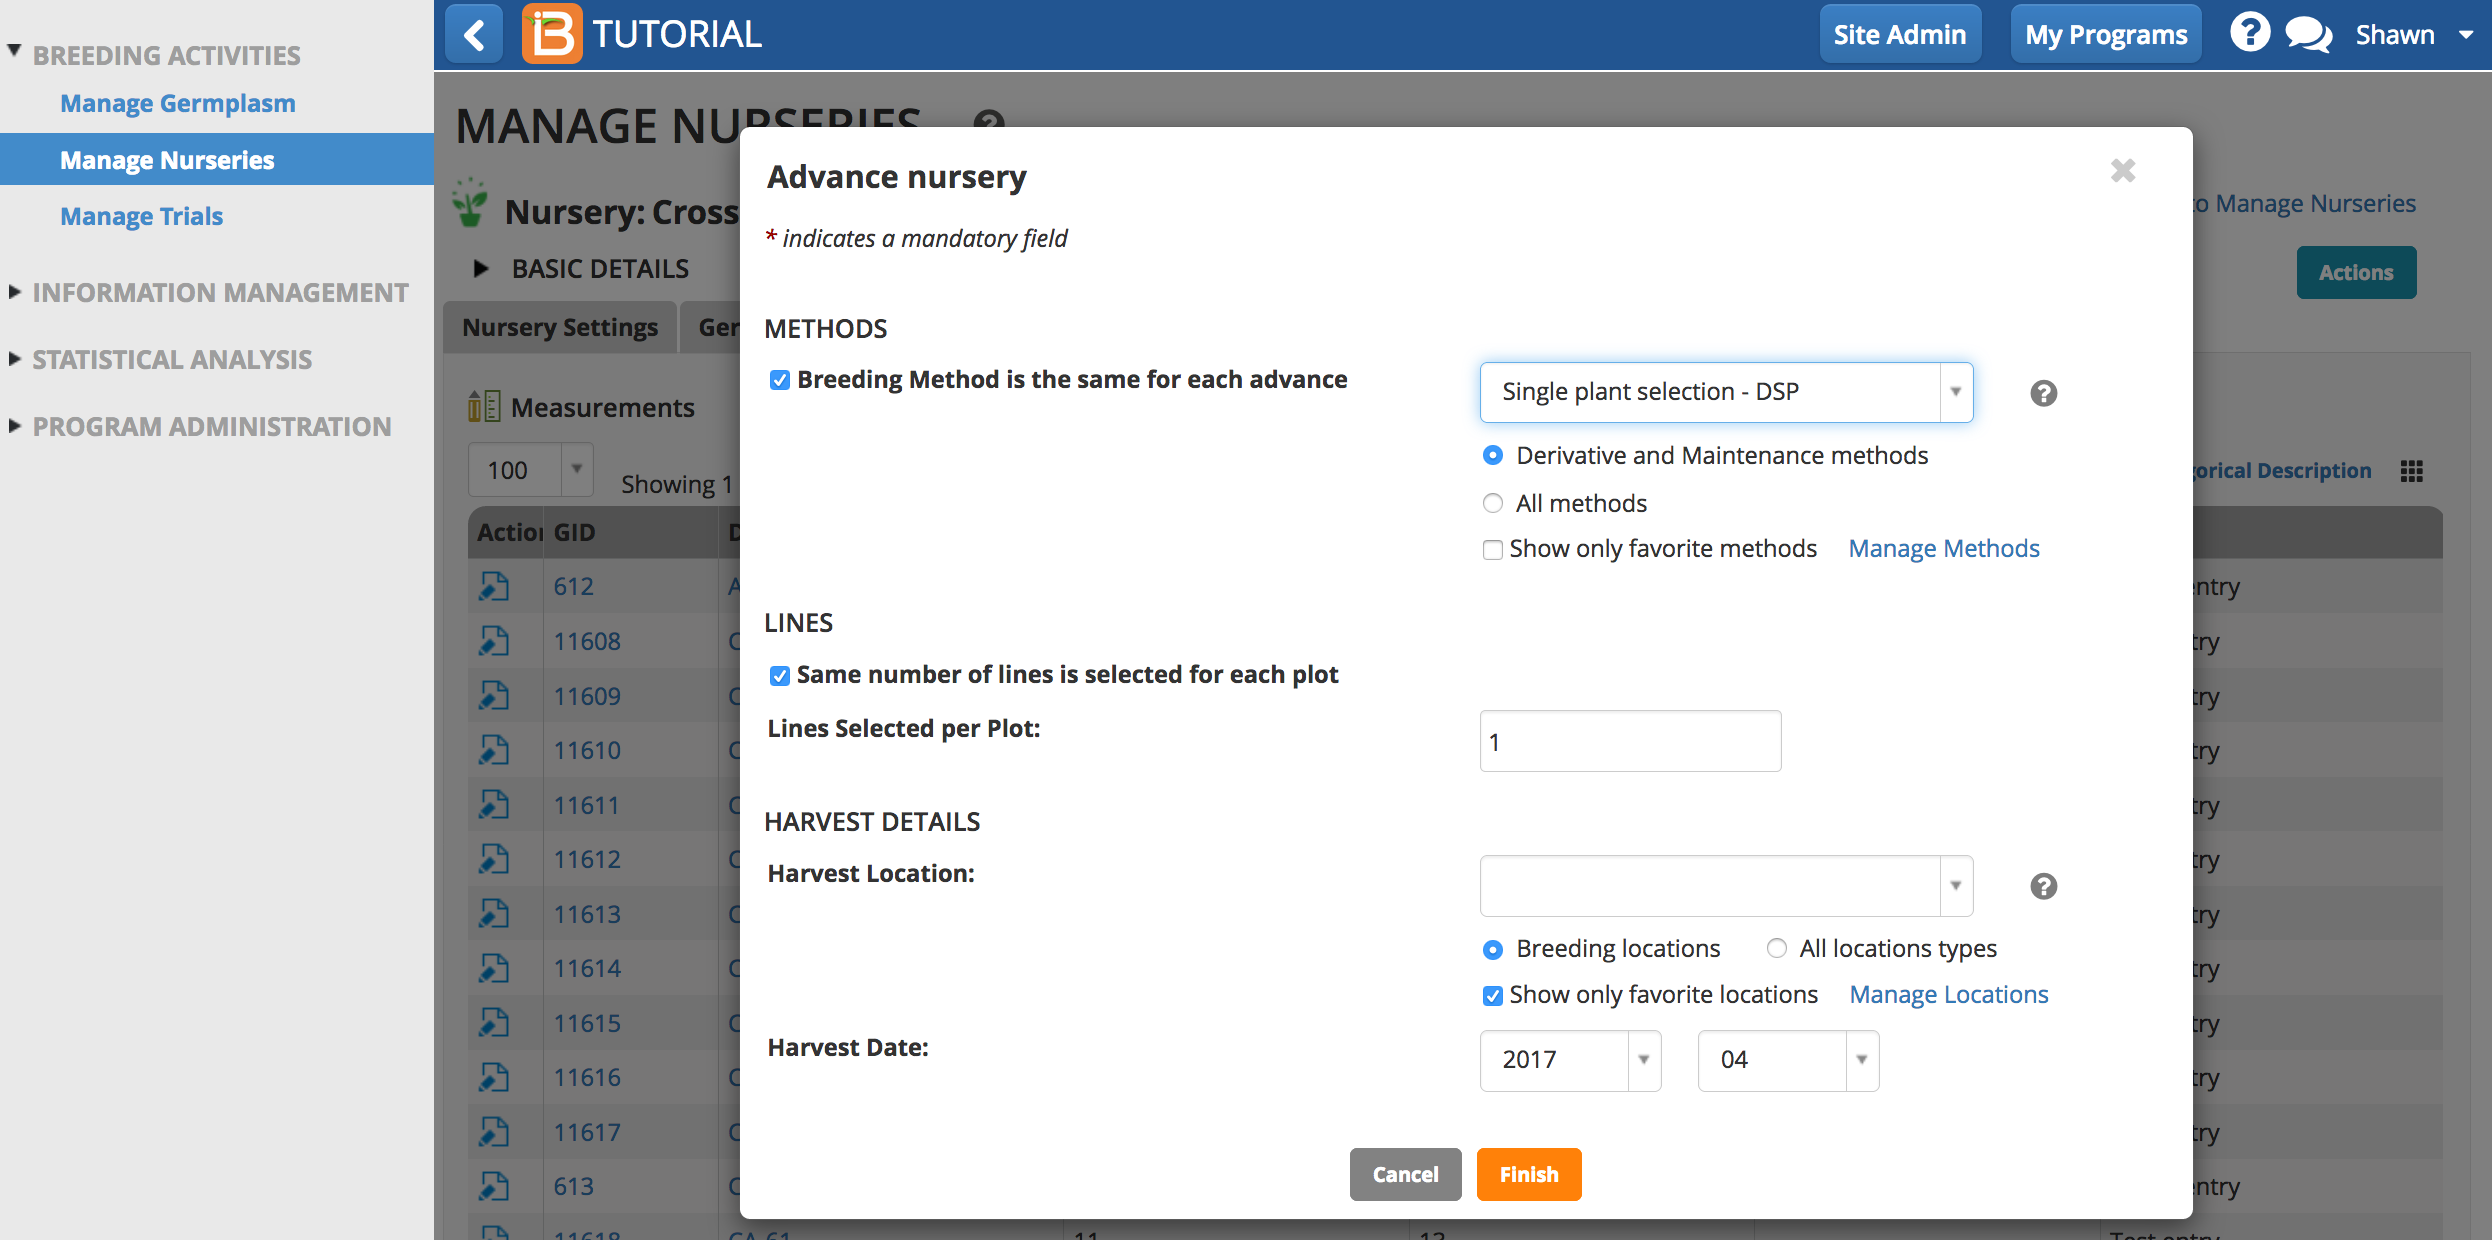
Breeding Method
- Advancement of selections is generally done by application of derivative and maintainance breeding methods. Choose a breeding method. If no breeding method is specified in the measurements tab
Lines
- Advance all plots in a nursery by checking 'Same number of lines is selected for each plot' and entering the number of lines per plot.
Advance Selected Units within Plots
- Advance single plants, or in the case of maize, single ears from plants in a plot. De-select "All plots are selected" and specify the selection variable with values in the measurements tab. For example, 5 ears selected from plot #1 will result in the BMS generating 5 new germplasm units (GIDs) in the database.
- Review advanced lines. Notice that GIDs are pending. Select Finish.
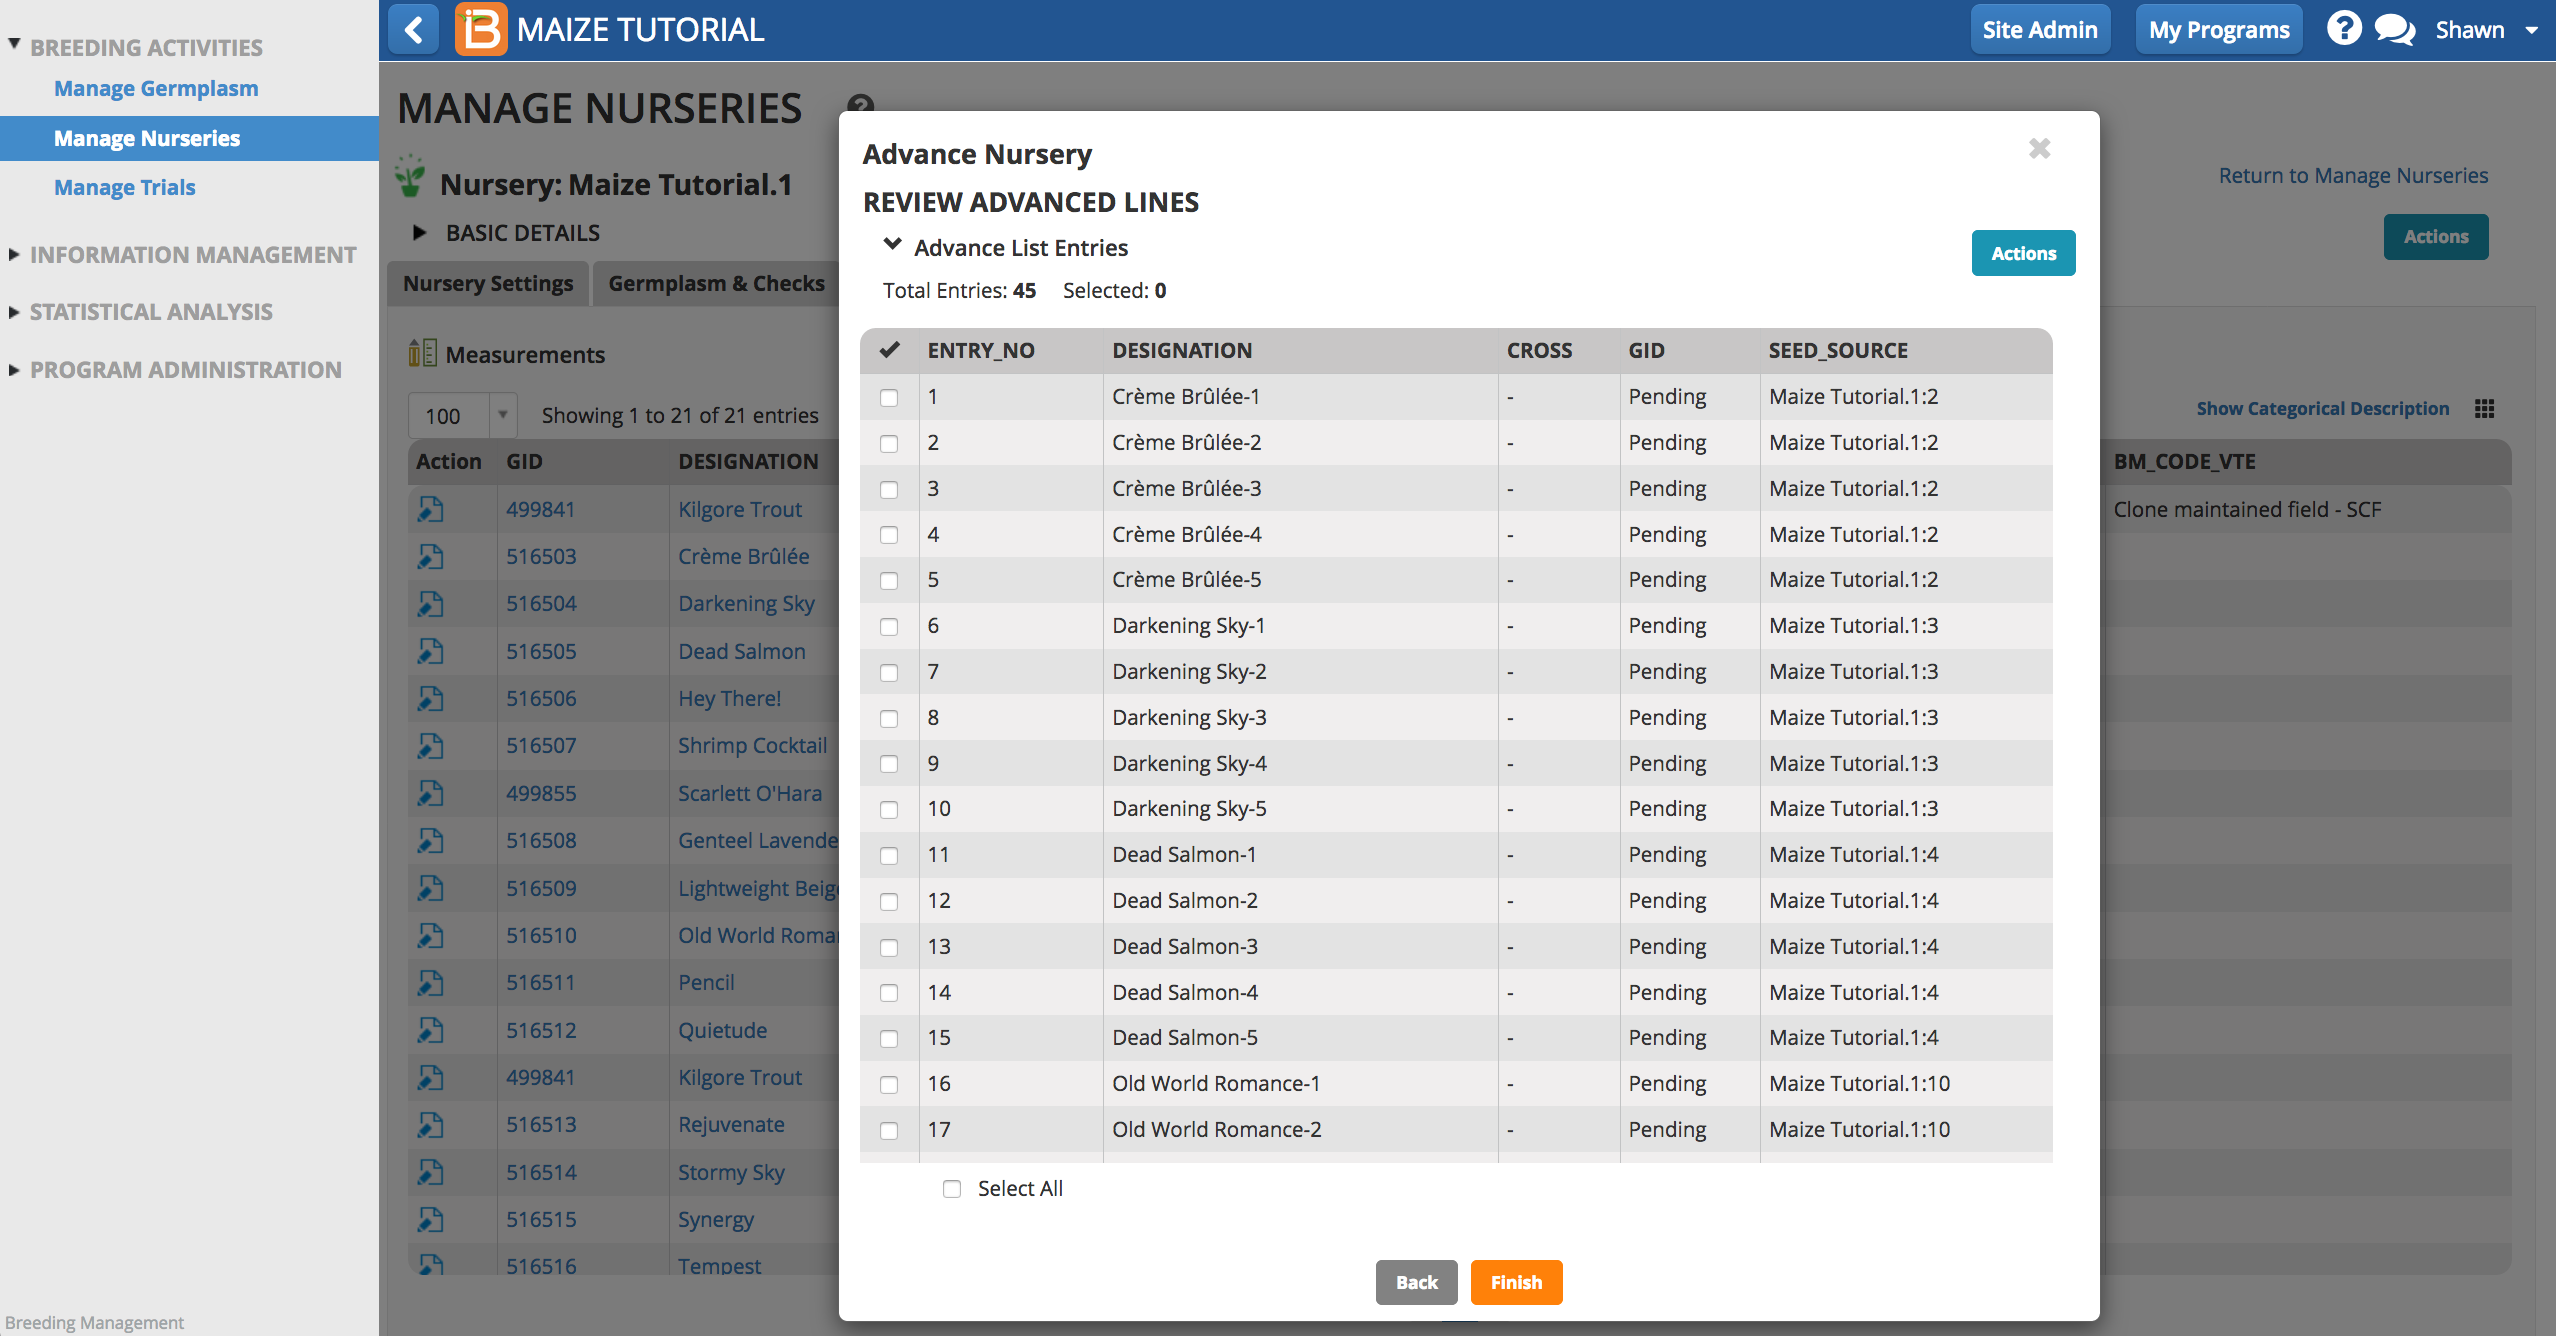
- Save the new list of germplasm.
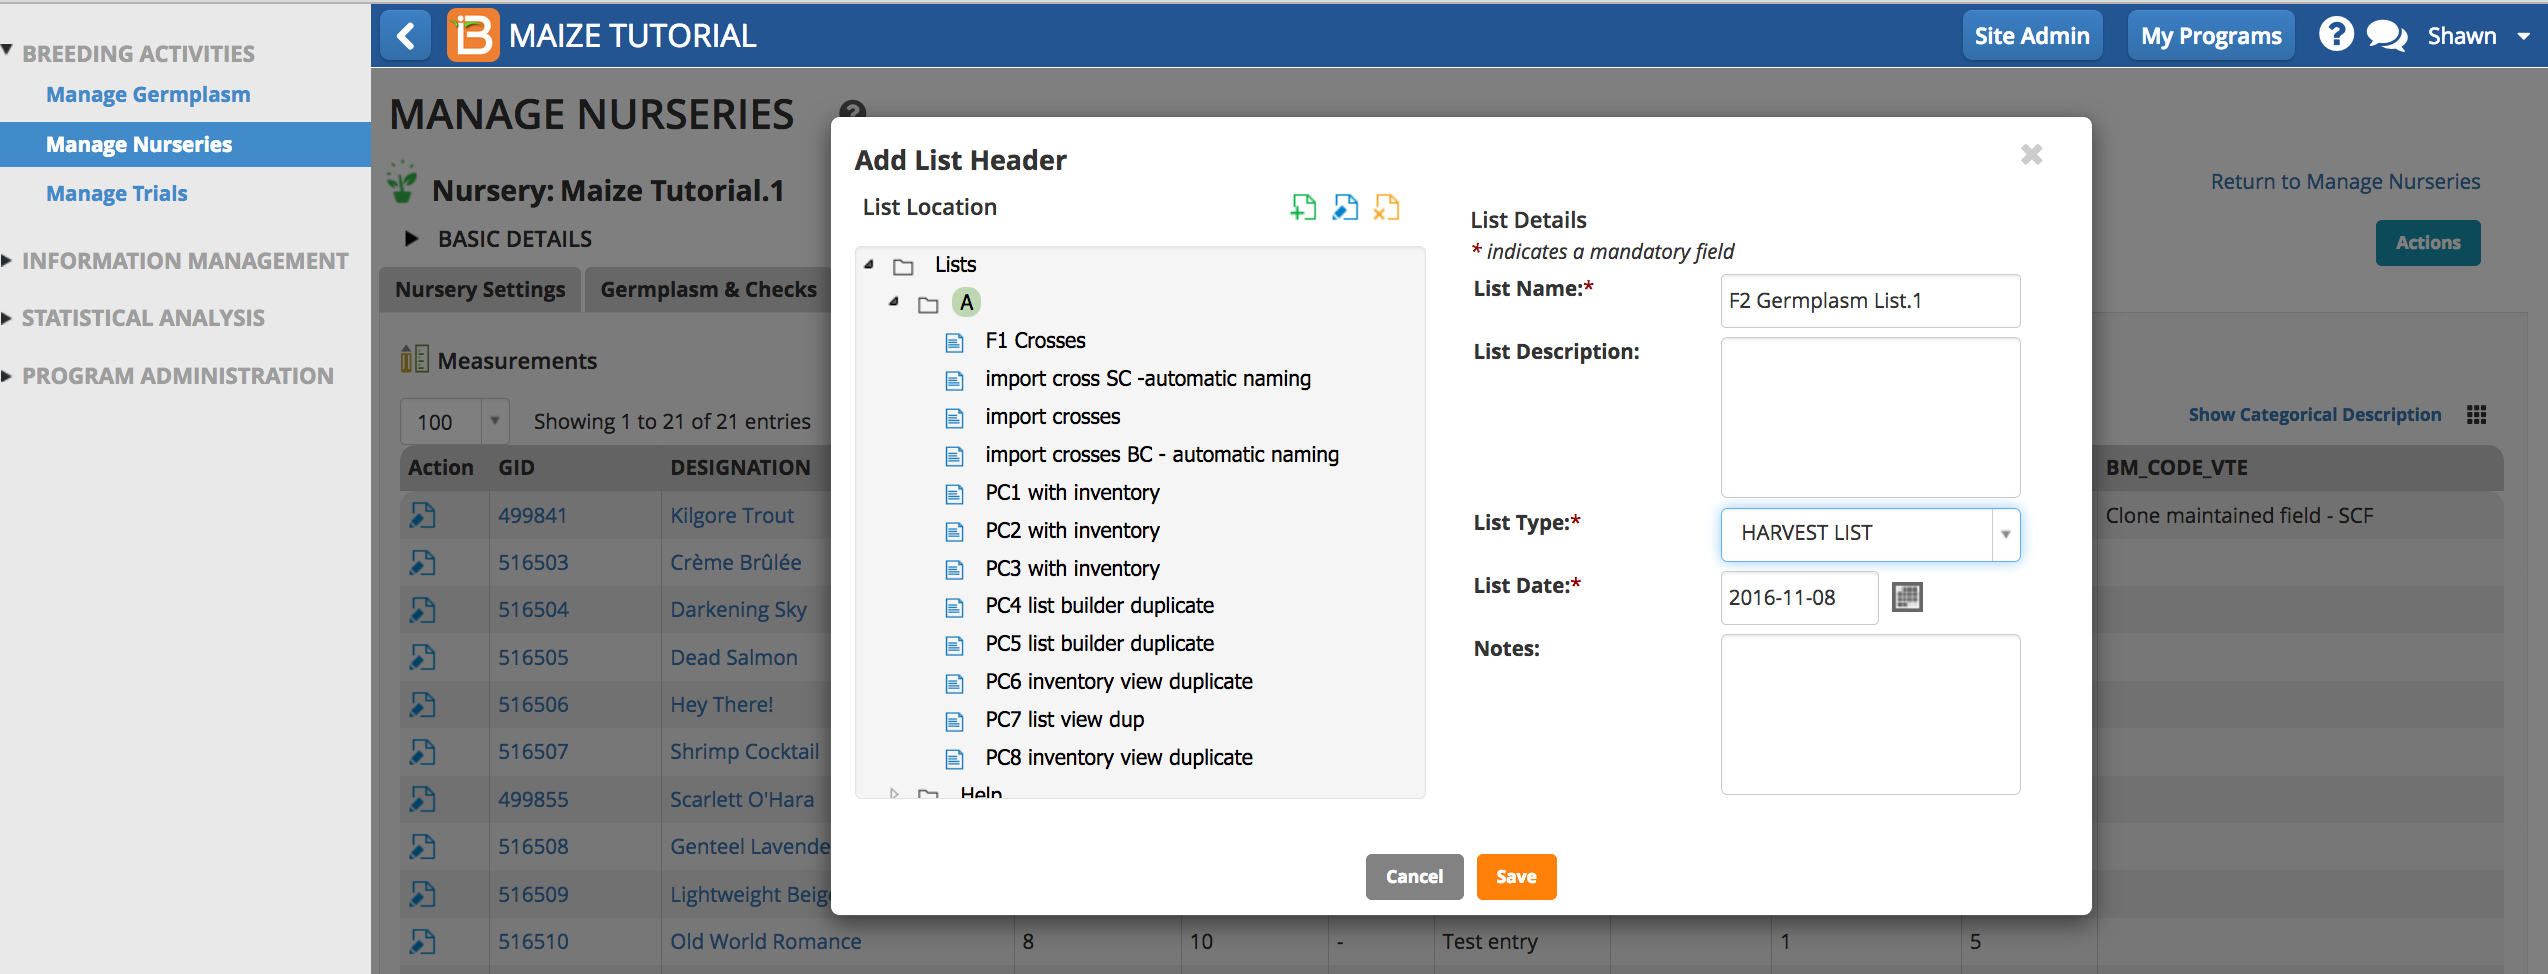
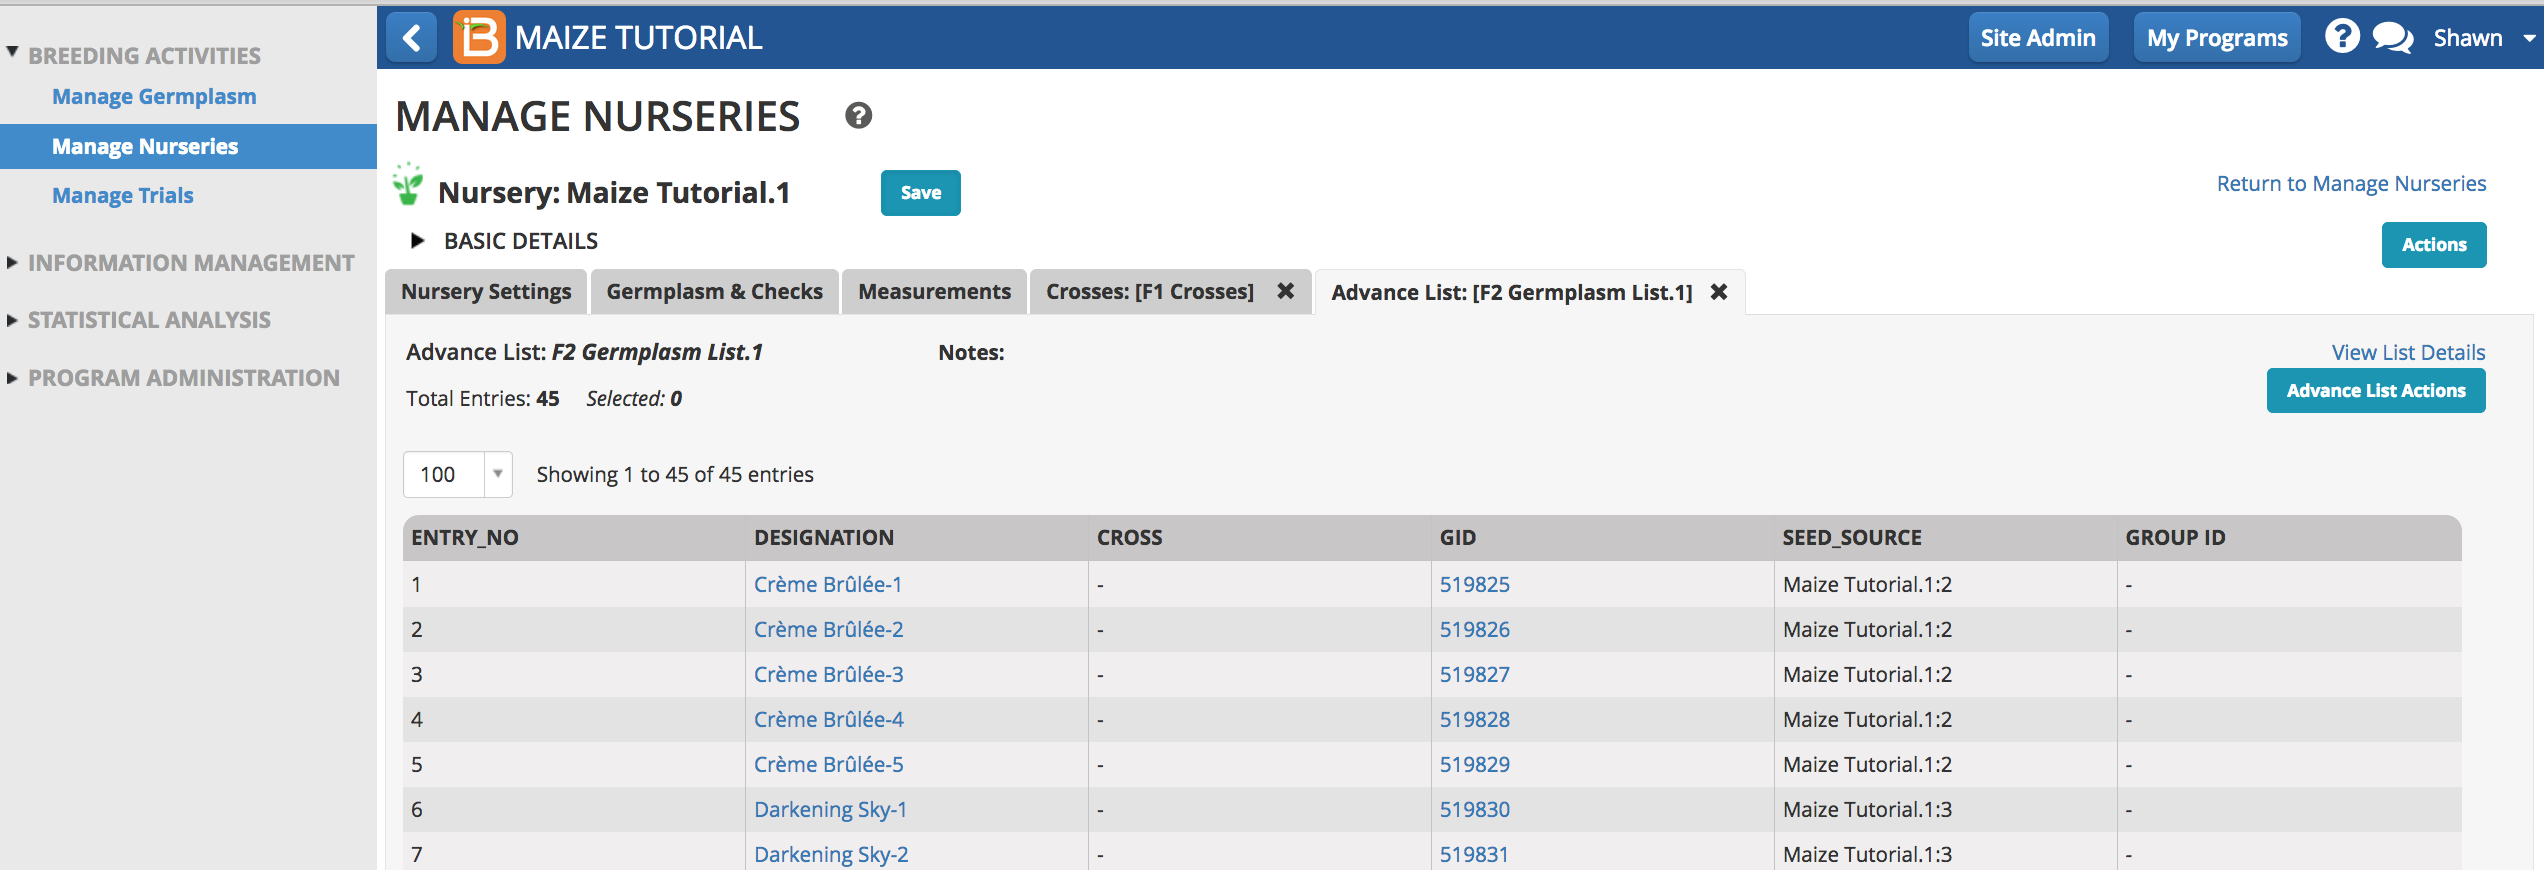
The advance list can now be viewed in the associated nursery. Harvest labels and stock inventory updates can also be made.
Related Topics
-
Harvest labels
-
Update inventory after harvest
